How to Build a House in Sri Lanka
Building a house in Sri Lanka is a sort of extended nightmare that many people go through and come out with a mild form of PTSD. If you’re lucky, you end up with a house and proceed to bury all the traumatic memories. If you’re unlucky, the trauma continues, you bleed out of your wallet, and end up complaining bitterly for years to anyone who will listen.
After five years of construction, we have finally finished our house. This is my attempt to distill the lessons. I hope it spares you some pain.

On this page:
- The Three Types of Contractors
- Before You Build
- The Architect
- Permits
- The Process of Construction
- Costing
- Labour, Erratica, and Build Time
- Final QC
- Aftercare and Maintenance
The Three Types of Contractors
Before we begin, you must understand one thing. There are three types of people who build houses in Sri Lanka.
- The professional high-end contractor. These people at minimum have the correct national registrations and certifications - at minimum a CS2 grade certification from the Construction Industry Development Authority under the Ministry of Urban Development, Construction and Housing. They have architects, construction engineers, a workforce and equipment they can deploy, and project managers.
They tend to have decent websites. They may have designs on the site that you can peruse. Their staff have appropriate qualifications listed. They have publicly listed projects. Some of those projects may even be for large private or public corporations, which means you can actually go and see these things for yourself.
The less professional small business contractor. These tend to be small private limited companies, usually headed by one person. Websites and public search presence are not necessarily what they’re good at. They do not tend to have engineers or architects on staff. They may have some familiarity with people who can be hired for these jobs; but mostly what they are is project managers who will figure out local supply chains, find labour for your site, and handle materials, transport, and workers until the build is complete.
The local baas unnahe and his goalayo.
The reason for this division is the different cost and complexity of your involvement. The professional high-end contractor is the most expensive, but will require the least amount of time and energy on your part. The local baas is the cheapest, but will require an extraordinary amount of time, effort, and energy from your end to make sure the walls you build actually align. The small business contractor is exactly in the middle.
Most Sri Lankans, including ourselves, opt for number two or number three. In our case, we used both to make our dream house come true.
A few people I know have used number one. If you are well off enough to use a high-end contractor, you can read this essay, but disregard most of the advice - someone will be there to guide you through the process. That’s part of what you’re paying for. This is primarily advice for options two and three.
Get it in writing
Regardless of which type of contractor you use: get something in writing before money changes hands.
This doesn’t have to be a 40-page legal document. Even a simple letter of agreement - scope of work, list of materials, milestone schedule, and payment terms - is the difference between having some recourse and having none. Verbal agreements in Sri Lankan construction have a way of becoming very flexible in memory once problems arise.
The key things to pin down in writing:
- What exactly is being built (ideally referenced to the architect’s plans)
- What materials are being used, and to what specification
- The payment schedule - tied to milestones, not to time
- What happens if work is defective or incomplete
If your contractor refuses to put anything in writing, that tells you something important.
Before You Build
Examine your property
When you buy a piece of property, you should have access to a survey plan. Make a copy and mark the following on it:
- Where the sun rises and sets
- How water naturally flows when it rains, particularly when it rains heavily
- Where your road access and entry point is
- Where your access point to electricity is, and where your closest access point to the water line is
- Any natural features you’re particularly enamoured of
These factors will help you determine the placement and orientation of your house. Placement and orientation will in turn massively affect your construction costs, construction complexity, and overall quality of life.
Get a soil test
Before you start sizing anything, find out what you’re actually building on.
Soil varies enormously - rock, clay, loose fill, expansive soil that heaves when wet - and this affects what kind of foundation you need, how deep it has to go, and how much it costs. Building on a slope (as we are) adds further complications: you need to think about retaining walls, drainage, and what happens when the earth above you decides to move.
A soil test - or at least a basic soil investigation by a geotechnical engineer - is relatively cheap. Discovering mid-build that your foundation design is wrong for your soil type is not cheap. In some cases it is catastrophic.
Your chartered engineer will know who to call for this. Do it before you finalise your plans.
The size and price of the house
First you need to figure out what size your house will be. This will be determined by both the land and your budget.
Note that it’s impossible to get a precise costing at this stage. Costing out a house build involves pricing in materials, transport, labour, and a whole host of things besides - this can only really be calculated by the contractor (or by you, if you get your hands dirty). And even then it will most likely be done in stages, unless you can account for price shifts in the market over the course of a couple of years.
(Unless you’re going with a tier-one contractor. They can price in shifting costs; they deal with this by charging you more for it.)
However, you can use some back-of-the-napkin math:
- A basic house that is all concrete: about ten thousand rupees per square foot
- Slightly higher quality tiling and more sophisticated materials: fourteen thousand to twenty thousand rupees per square foot
- Luxury: twenty thousand rupees per square foot and up from there
Depending on how much you can afford, you should arrive at a rough square footage.
Your core features
Now that you have your square footage in hand, figure out what goes in it.
How many bedrooms will you have? How many other rooms, and for what? Where will the kitchen go? Where do you want it ideally placed? What are the proportions? Treat your house as a series of interchangeable Lego blocks and move things around until you’re satisfied.
The most important functional ingredients of a house are the kitchen, the bathrooms, and the bedrooms.
Ideally:
- You have a large kitchen that is easily accessible, easy to cook in, easy to clean.
- You have bathrooms that will vent steam and smell away from the kitchen and the bedrooms, yet remain accessible.
- You have bedrooms that offer privacy so that guests coming to your house aren’t immediately jump-scared by a sleepy denizen trundling towards the loo.
You would be surprised at how many houses routinely get this the other way around. Sri Lankan houses (by my mother’s count, we have now lived in twenty-four) often tend towards grandiose living rooms but trade that off for cramped, tiny kitchens and impractical bathrooms that are small and difficult to clean.
You don’t necessarily have to be precise at this step or use complex software. Our sketches were drawn in notebooks, as you can see from the images below.
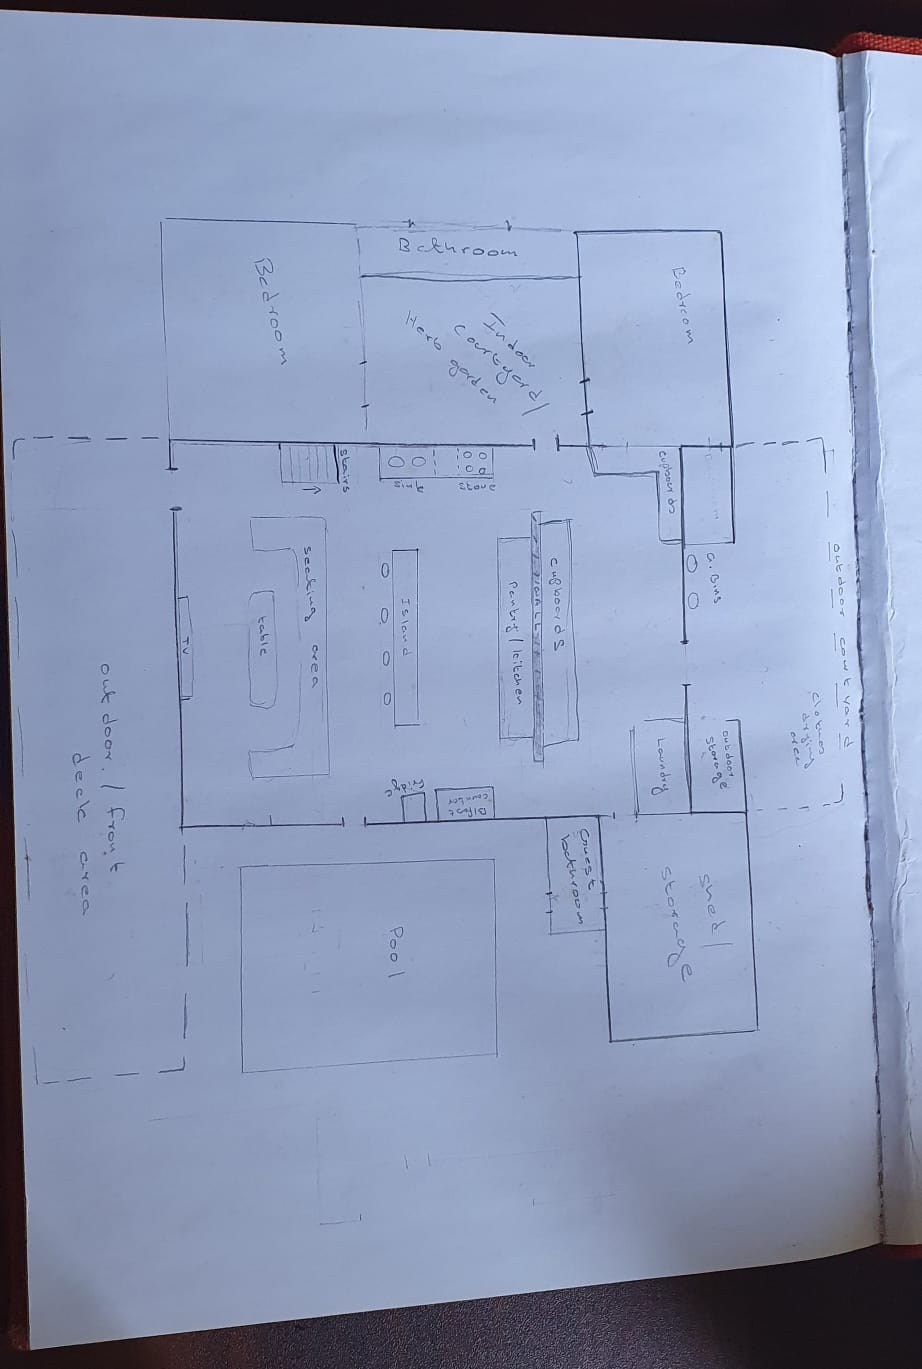
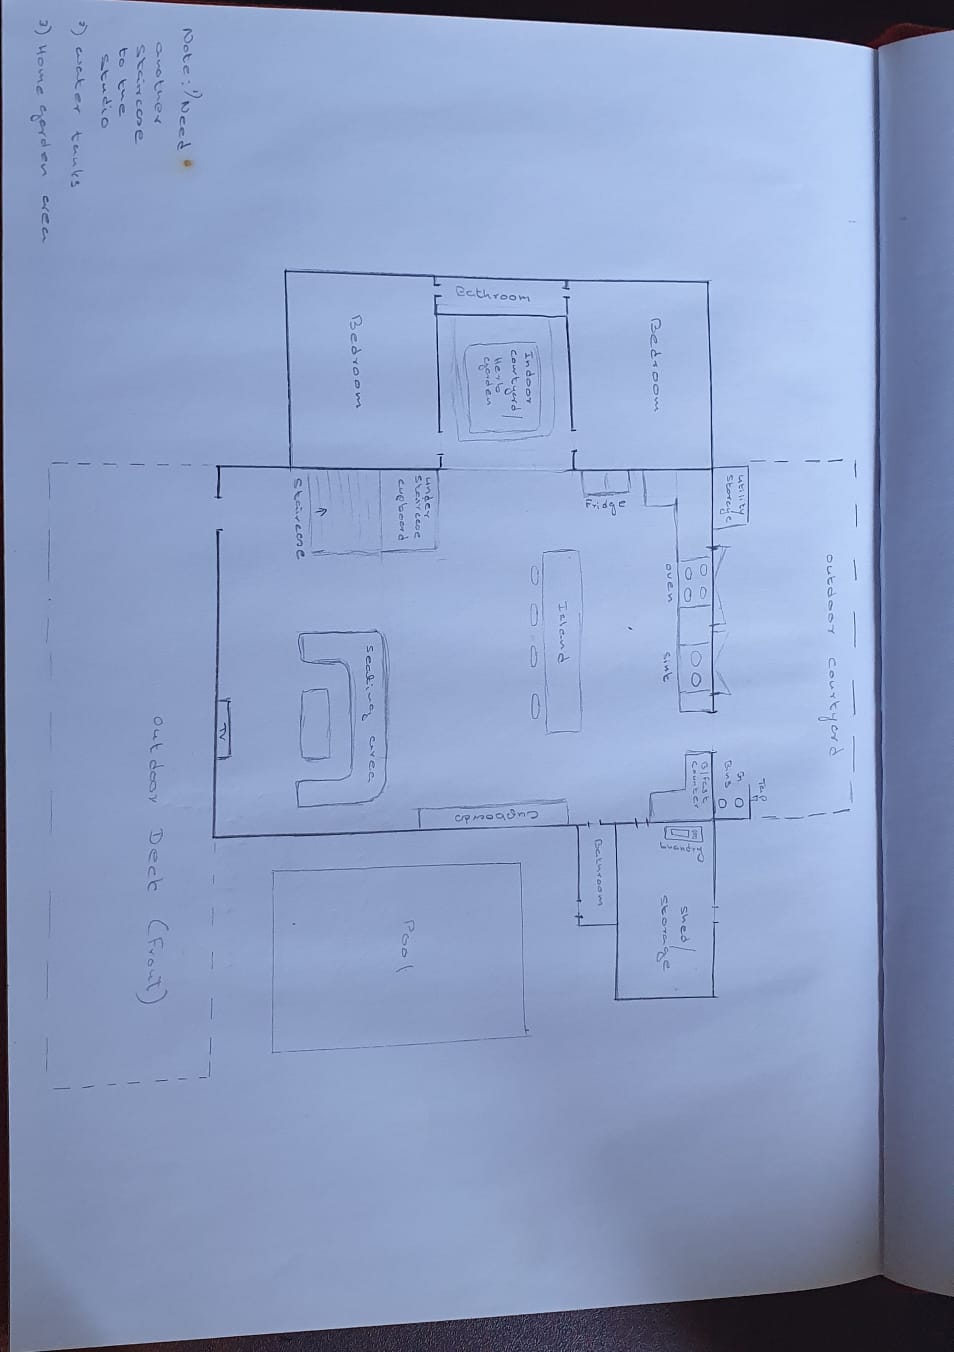

We then turned these into a Powerpoint:
A friend of mine, Bhanuka Harischandra, used Minecraft to create the earliest layout of his first office building - 300 Rajagiriya Road, Rajagiriya, the old Surge headquarters.
If you’ve done these steps, you have:
- A - an idea of where your house should be and how it should be oriented
- B - a rough idea of how large it should be
- C - an idea of what you want within that space
The Architect
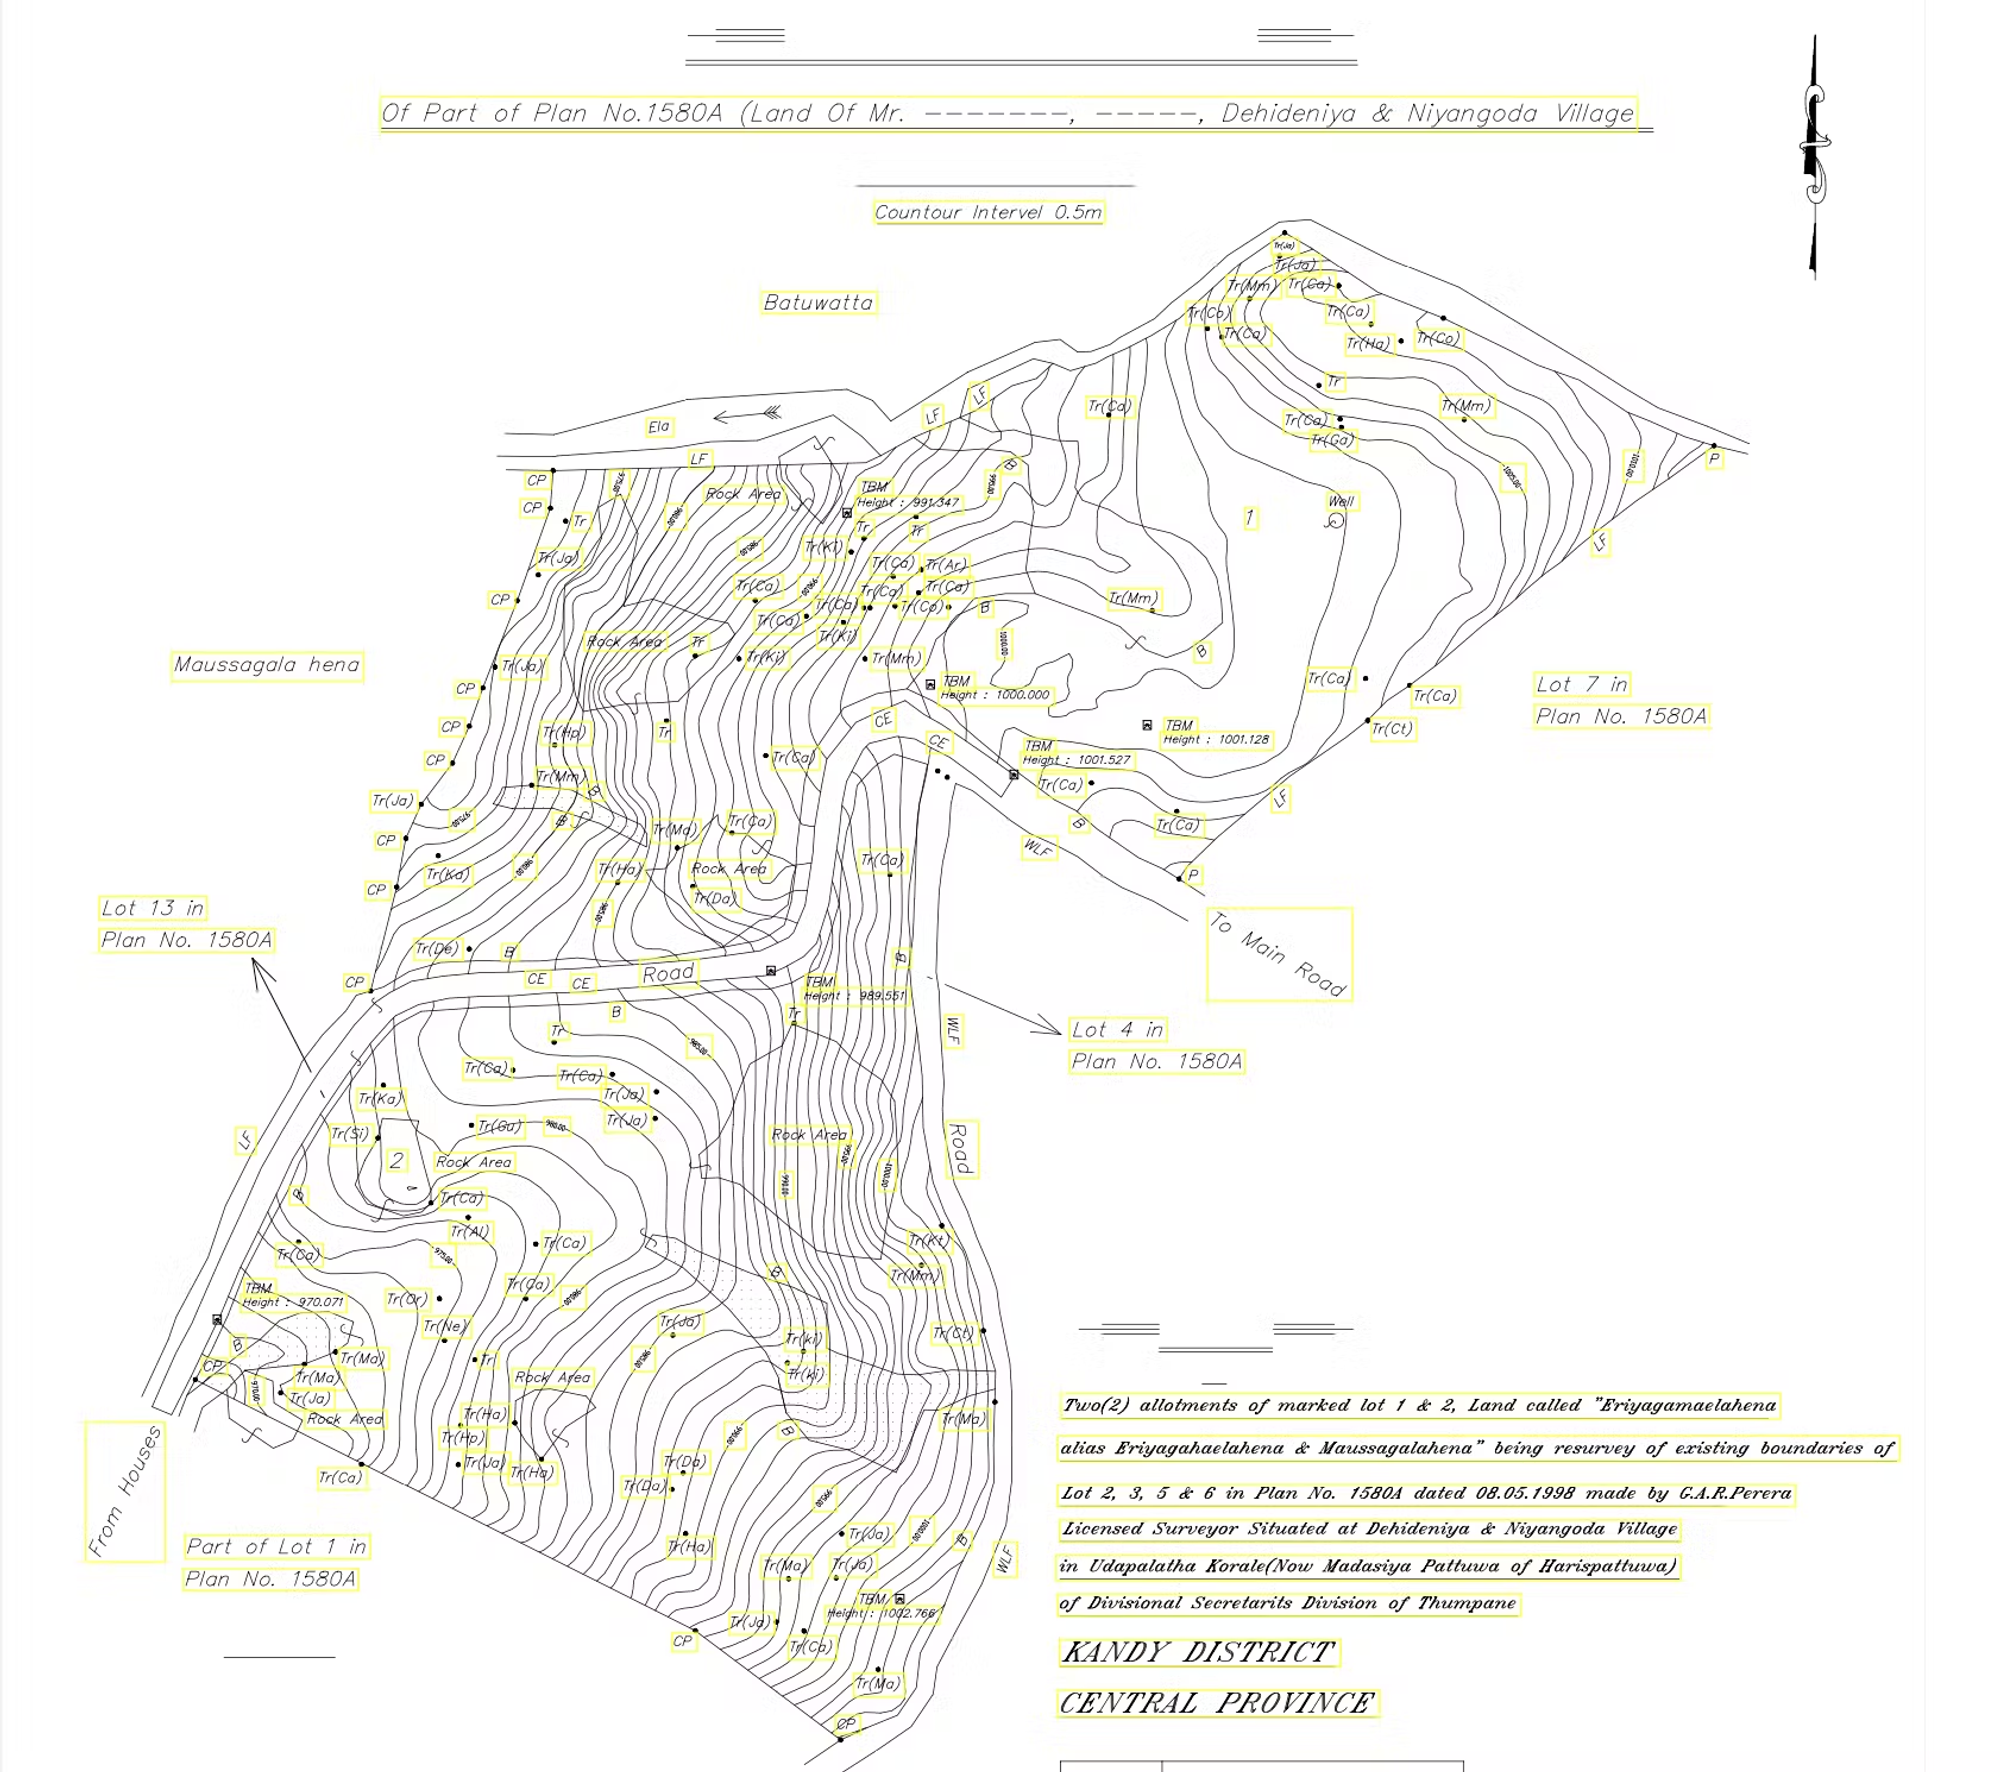
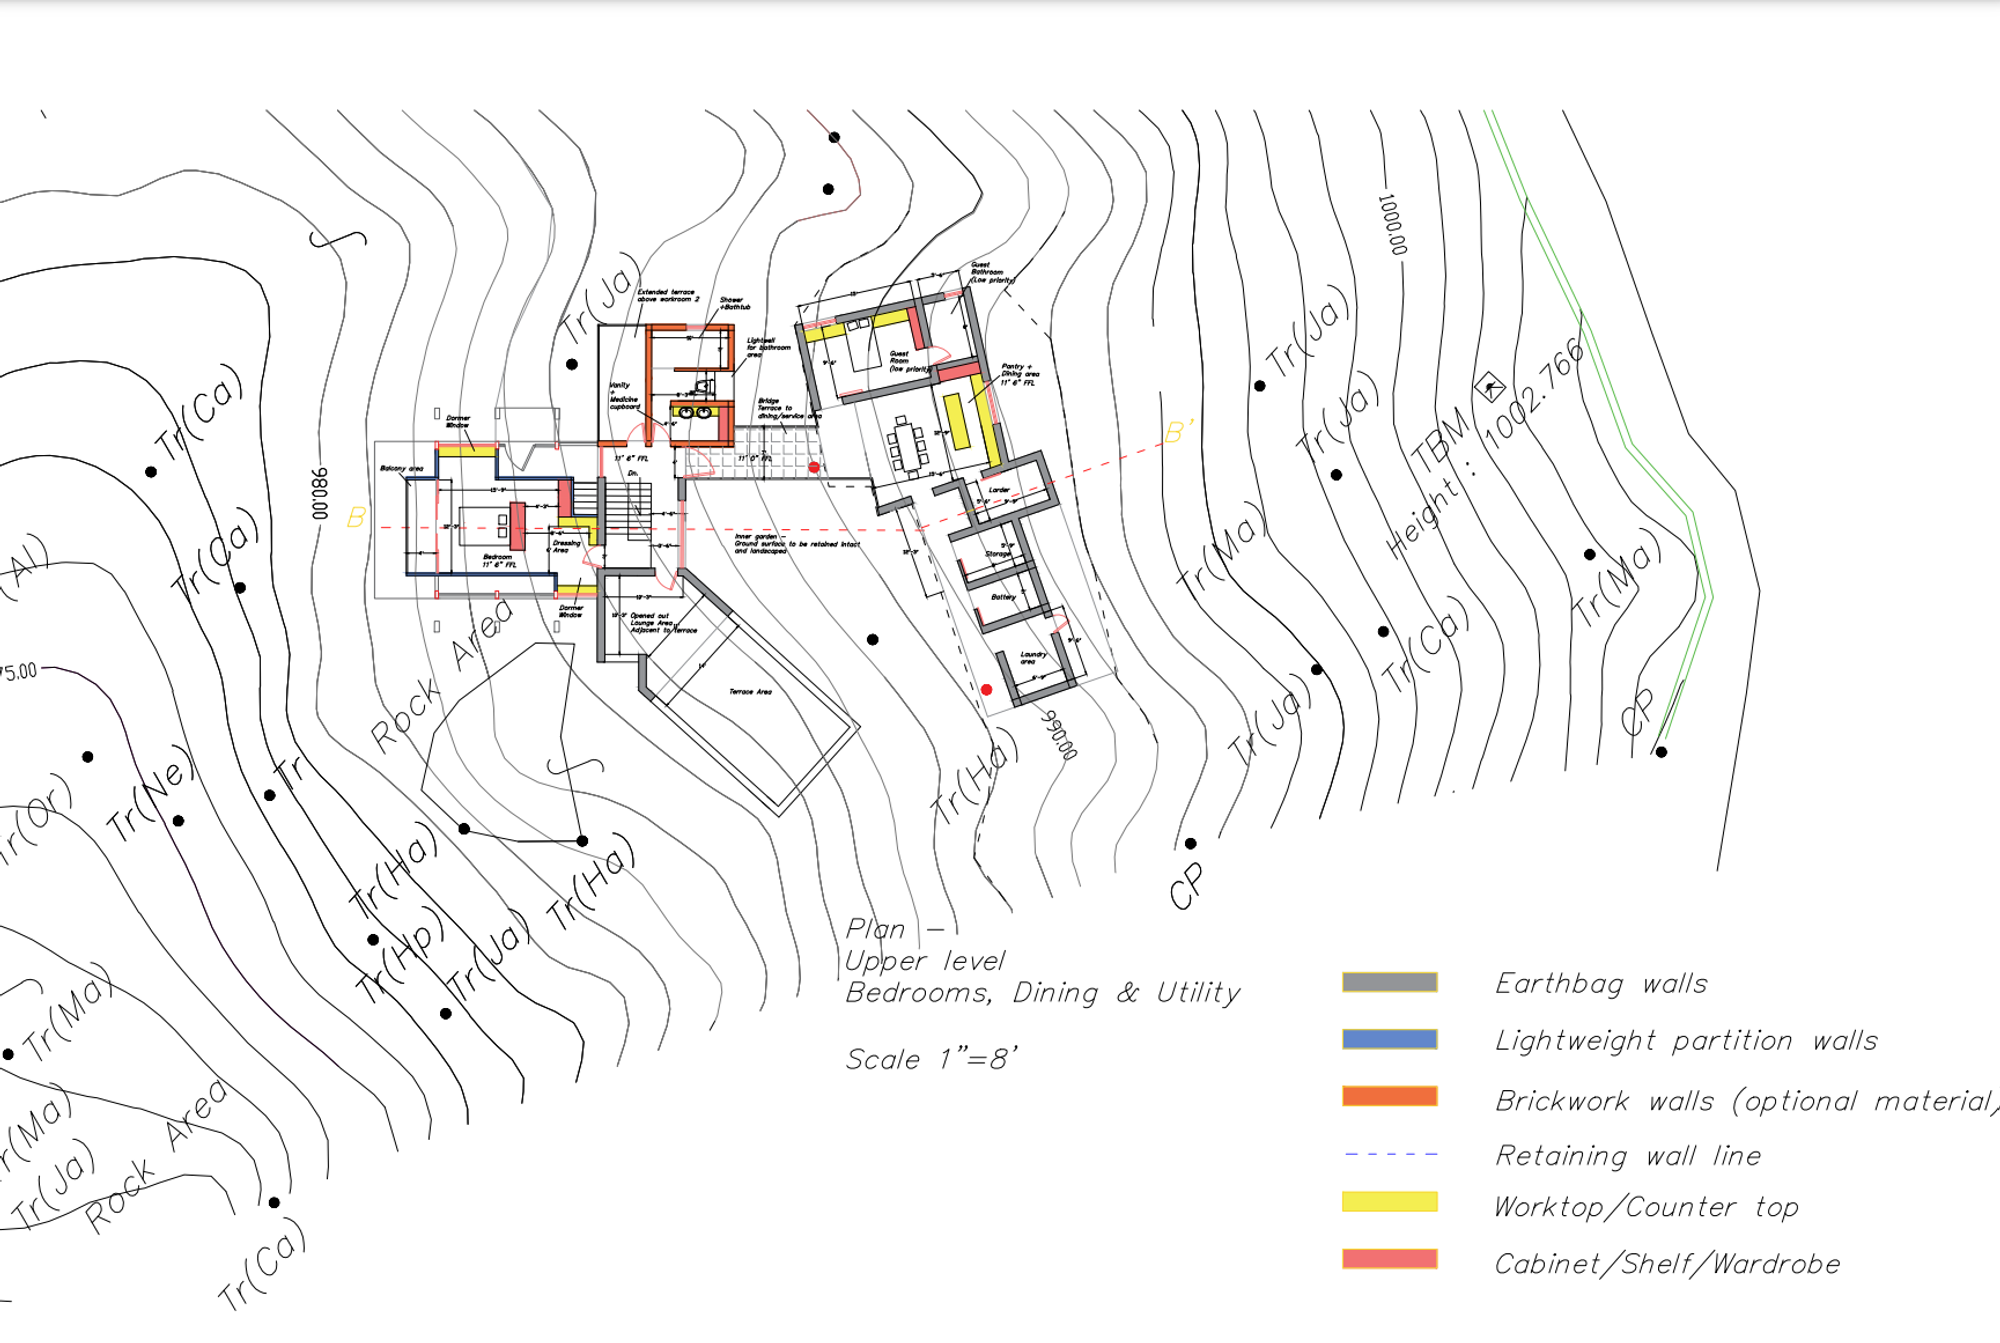
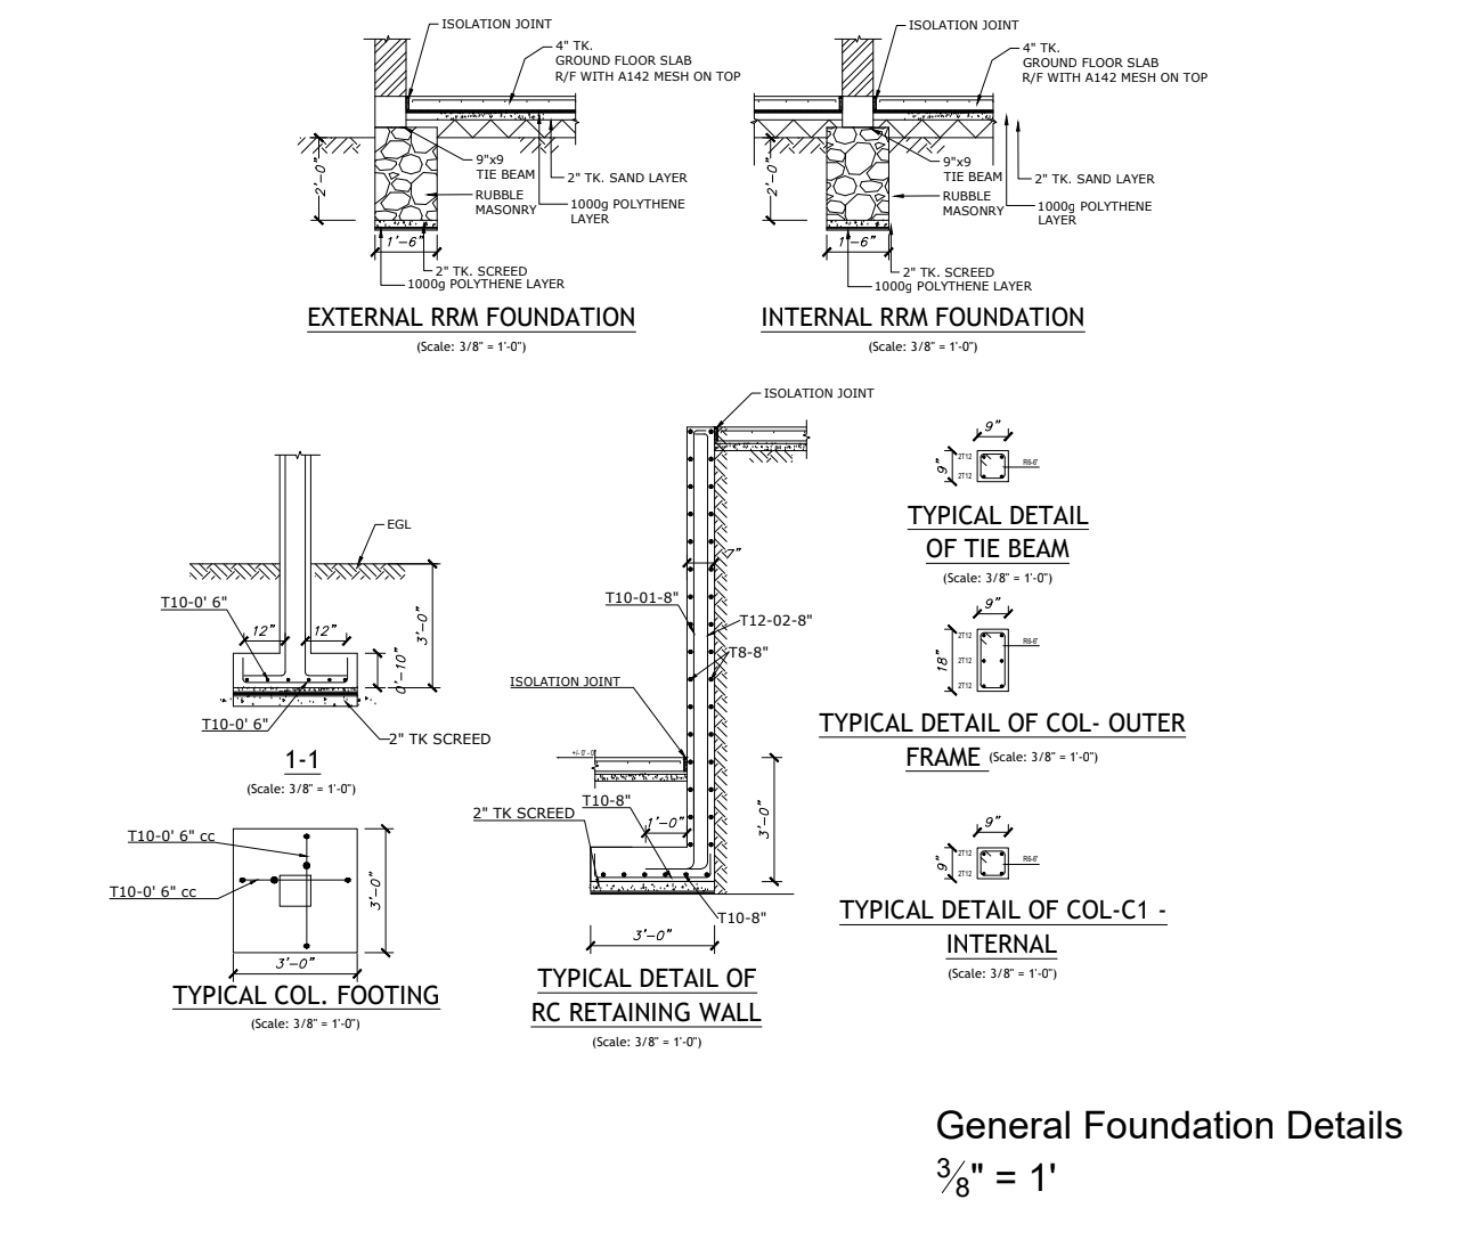
An architect’s final job is to deliver to you a set of formal, printed building plans in collaboration with a chartered engineer. These are what we call the Council Plans, and they kind of look like this:
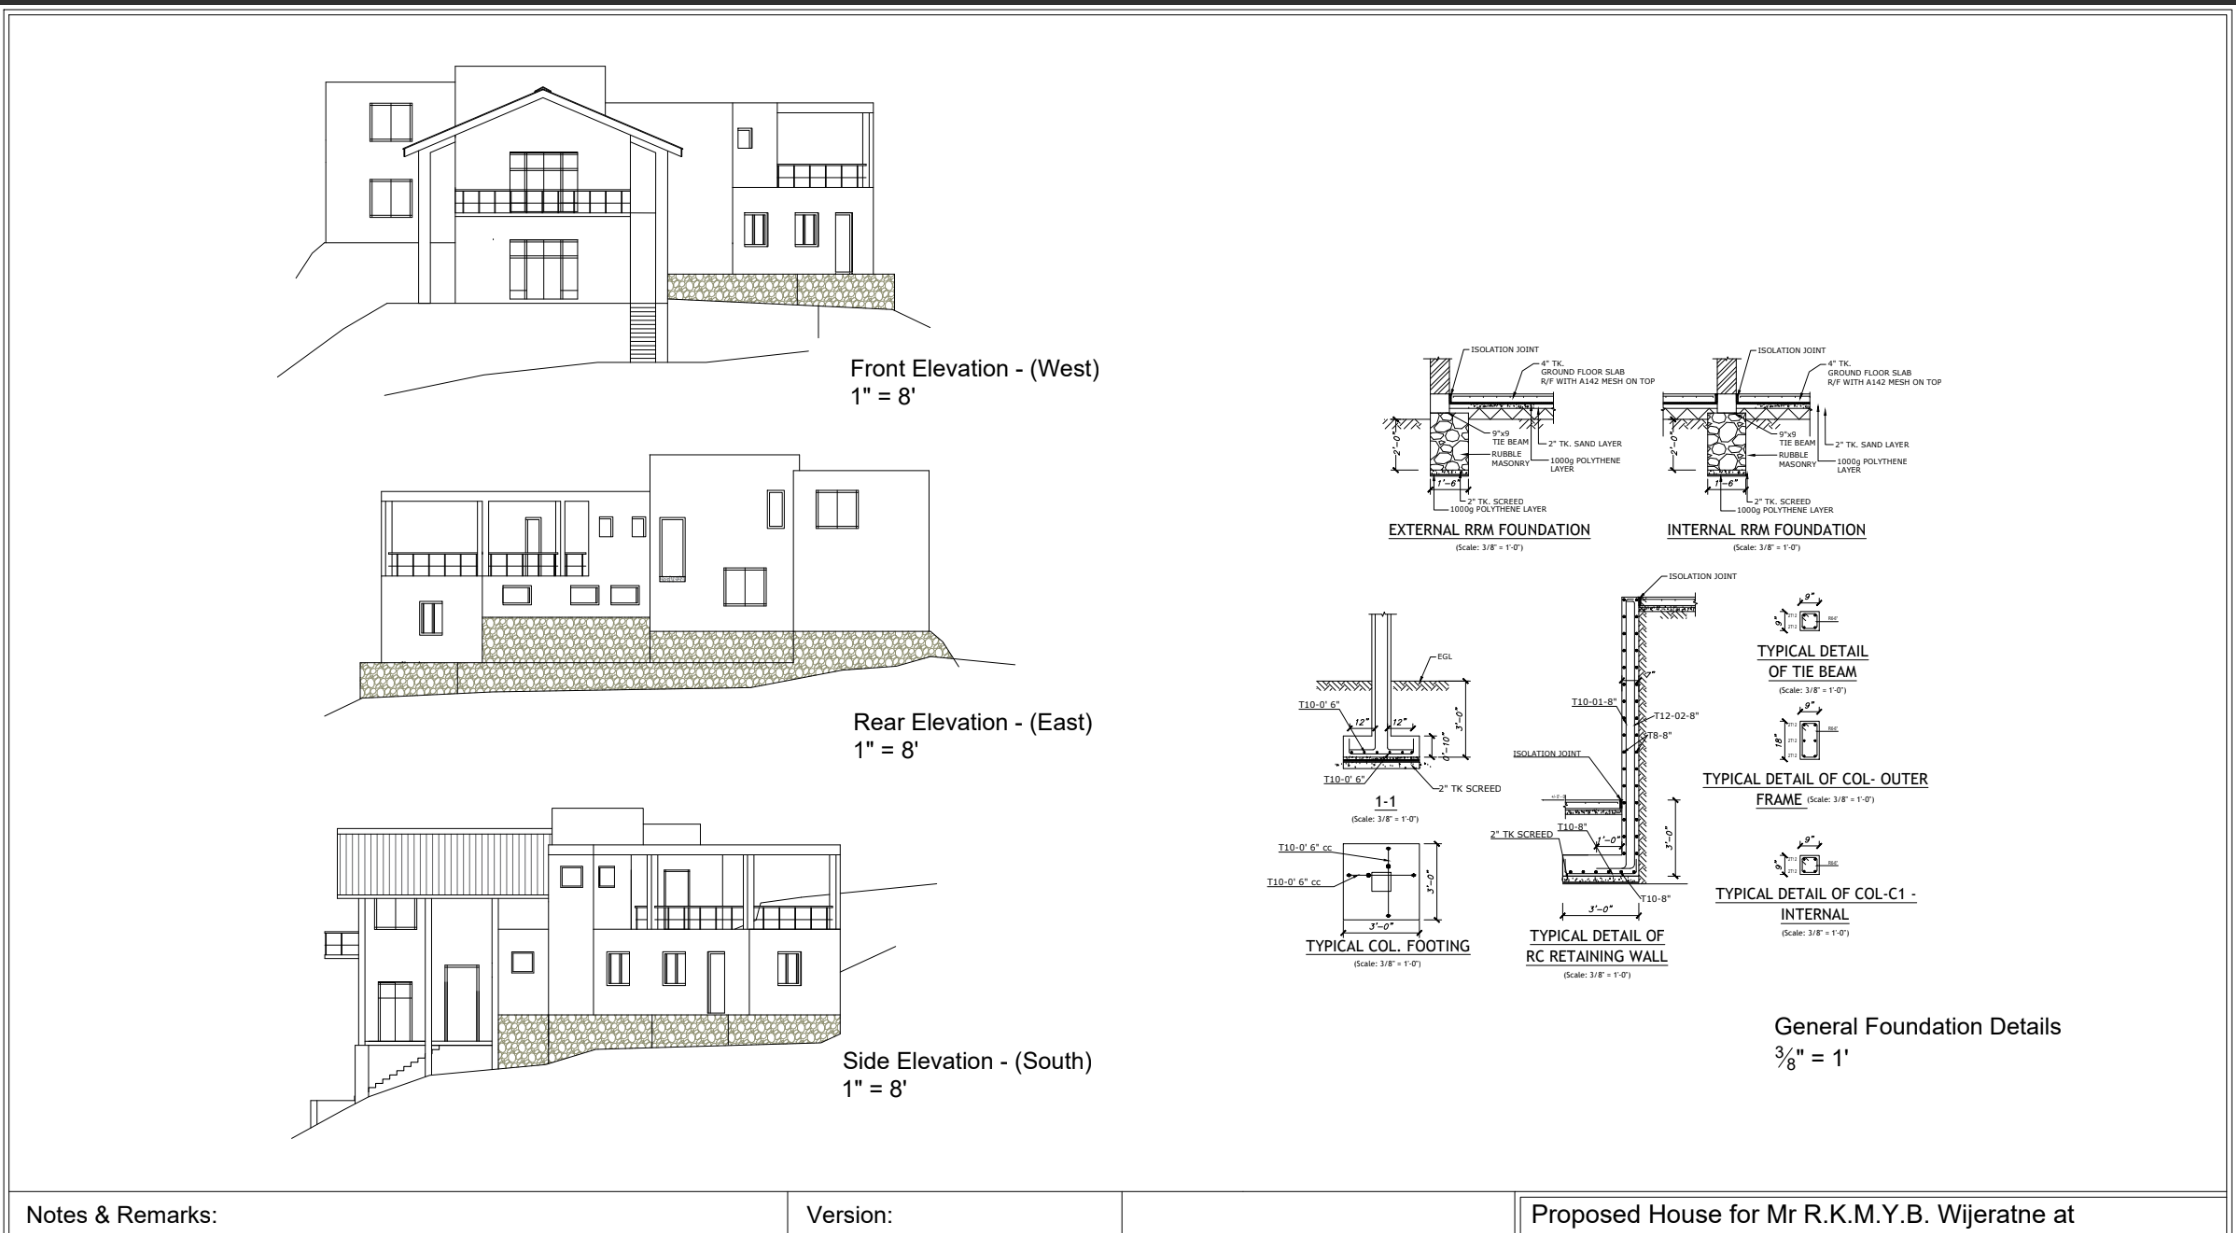
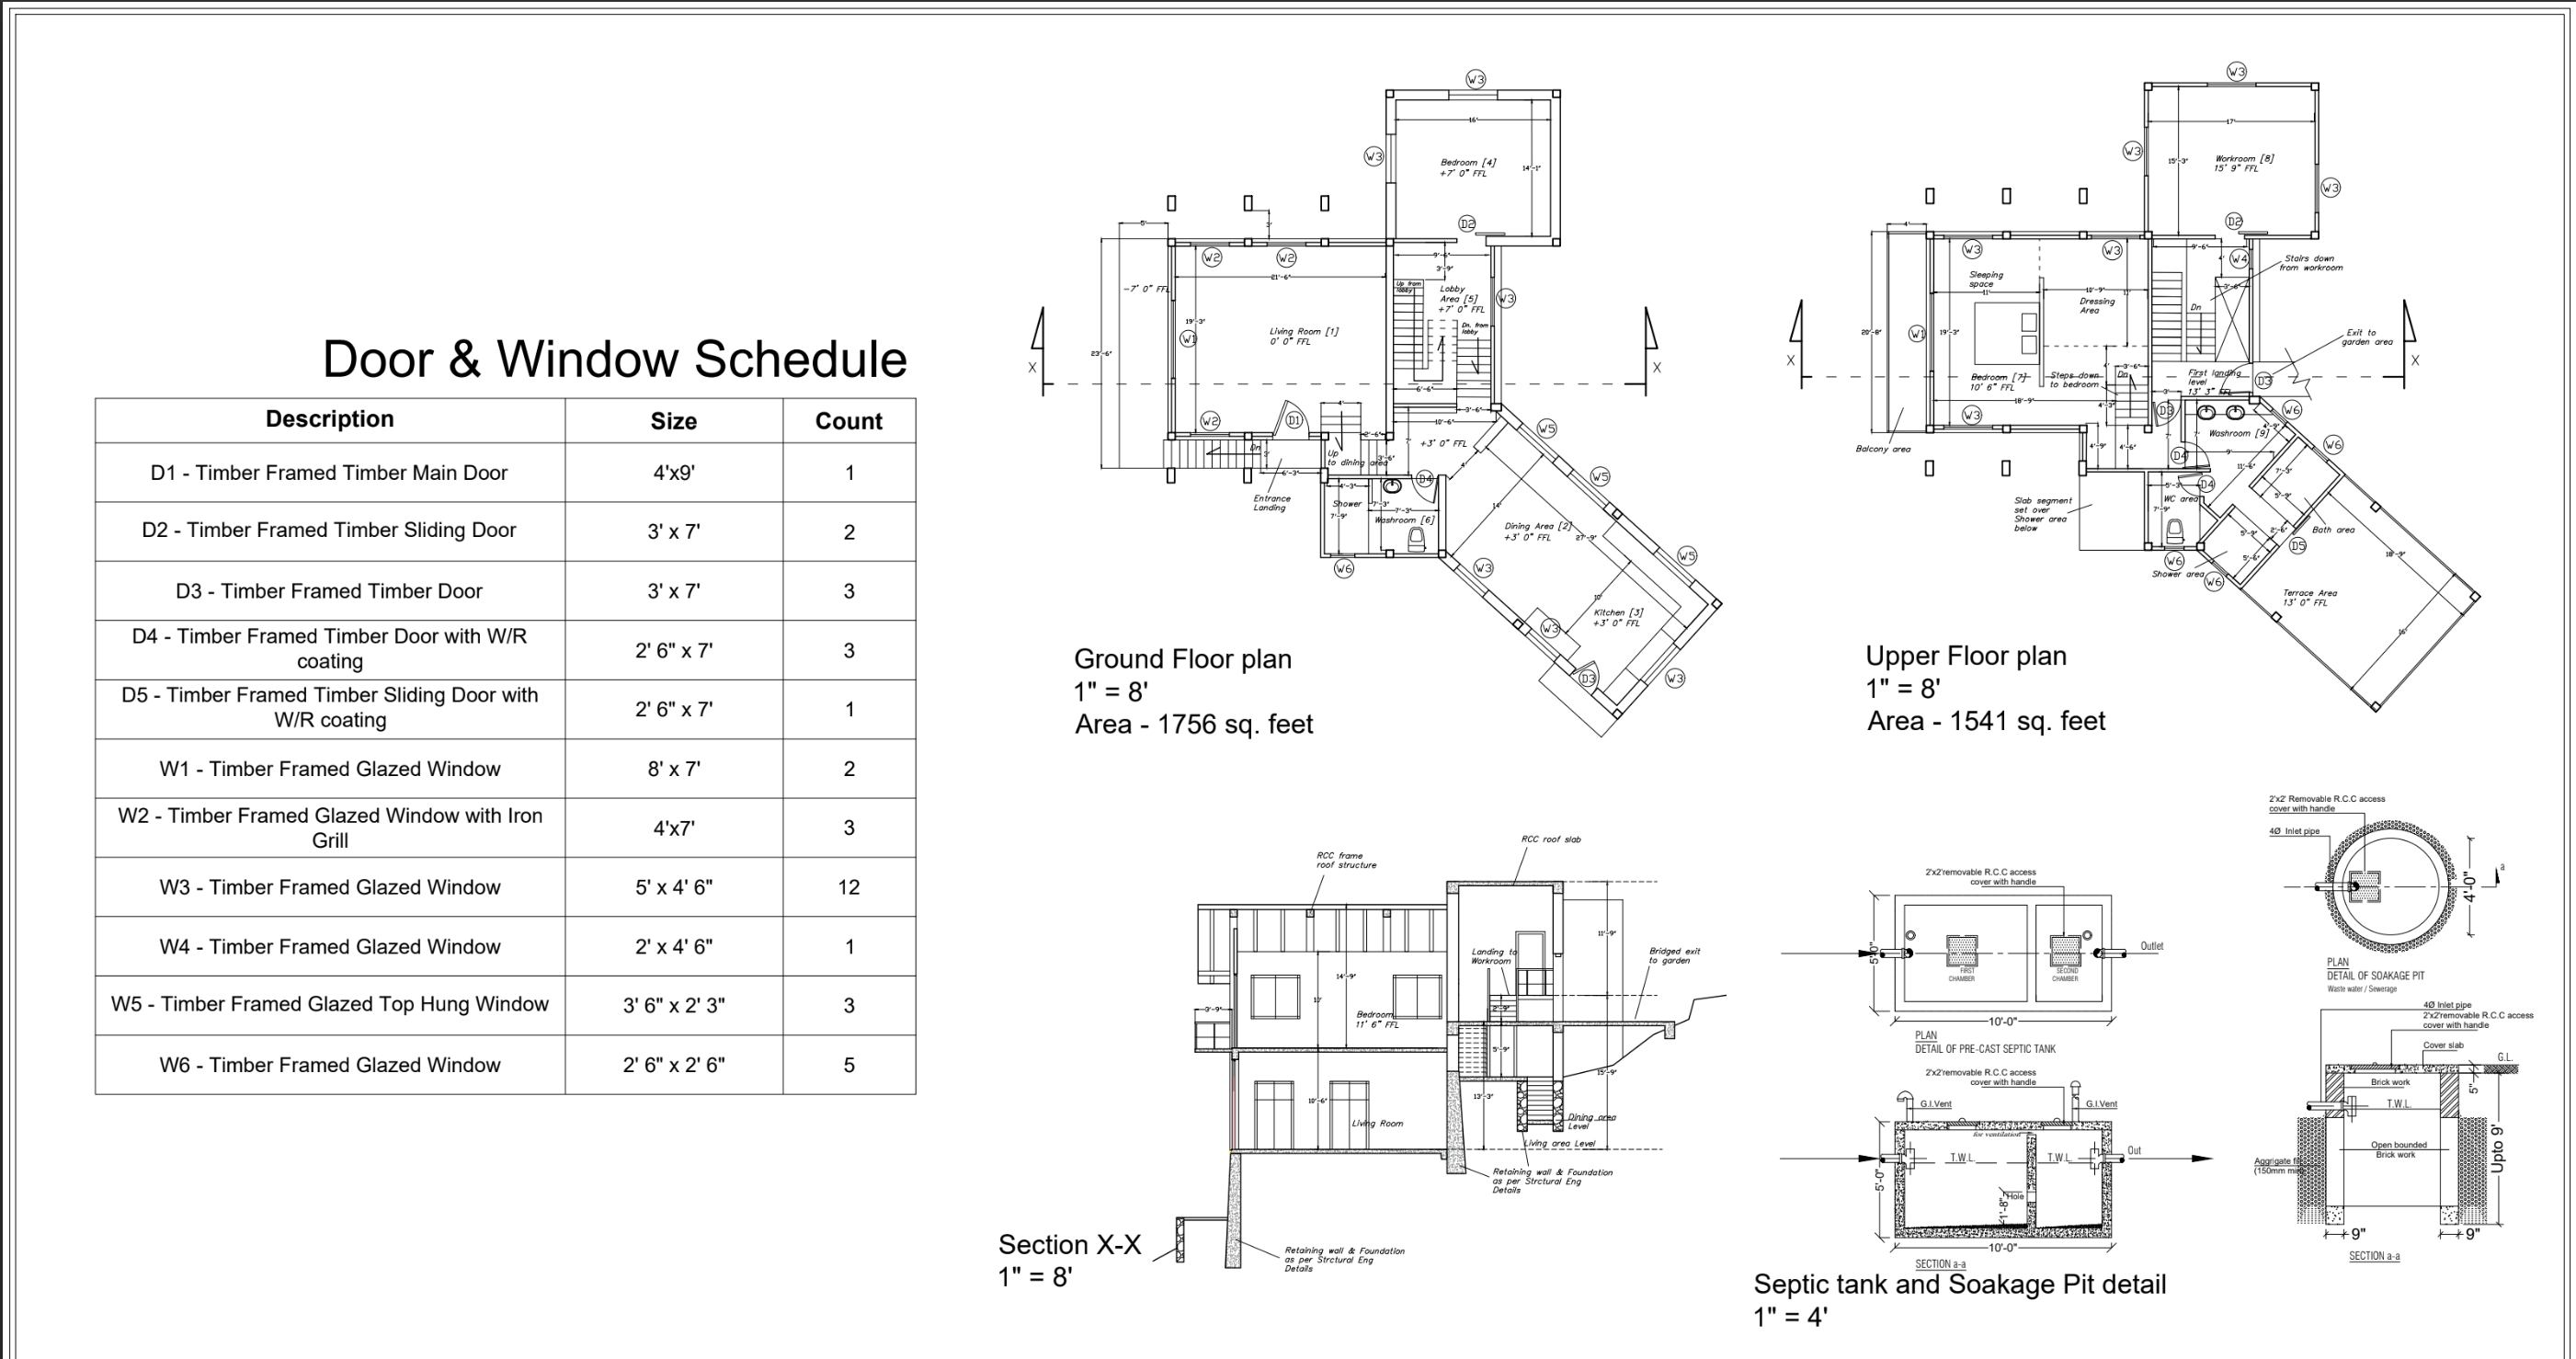
The council plan contains the top structural view of a house, the front, the back, the sides, and importantly details of foundations, sewage, and your septic tanks. You then use these plans to apply for a Certificate of Conformity (CoC) from your local authority (Pradeshiya Sabhawa). There are of course other documents and forms involved, but this is the heart of the matter. You need a COC.
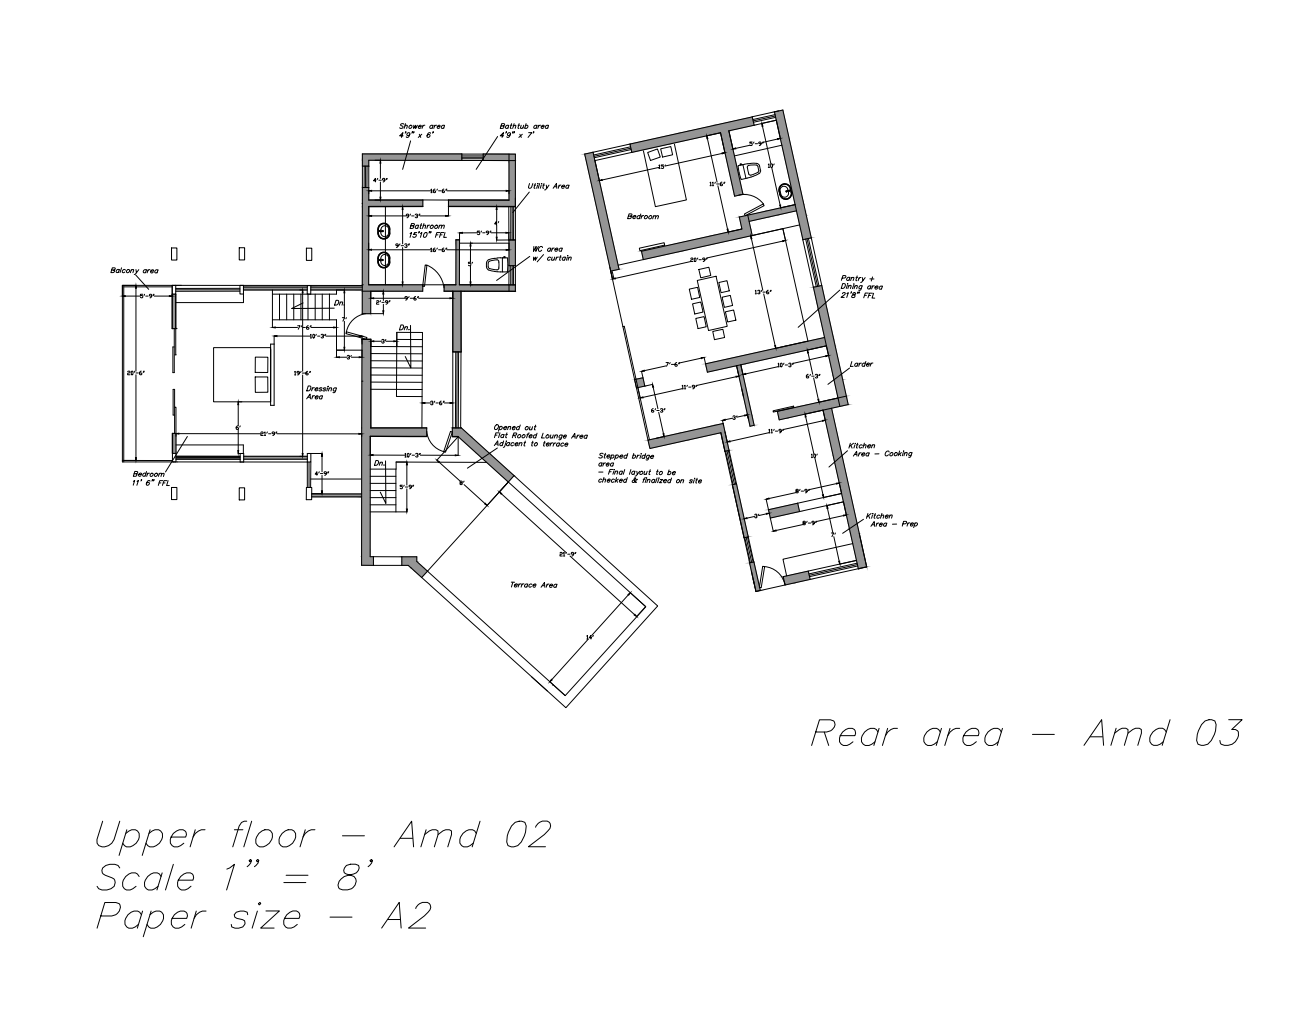
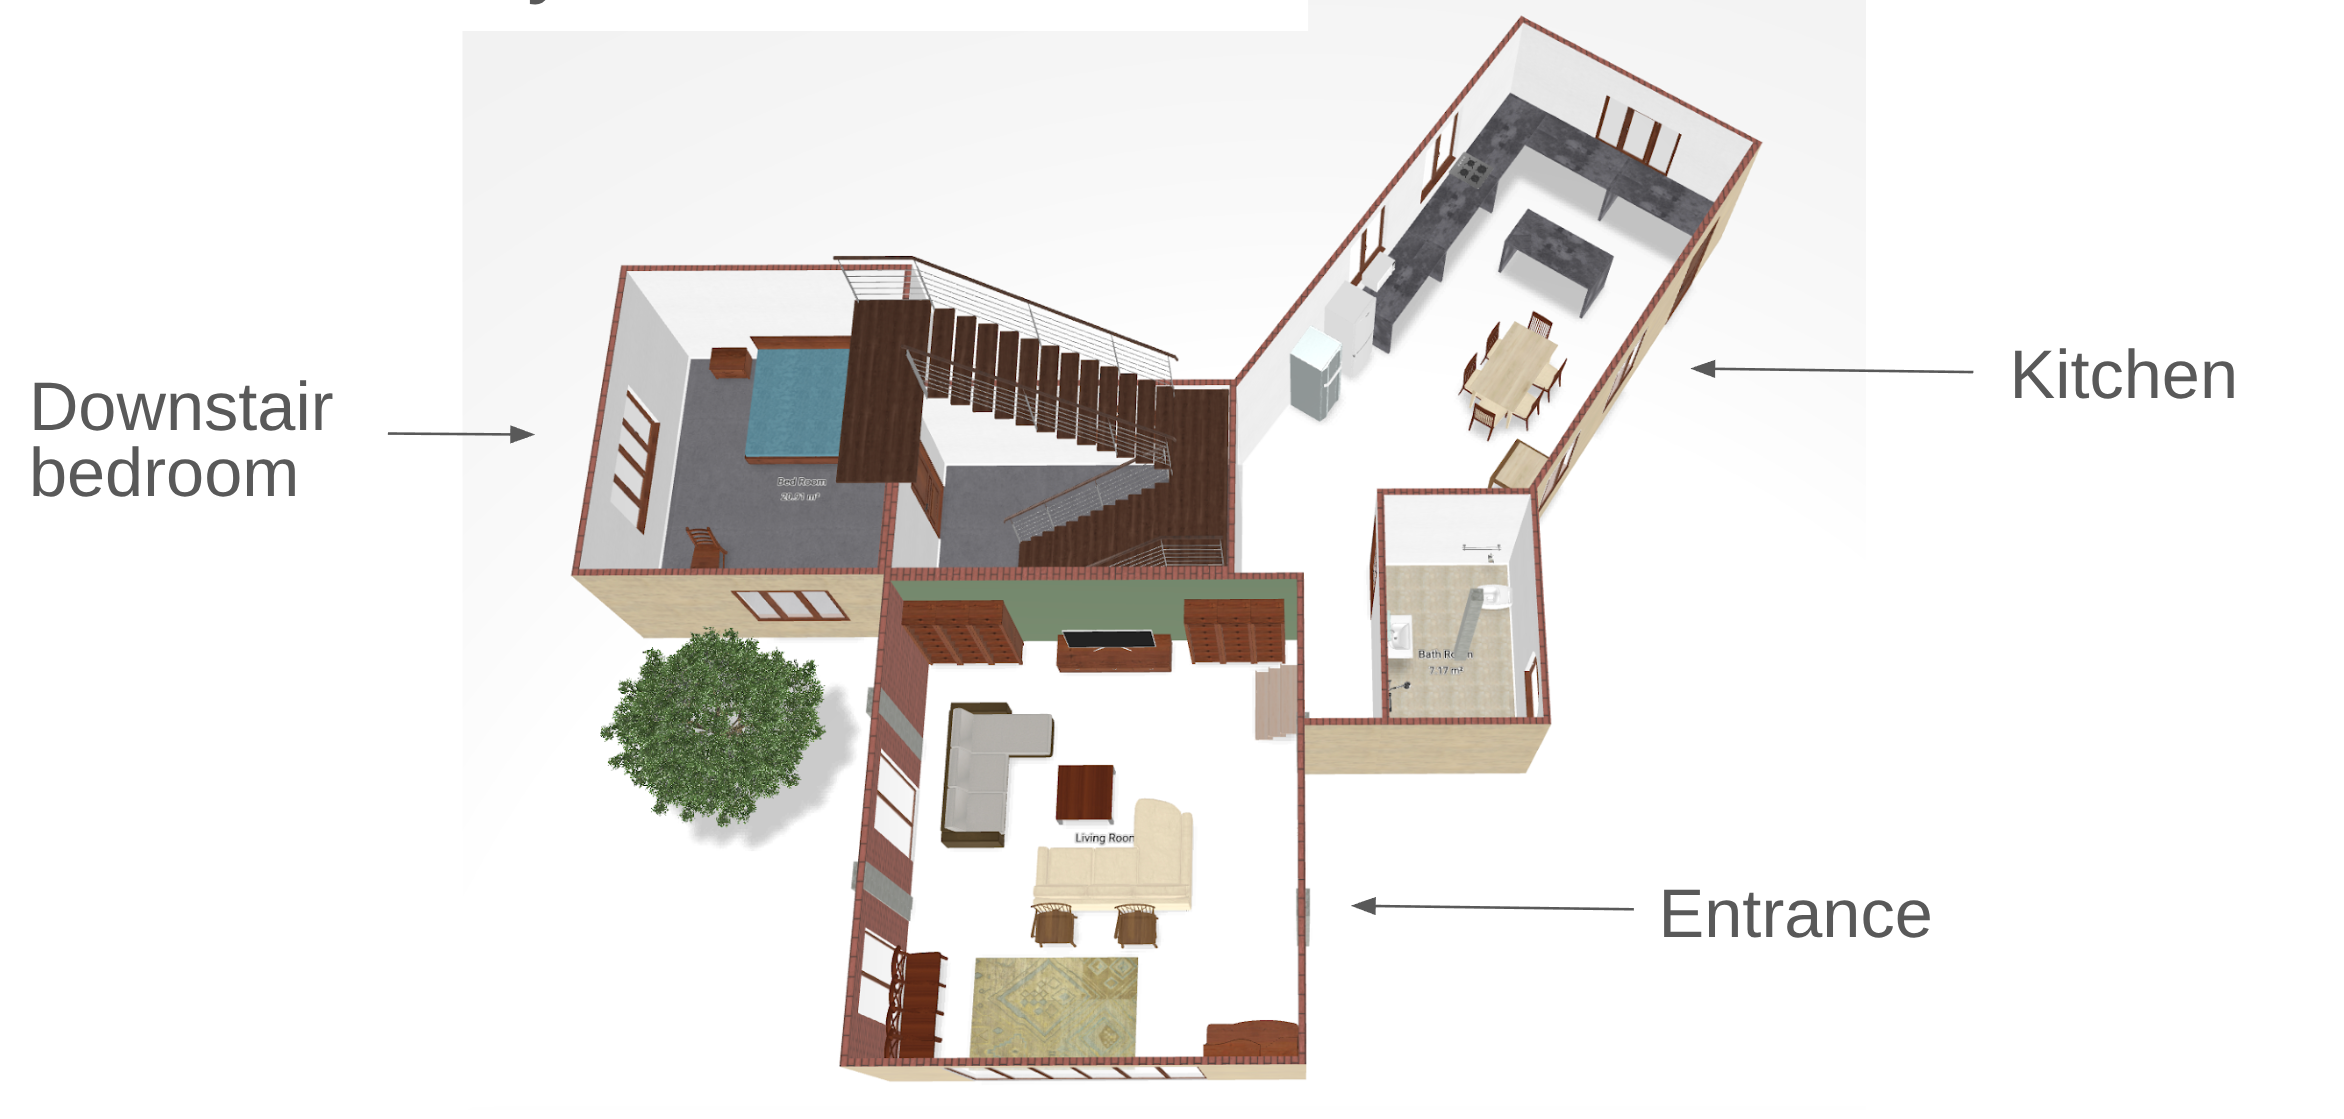
A good architect will also be able to deliver a 3D render of the building, and update it as changes are required. No government approval process currently requires this three D step. But it is critical for you, the customer, to understand and visualize the site because architectural backgrounds will often not give you a very clear picture unless you’re used to reading them.
They will also factor in what you observed from the previous step.
The shape of the land that you have might help you or might hinder you.
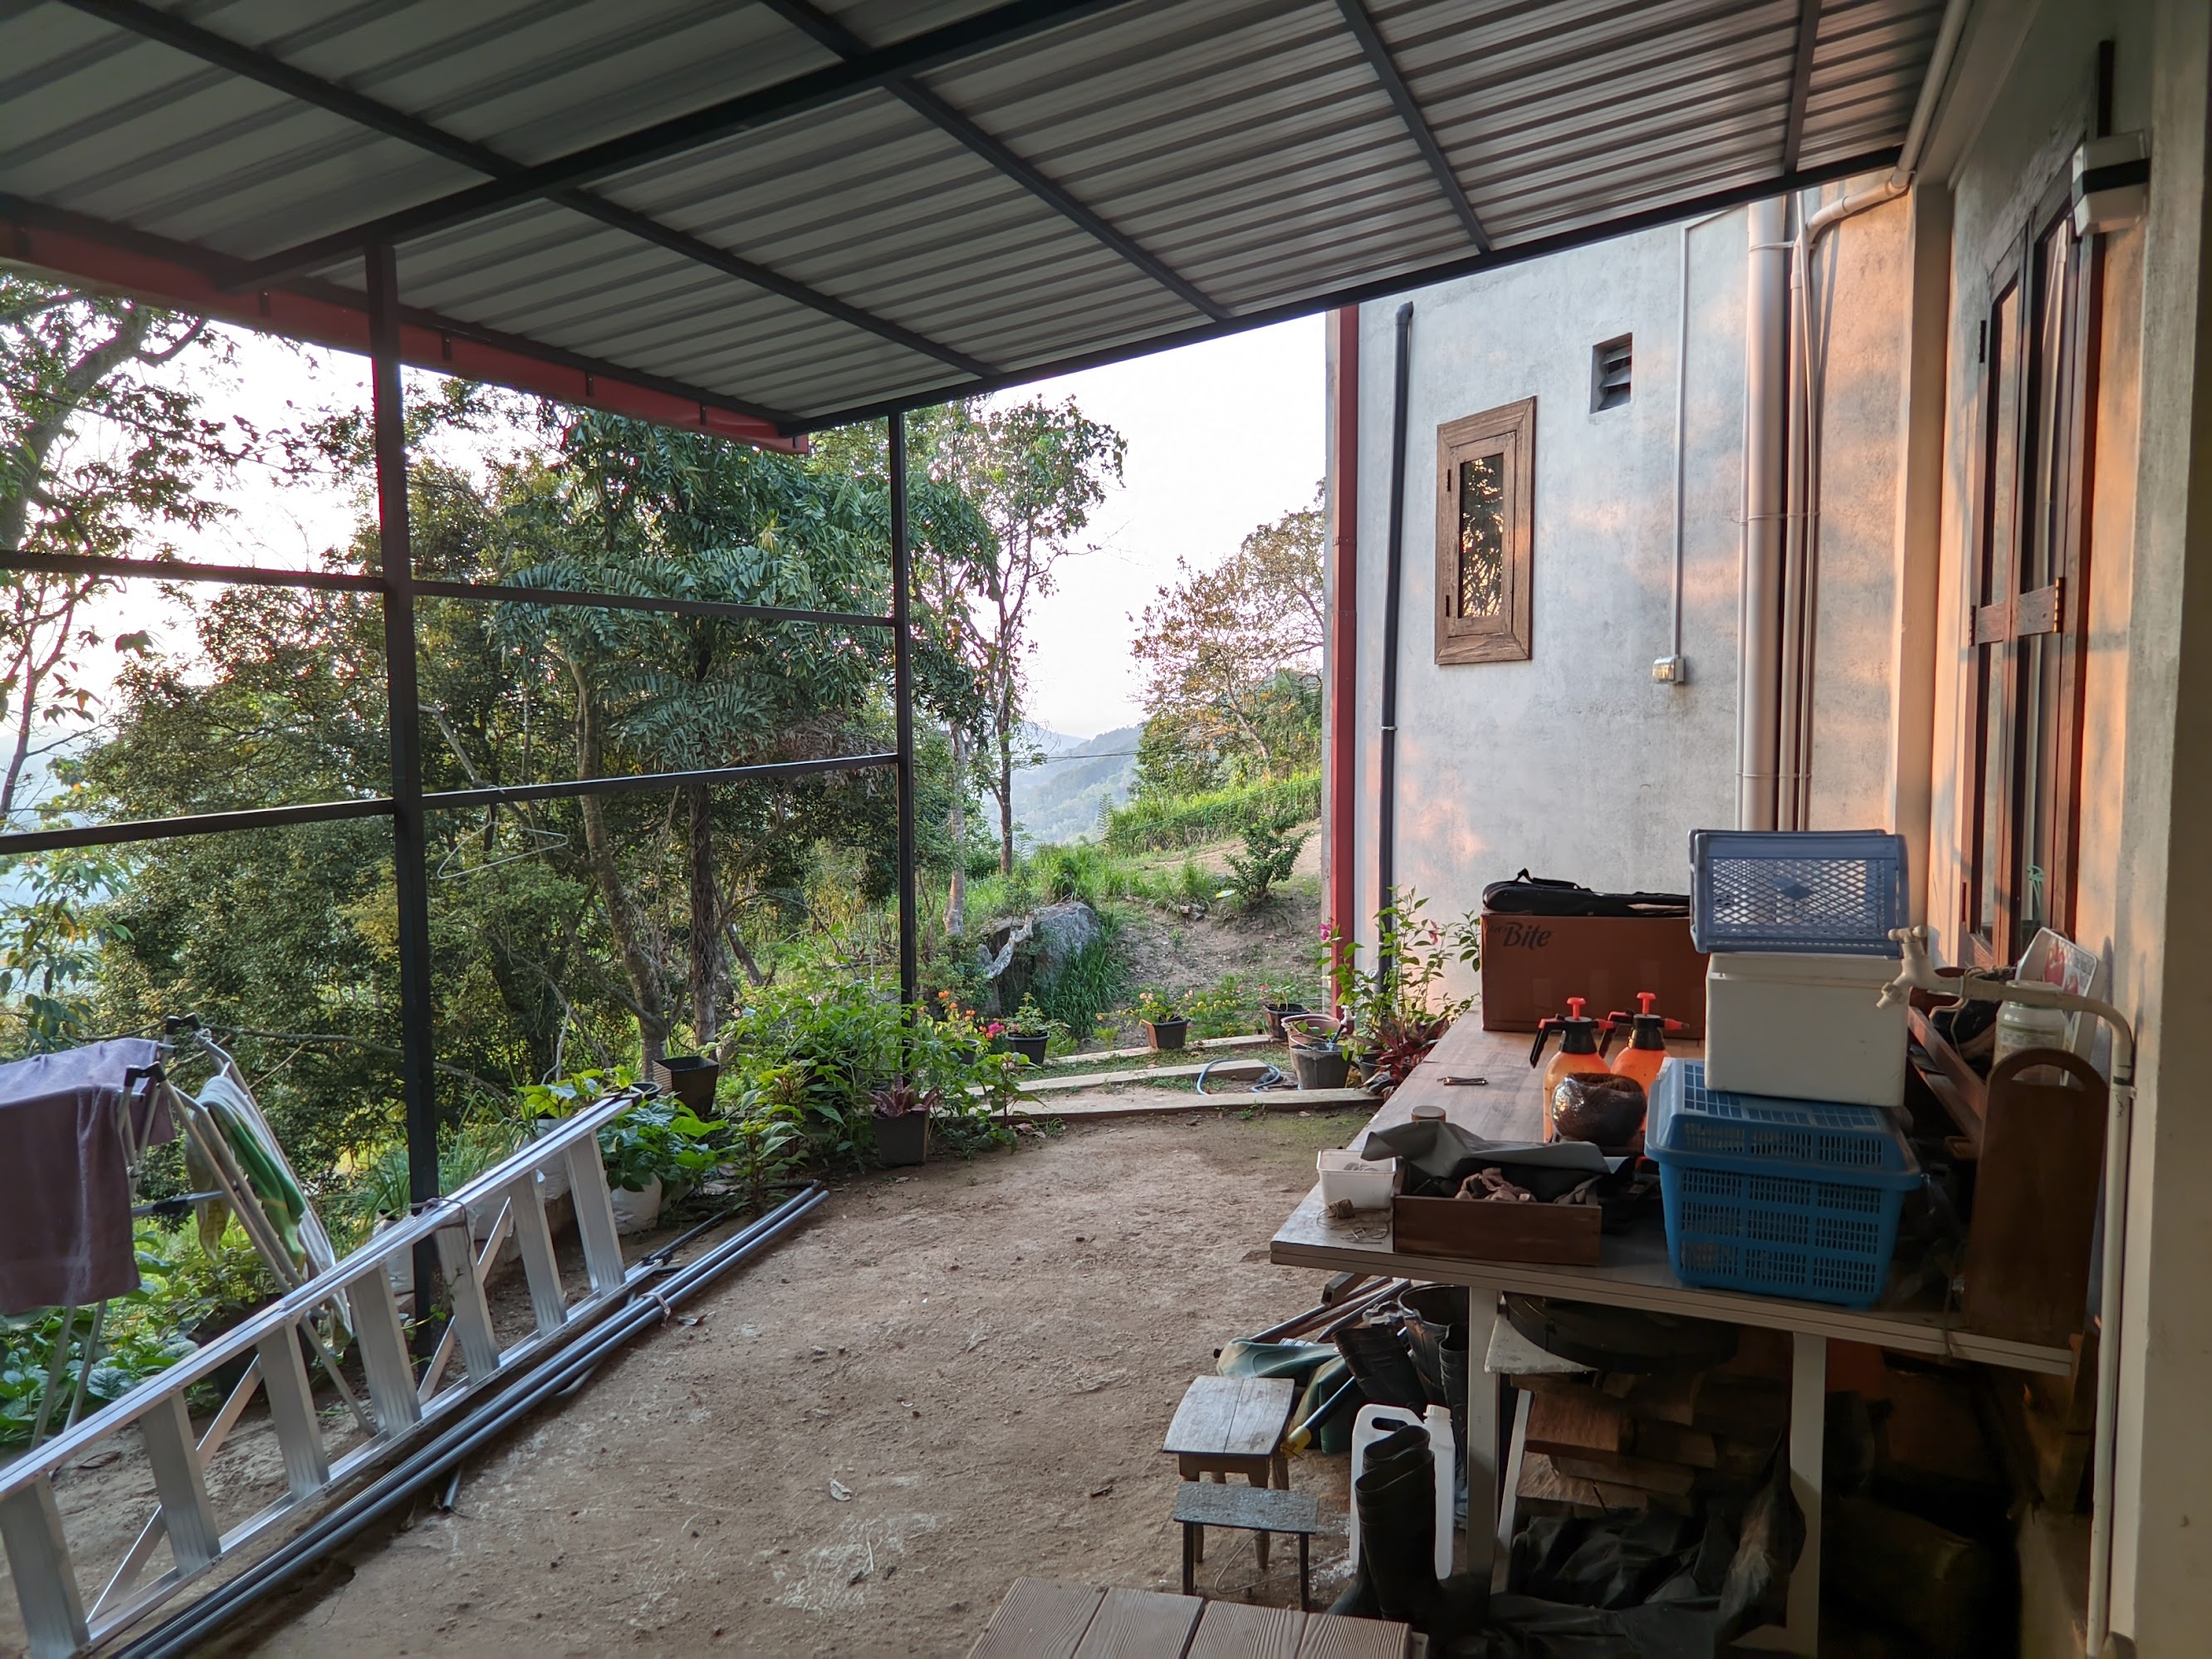
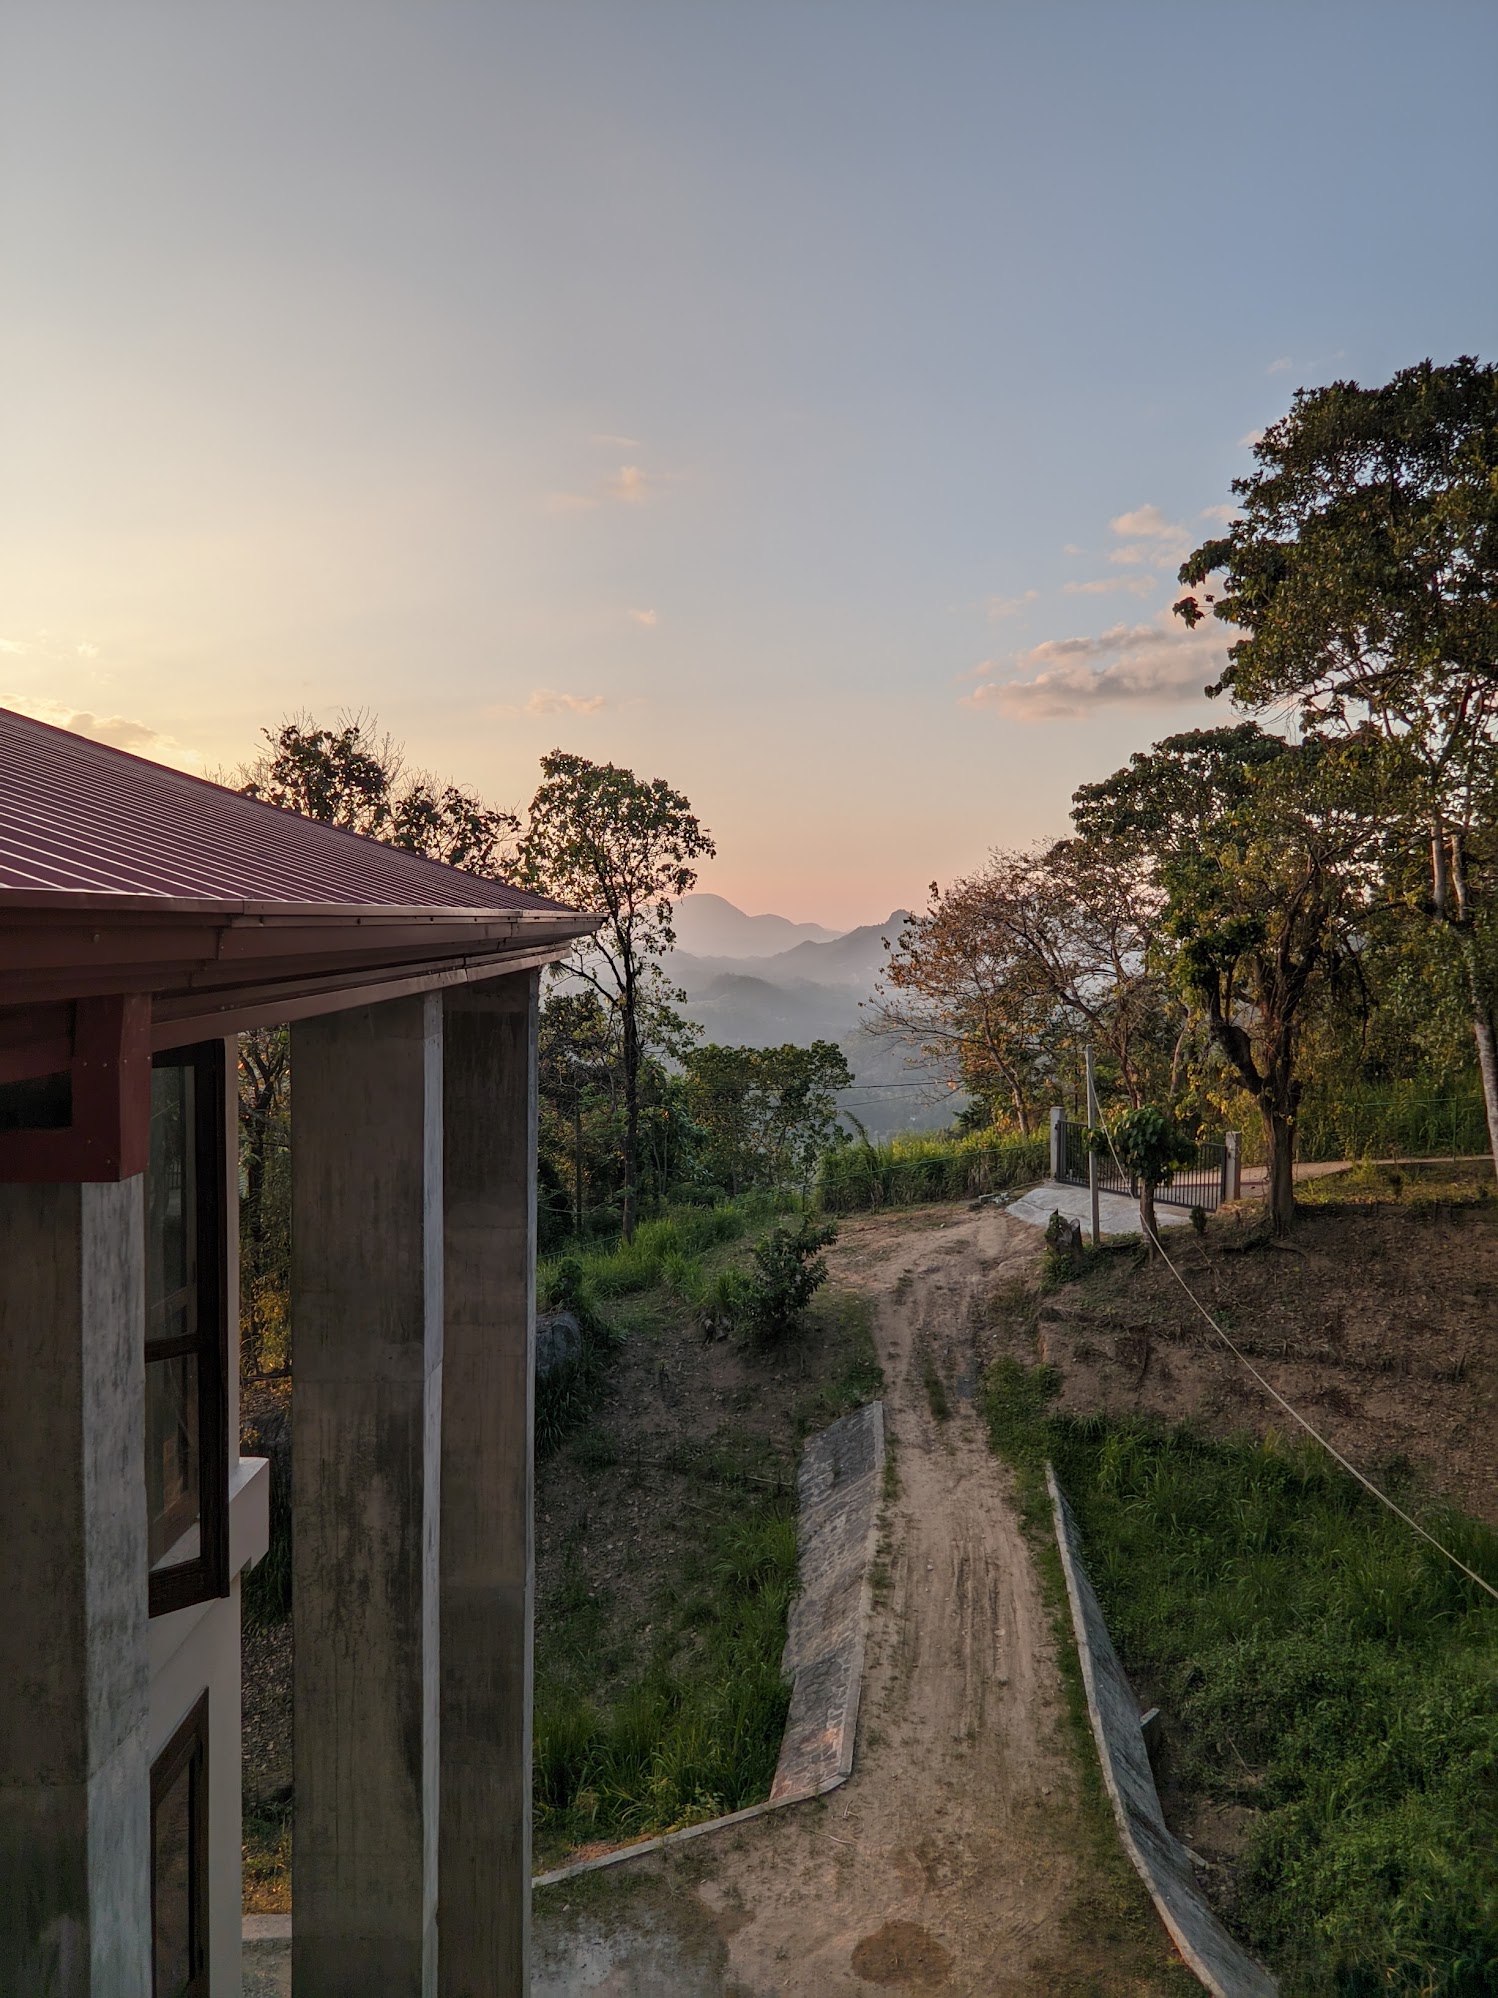
For example, we’re on a large sloped lot of 186 perches. There was a perfect place to put the house so that our windows could see the sunset and the mountains in the distance; but getting road access required us to build a ten-foot concrete road. Getting main water involved negotiating with neighbouring estates for meter access, piping water roughly 800 metres, and adding significant water tank storage.
Or your challenges may not be so rooted. Perhaps you want a bedroom that stays cool during heatwaves - look for shade and avoid the sun line. You may have noisy neighbours and want a pocket of privacy, in which case think about indoor gardens and courtyard spaces. Your architect will not do all the work at this stage, but it is their job to take into account the light, the flow of water, the shape of the land, and think about your living experience.
To get there, you and the architect will engage in a collaborative back-and-forth that results in plans showing the site layout, the positioning of your home, the details within your home, and the structure of the home. No pantry cupboards yet, no interiors - but your foundations and layout will be decided in this process. The architect should bring in a chartered engineer to help decide on say the thickness of retaining walls and how they’re going to be constructed. These are critical for the structural integrity of your house.
In the process they also have to stick to local approval processes and regulations. Different areas have different processes. For example, building in the Colombo area requires a little bit more scrutiny than building somewhere in the outskirts of Kandy.
A word of warning: architects are bizarre creatures. They are halfway between artist and engineer, with all of their weaknesses and almost none of their strengths.
The right architect will take your ideas, think deeply about how the house is going to be used and its aesthetics, and produce a plan that makes sense to everyone involved. The wrong architect will create a catastrophic clusterfuck that will cost you millions down the line.
Even famous architects are well known for this. Frank Lloyd Wright is often held up in American architecture as a defining figure, and yet his creations - like Fallingwater - were never that liveable, with water and damp soaking in and the owner spending decades and enormous sums trying to fix the many flaws.
Even when architects are competent, they may not be designing with your price tag or specific aesthetics in mind.
A good example is the late Geoffrey Bawa. His houses have an elegant tropical modernism about them, and yet - visit one, like Lunuganga - if you know anything about house maintenance, you will notice that keeping out insects and dust requires a great deal of labour. These designs were not built for people on a budget; they were built for people who could afford servants.
Another example: Palinda Kannangara is making a name for himself espousing minimalism and closer integration with nature. I very much like his style because it’s quite close to what we really like in terms of colours, textures, and how light works in that space. But you may have a maximalist style; you may want something that looks more like a Scandinavian apartment, or something that feels more like a English cottage, or even something that inherits from sort of the Dutch Sri Lankan architectural tradition that you see in Galle or in Jaffna.
Finally: treat your architects like doctors you don’t particularly like. Get a second opinion. Once a project goes into serious planning, you are going to be stuck with that architect. We’ve both seen and experienced architects who don’t listen to clients, vanish for months, or simply don’t stick to timelines, so pick wisely.
Break your deliverables into an initial design stage - get an initial 2D plan and a 3D model from one or more architects.
In our case, my wife got so pissed off that she taught herself 3D modelling and redid all the 3D work herself.
Pick the one you really like - ideally this is someone who works promptly and is accurate - and engage them for the final plan (which involves the chartered engineer) and the government-compliant designs.
It’s absolutely critical that you get to that Council Plan stage. Your architect tells you of these steps, you may have what feels like a very productive collaboration with your architect, only to find out they have left some very critical detail out.
In our case, for example, we had finalized the plan, so we thought everything was in tip top shape, and we actually began construction. The architect himself did regular side visits and saw no reason to inform us of any of the actual process requirements.
We only found these out from my friend Bhanuka, who one day over dinner, as we were talking about the construction project, asked to see the Council Plan.
And so we showed him the PDFs that had been sent to us of the top view.
And he said, no, no, but where is your finalized council plan and where is your certificate of conformity?
At which point we went, Oh.
And at which point he went, Oh my god, you guys are completely fucked.
He was right. We were halfway through the building process. The council plans had not been submitted. We had to pay a fine for this at the end. The pain of this process is something I describe as squatting on a cactus.
No, perhaps because of this back and forth, it is customary in Sri Lanka, particularly outside the cities, to hire a draftsman to take your plans, create the draft for you, sign the council plan, and get permission immediately.
I would not advise this process. Not only because it circumvents how things should be legally done, but for very practical reasons. We live in an area where this draftsman approach is quite common. What happens is that you end up spending millions on something that is substandard.
We’ve seen multiple examples of this in our area (Galagedara): houses where beams were not built with the right thickness of concrete or the right strength of rebar, where foundations were not laid thick enough. As A result, when Cyclone Ditwa rolled around, slabs cracked under the pressure of earth and water. Many houses were completely destroyed.
This stuff is critical.
That’s just engineering. From a design sense, you’ll often see small houses that immediately make you feel comfortable - spaces laid out with deliberation - and then other houses where nothing quite makes sense and everything looks like it was designed without its inhabitants in mind.
For example, the last house we rented - in Mount Lavinia - had been built by someone who wanted to impress. It had an extravagantly large living hall with bas-reliefs on the walls. However, given the directions the windows faced, that area turned into a greenhouse around eleven in the morning. The kitchen was so tiny and cramped that you could tell nobody who had actually cooked a meal had participated in the design. It was extraordinarily impressive to anyone who came in for the first time, but living in it was an absolute hell of maintenance, heat stress, and suffering.
This is the kind of stuff we’re trying to avoid. A house is a significant expense, and paying a relatively small amount of money to make it suit your purposes and feel well-lit and comfortable is, in my mind, a perfectly reasonable thing to do.
Here’s what I advise.
Most people go through friends and family, but I would advise against it. Every person in our circles who has built a house, or in some cases a boutique hotel, has at some point had a major blow-up with an architect. Better to keep your friends and family circles away from this kind of drama. Instead, go around looking at houses that you think are nice, match your personal style, and are well constructed. Try to figure out who architected them. Check their portfolio of other sites. Then explain your constraints - this much square footage, this placement, this slope. See if they’re enthusiastic about your project. They may require a site visit. If you are going down the friends and family route, ask around in your circles from people who have built a home with that specific architect and spent at least a year in it. Do not take advice from someone who hasn’t. There are so many nitty-gritties and intricacies in the process that simply knowing a friend who is an architect or knowing a family member who’s an architect is not enough. You need some reliable way of someone being able to assess that architect’s work, and that usually involves at least living a year inside.
Lay down a concrete timeline with your architect for deliverables and the payouts. Some architects will ask for a percentage of the construction cost (3-5%). Others will work for flat fees.
A contract is important. We have seen and had many many cases of architects just vanishing or taking a whole year to send plans over. At which point the build just gets stuck in limbo.
Read up on the relevant provincial council requirements for your area. Note that different authorities have different requirements. Read the UDA approval process. The architect is responsible for ensuring the design adheres to planning regulations and for preparing the necessary clearances, survey plans, and deeds - but you should at least know what documents are required. If the processes for your area don’t exist on the internet or are hard to find, just go to the provincial council and ask nicely. They will explain things to you and will hand over copies of forms and the whole nine yards. It will take a day out of your life, but it will save you many days of pain to come.
Do not engage with any architect who will do things for free. Free is expensive when it comes to skilled work like this. If you are actually paying someone, you have the right to ask them to meet deadlines and schedules.
Permits, Water, Electricity
Let’s assume you have a set of plans you’re happy with. You’ve gone back and forth, moved a few bedrooms around, and now have a very good sense of what you’re building.
There are generally three big types of permits that you’re going to have to think about.
Approval permit from the local provincial council or body appropriate for the task. These are the permits that allow you to actually build. Some of these may involve filling out forms for organizations that you may never have encountered. For example, we have a very nice document from the NBRO, the National Building Research Organization, that even lists our houses GPS coordinates. What the National Building Research Organization actually does, and how relevant they are to anything, I have no idea. It’s a piece of paper, go get it signed.
Water board. Your second priority after getting planning permission should be getting running water to your site. Not only because you need to drink water from a tap, but because construction requires water. You will need to visit your local water board, file for permission. It may take a little bit of time. They’re going to then do a site visit to decide where your meter will go. And then they will show up, dig up a piece of road, and actually you know, do the process of laying down the pipes that will go to your meter.
Electricity. Similar process as water: go to your local CEB office and they will most likely send the contractor over. In our case, the guy arrived in a truck with an electricity pole, planted the thing, filled some concrete around it, his guys went up, connected all the cables to the nearest poles, and gave us an endpoint.
Each of these things may take anywhere from one week to four, sometimes a little bit longer. Some of these things may need to happen out of order. For example, while you can get water to a site, getting electricity may require having a wall that the CEB can come and pack a meter onto.
If you work with a larger firm, they may have people whose specific job it is to guide you through filing the appropriate permits and getting things registered.
If not, you’ll have to do it yourself.
This isn’t too hard - it just consumes some time. Call the provincial council, find out what permits and documents are required. Fill in the forms, send in the final architect plans, make sure everything is in order. Then follow up, and follow up again.
You need to stay on top of this process. Do not just hand it off to someone else. This will consume maybe four to five days spread over four to five weeks of your life. But there are good reasons to do it:
The first is that if you don’t have the appropriate permits, you will get fined. In our case, we were assured everything had been taken care of. It hadn’t. We had to go to the local provincial council, apologise, pay the fine, and get everything done over again.
The Process of Construction
The build sequence
There are multiple stages to construction. Done in order:
Structure:
- Site clearing and levelling - mostly unskilled labour, some machinery (JCB, etc.)
- Cutting the trenches and laying the foundations
- Building the plinth beam and ground floor slab (the concrete base)
- Building the concrete skeleton - columns, beams, and floor slabs
- Brick masonry and wall construction
- Laying plumbing and electrical conduits (rough work; some of this happens in parallel with wall construction)
- Roofing - roof structure and weatherproofing
Interior:
- Windows, doors, and frames installation
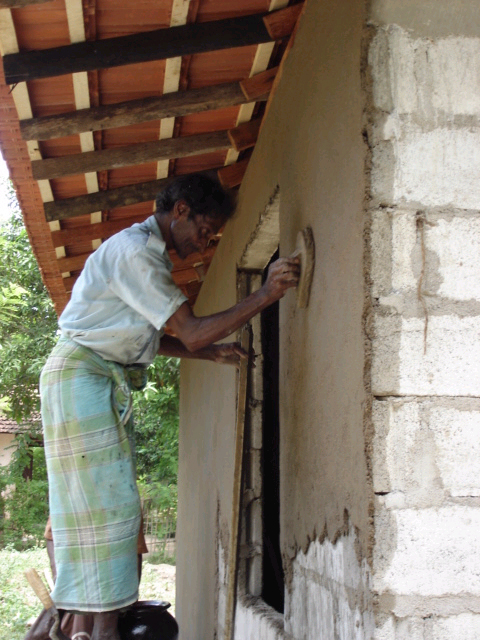
- Plastering of walls
- Tiling (flooring and walls)
- Painting and wall treatments
- Final electrical and plumbing installation (fixtures, switches, outlets, fittings)
- Fixtures and fittings (kitchen, bathrooms, hardware)
QA:
- Final inspection and cleanup
It should be abundantly clear that we’re talking about a large project. Even the smallest house is ultimately a testament to someone’s persistence.
If you select an SME contractor, they should be able to consult with you for each stage and give you a costing just before that stage is due. Here’s what that looks like:
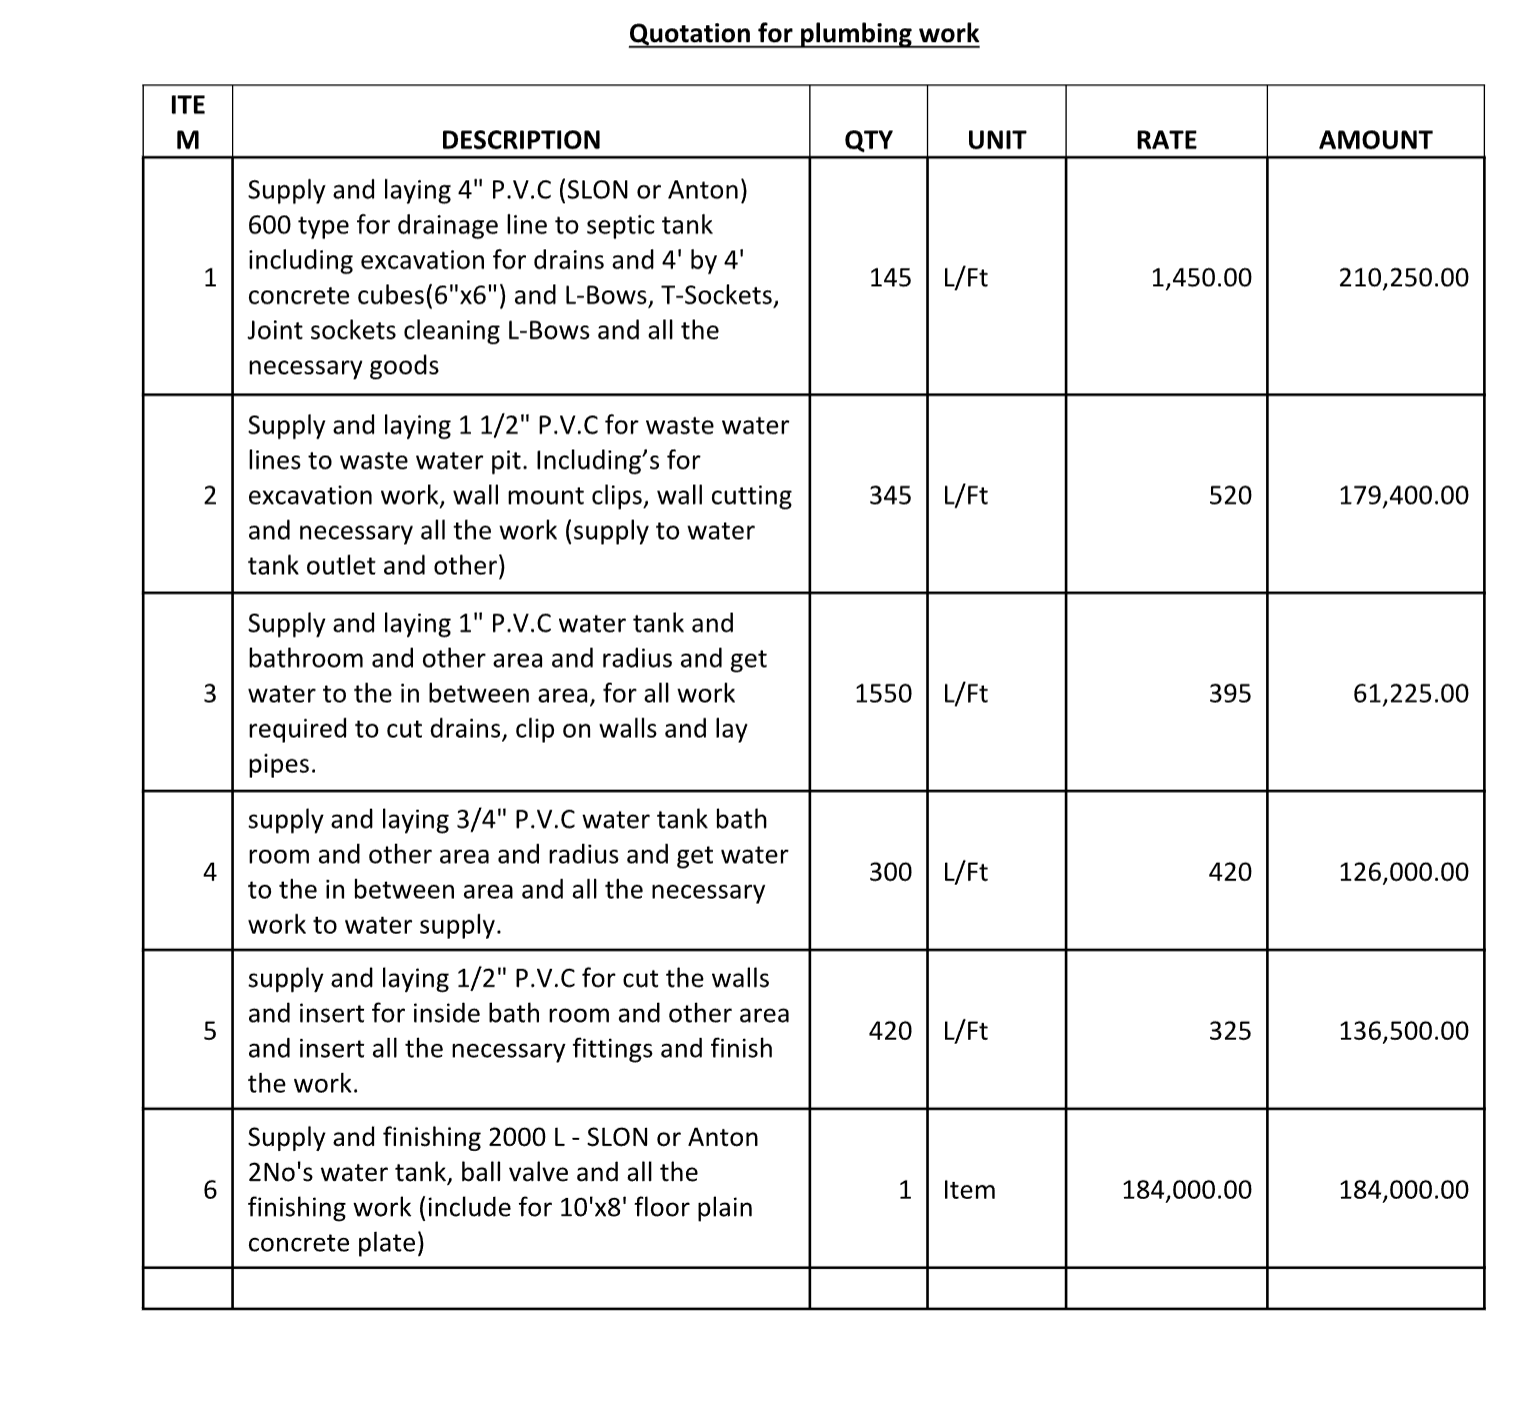
You’re essentially going to be throwing money at someone, and you should be inspecting at each stage, before and after. Contractors can and will cut corners - especially if you make them hurry.
If you’ve elected to use your local baas only, you should be able to separate each tier of your build into the components of this list. In that case, it is in your best interests to handle materials procurement yourself. Strike up a relationship with a good local hardware store that also provides transport. Order a few things from them, and once they realise you’re building a house, they should offer you a line of credit. In my case, I can order hundreds of thousands of rupees worth of materials - loads of sand, bags of cement - from the local hardware, and they’ll send everything over in lorries on the strength of a list I put on WhatsApp. They WhatsApp me the bill afterwards. You should also expect to be on site every single day, making sure work is done.
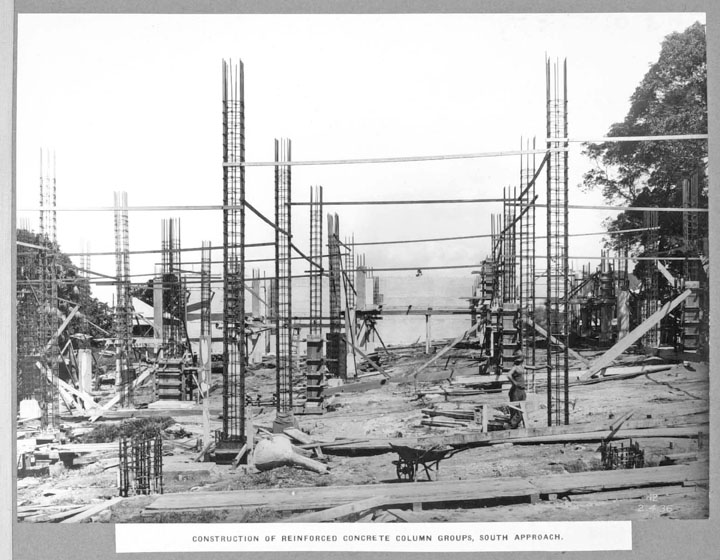
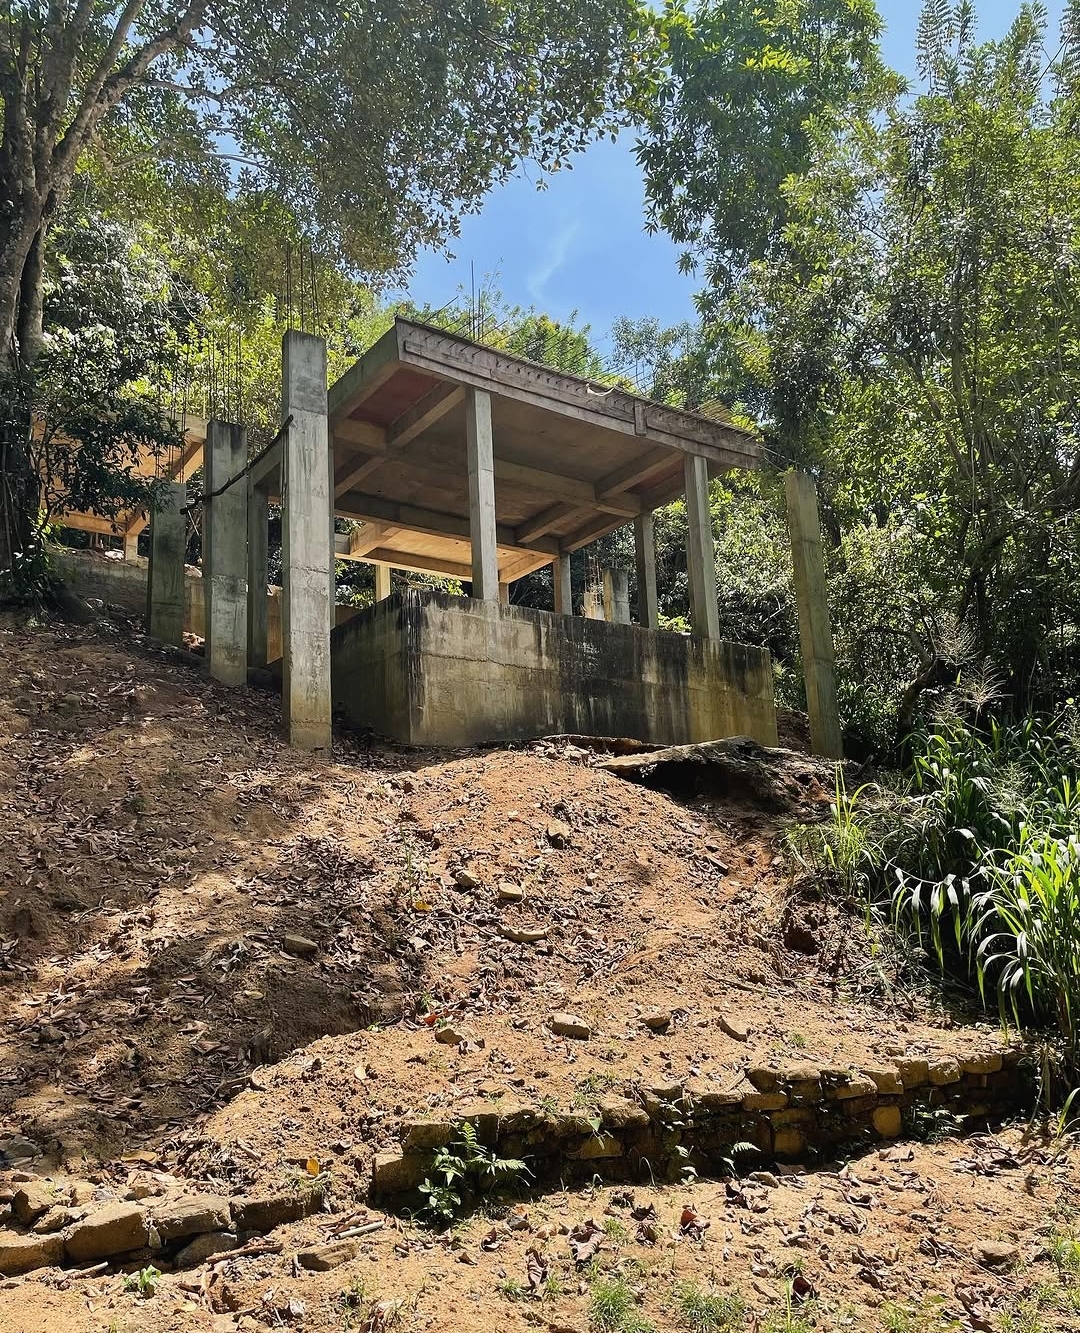
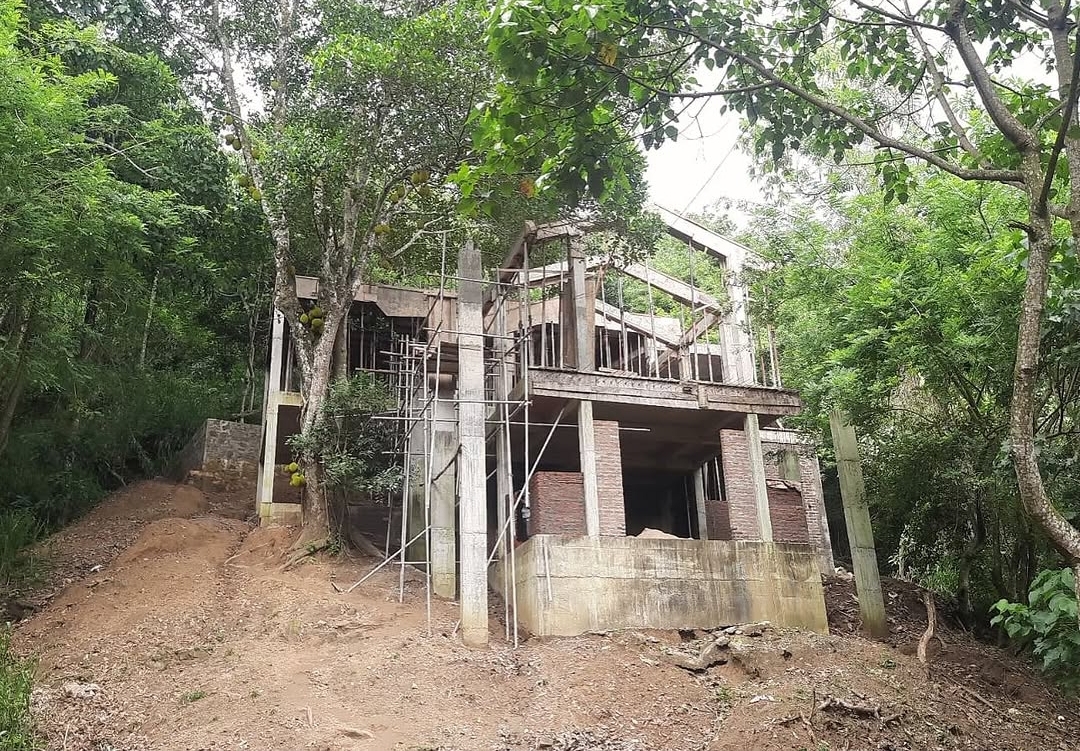
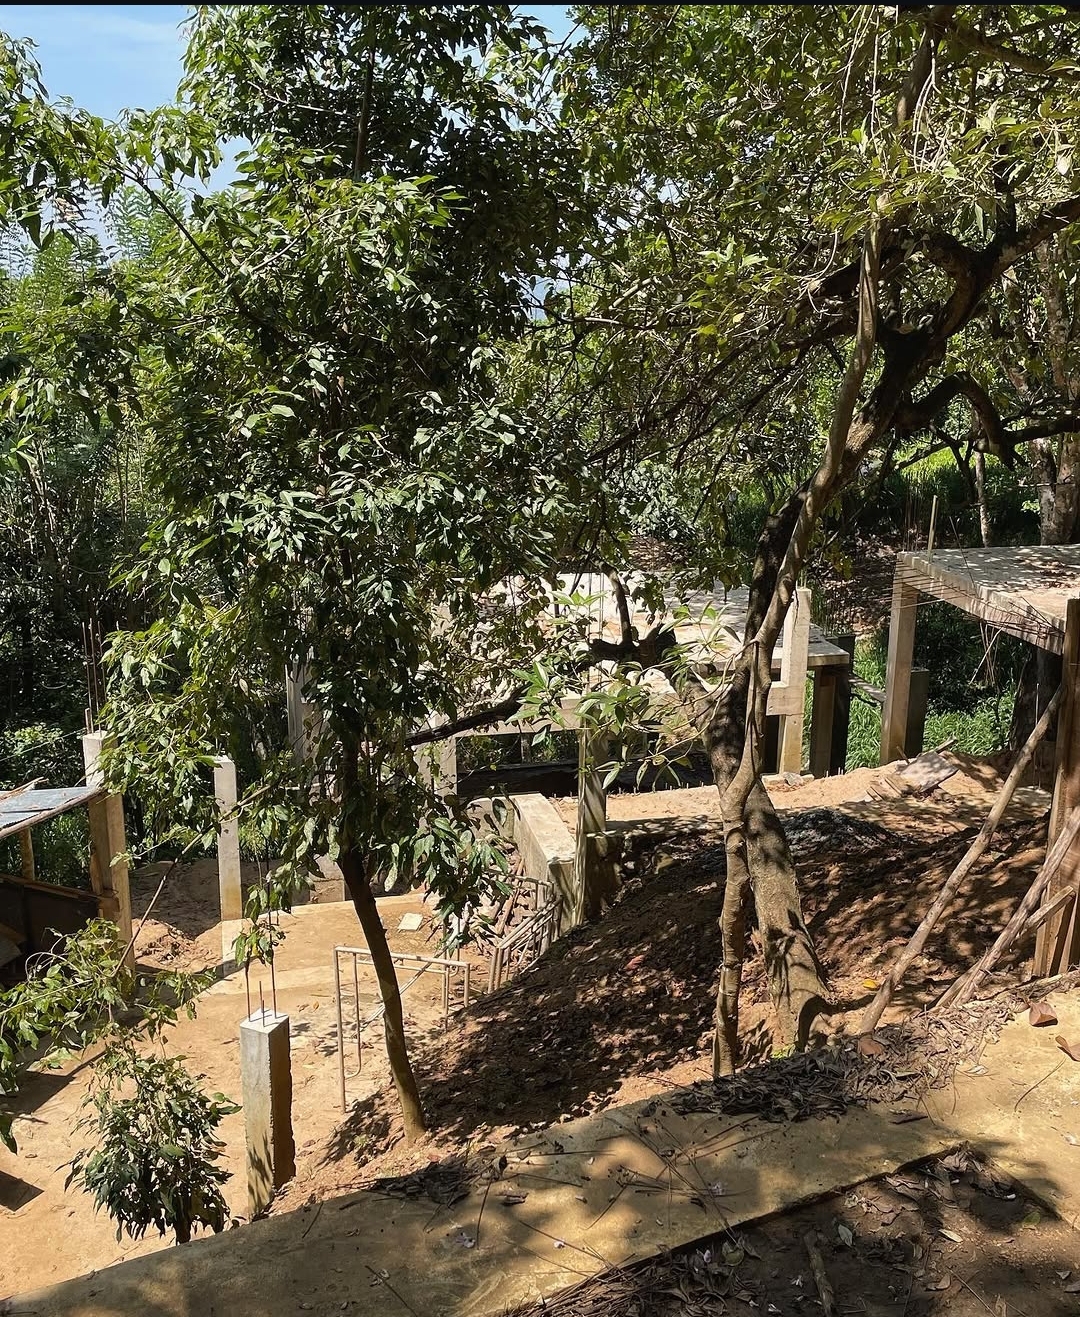
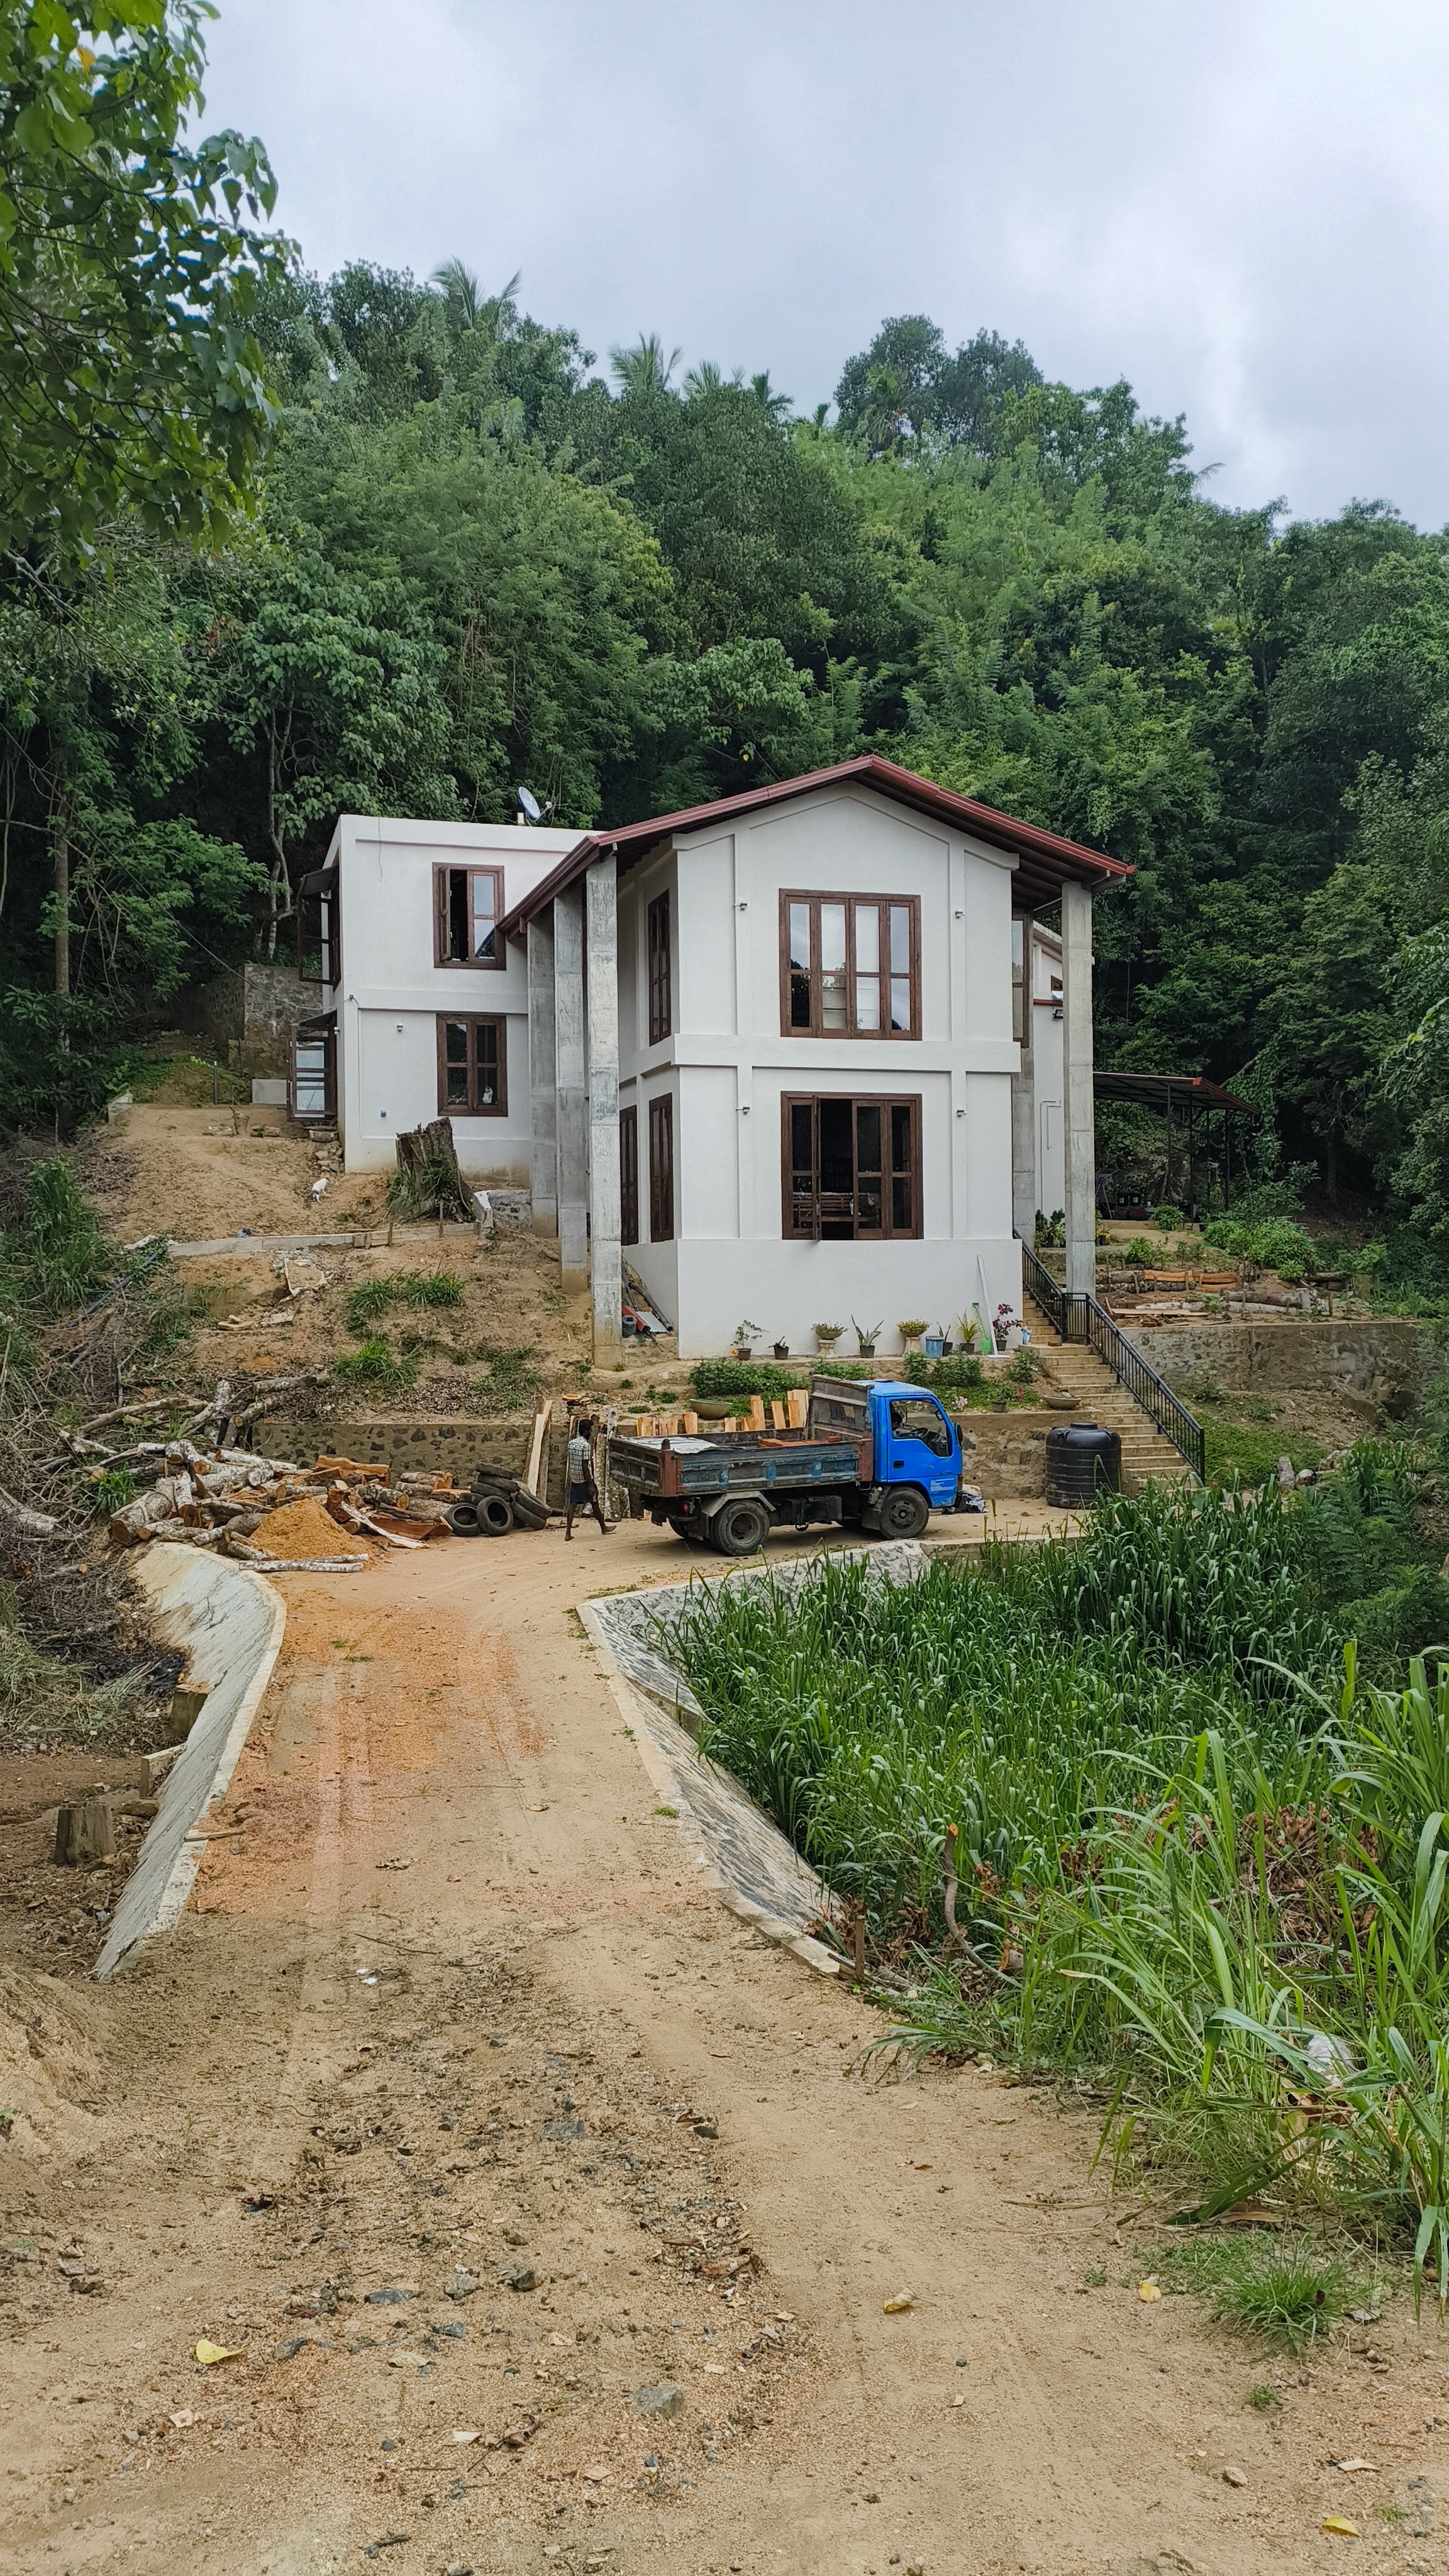
As construction progresses your site will go from looking like a flat bit of earth, or a flattened bit of earth to looking like something of an archaeological experiment. Here are some photos.
In an ideal world, an SME should do a good job with you periodically checking in. In practice, project management tends to be poor. Labour will not show up. A site foreman may have an issue with certain workers. Procurement will be late, or materials will go missing. The tooling available to workers may range from excellent to stone-age. We’ve seen situations where five to ten thousand rupees’ worth of tools - or a concrete mixer - would have significantly sped up work on a build costing multiple millions. We’ve had to force people to wear boots when working in mud, or gloves. And then the next day these things will be completely forgotten, and you’ll be treated to the sight of an old man in a sarong bent double over a concrete slab, one-handing a circular saw with a beedi in his mouth.
Obviously the fact that we can get work done this way contributes to the cheapness of labour in Sri Lanka. But it also means that standards can be bizarrely inconsistent - sometimes from slab to slab, day to day. People may get injured. You will have to put your foot down on certain things and practices. You can and should double check the angles of walls and foundations to see if they conform to the actual plan that you all agreed on.The final quality of what you expect will need a few harsh words and a site visit or three from your architect and engineer to make sure things happen as intended.
One more thing that nobody warns you about: materials theft. Cement bags, rebar, roofing sheets, tiles - they walk off sites. This happens more when you’re not there, and more when materials are delivered and left unattended. Keep track of what was ordered, what was delivered, and what’s been used. Develop the habit of counting bags and lengths. If you’re using a baas, make sure someone you trust is on site when large deliveries arrive. It is not a comfortable thing to think about, but it is a very common thing.
The quasi-firm: what you need to know
Bhanuka (yes, the same one featured here) recently pointed out that every person in Sri Lanka who builds a house - unless they’re using a tier-one contractor - ends up building a quasi-firm that handles some amount of project management, some amount of accounting, some oddball bits of architecture and design. That firm is you, and whoever else in your family is involved.
Over the course of construction, you’re going to have to learn a few things:
Architecture. You’re going to have to learn the basics. At the very least, you should be able to play around with readily available free software and prototype different configurations. This will save you a lot of trouble.
Construction best practices. You may not be able to pour a concrete wall yourself, but you should understand the basics of what goes into construction: rebar and what it’s used for, concrete and how it’s mixed, bricks and in what ratios, sand, gravel (called “metal” in Sri Lanka). You need a basic understanding of proportions and materials. You should know when poured-cement walls are appropriate and when it’s better to go brick or cement block. Without this knowledge, you may be sold features you don’t need.
Prices. Finding out the cost of things - especially online - can be difficult. The easiest way: when a contractor gives you a bill of materials, go to the local hardware they’re pulling materials from and get the prices yourself. Record these somewhere. Otherwise you’re going to be quoted at significant markups, sometimes hidden in ways you won’t recognise until it’s too late.
Plumbing and wiring
Over the years and the many houses we’ve stayed in, I’ve realised that most people don’t actually understand how their wiring is set up. The peak of my experiences was a house where the owner assured us all the wiring had been updated. We saw a brand-new breaker board and were satisfied - until one day we plugged in a laptop at the other end of the house, leading to sparks. We then learned that side of the house was managed by an extremely old board that used an iron nail as a fuse.
Same house, there was a concrete water tank. Whoever had done the waterproofing had done a terrible job. The waterproofing - for reasons we don’t quite understand - started to dissolve and seep through the water outlets in the bathroom and kitchen. We initially noticed the water smelled slightly oily, and then shortly afterwards we suffered severe bouts of food poisoning. Plumbers called in from outside couldn’t immediately diagnose the problem because nobody knew the concrete tank existed - everyone assumed the water came from the plastic tanks on the outside of the house.
Another house that served as the Watchdog office: we had computers in one part of the living room. It was a while before we realised that those computers, the electric kettle near the meeting table, and the microwave and fridge in the kitchen were all on the same circuit as the light of one of the bathrooms upstairs. After three different electricians were unable to figure out the grid, I resorted to overloading and tripping fuses on each circuit to work out roughly where things were and what could and could not be connected.
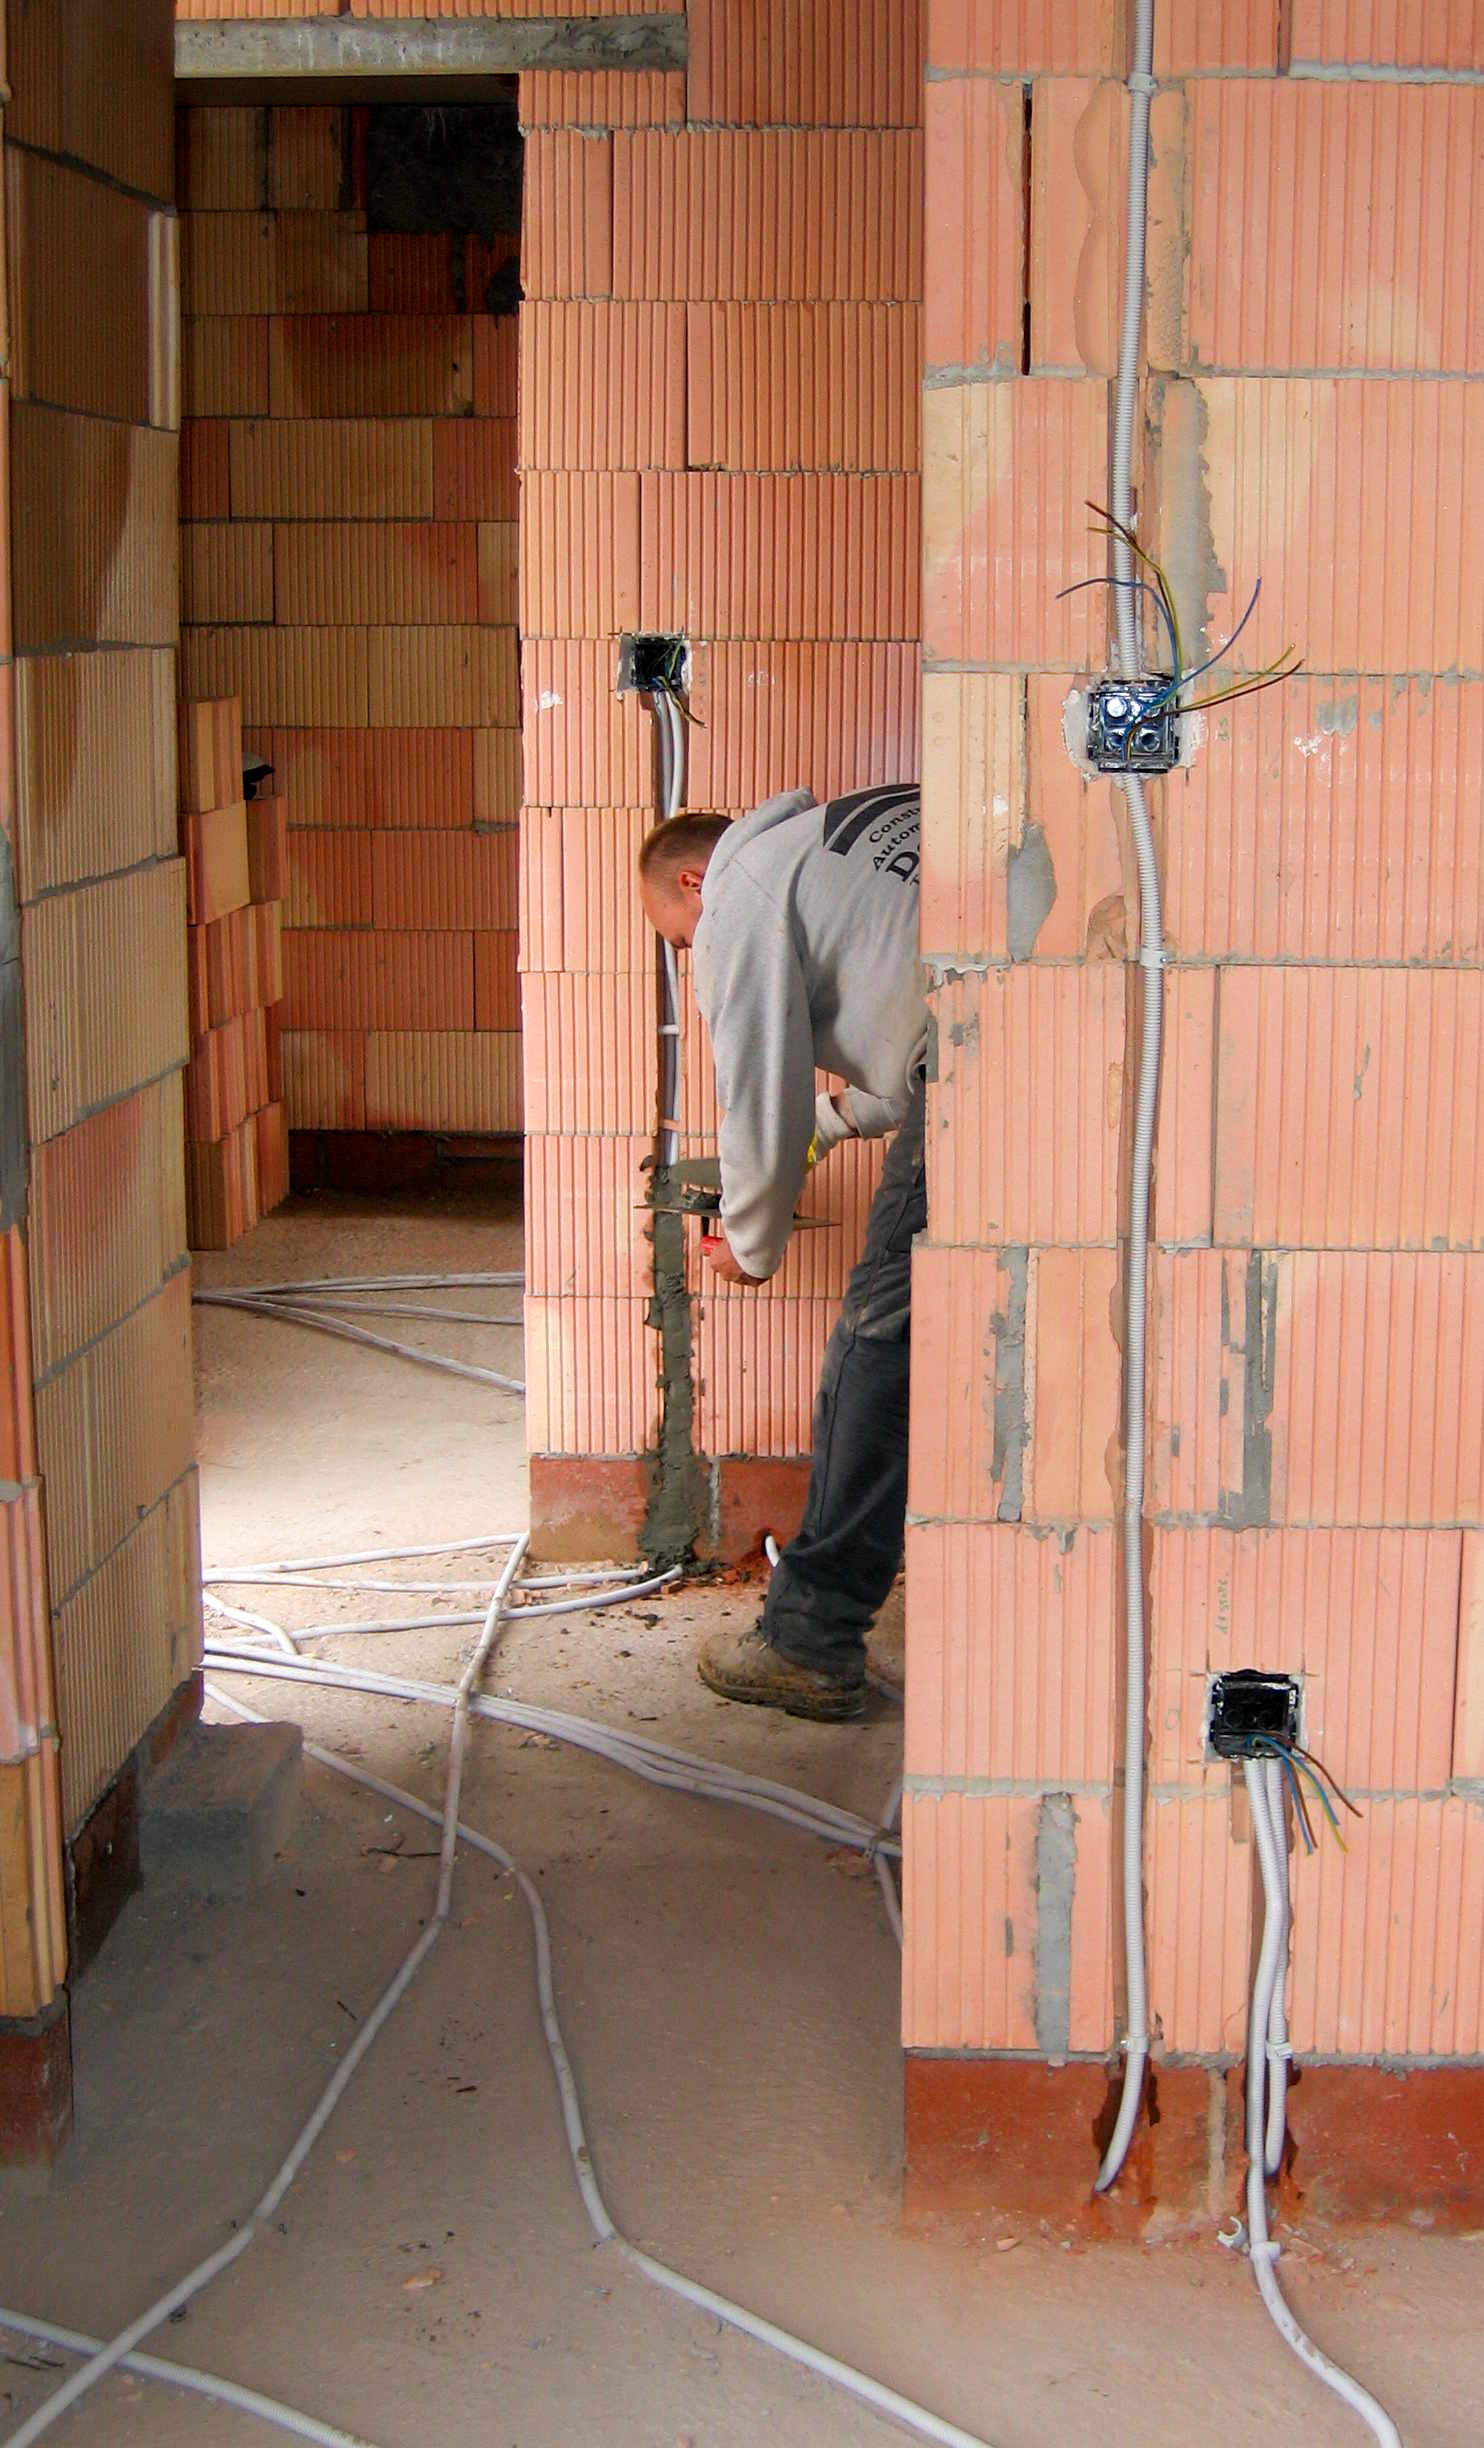
All of this to say: you should be heavily involved in the process of plumbing and wiring. Not necessarily to do the work yourself - but alongside your architecture diagrams, you should have a wiring diagram and a plumbing diagram. You should know your inputs and your outputs.
The safest approach is to hire an actual electrical engineer. Not an electrician. Note that electrical engineers and electricians are two different people.
There are plenty of electrical engineering graduates who don’t have a lot of work and are happy for extra cash. Give these diagrams to your contractor and say “build this.” Most SME contractors will have electricians and plumbers on daily-wage arrangements. If you’re going with your local baas, you’ll have to find these people yourself. Whatever the case, they have to work together to produce something usable.
When done, you should have diagrams for yourself showing how the electrical circuit is laid out and how the plumbing inputs and outputs work. These will be critical for repairs down the line.
Note that architects are not necessarily qualified to make these decisions. I would prefer to commit ritual suicide than allowing an architect to decide the flow of water and electricity. You let them figure out the placement of lights and switches - but how those things connect to the breaker box, what comes from where, what breakers are responsible for what - that has to be the province of someone who knows a thing or two about electricity loads, breakers and wiring.
Good plumbers and electricians are genuinely rare to find in Sri Lanka. This is a feature of our society and economy where jobs like these are considered low wage, unskilled or blue collar labour to be looked down on by people who sit in offices with uncomfortable shirts and ties. the reality of it is good plumbers and electricians can earn a lot of money and anyone who is good at anything eventually figures out a way to go and work in the Middle East or in countries like Israel, where they can actually earn a pretty hefty paycheck.
Again, you may be surprised here about varying degrees of competency. For our house, SME contractor had a guy who was German tech qualified and therefore supposed to be competent. He was not. Took me about a week and one burned PC to realize that this fool had not properly earthed the house. A few months later, during a heavy rain, our UPSs were tripping every five minutes, with voltages fluctuating all over the place. And this was how I figured that the electrician had left three dangling wires outside the house, for presumed further expansion, and had not worked the end of those wires properly. So with the rain seeping in, the live, the earth and the neutral were touching each other and sparking. And by the time I got to cutting out the wires, they had already sparked enough that the ends had melted together into smoking plastic mass.
However, one guy that we brought in to do some additional concrete work turned out to be unexpectedly exceptional at both plumbing and electricity. He had no qualifications to show, but had a great deal of common sense and was able to solve a very great number of problems for us.
Electricians. Well, if you’re going with an SME, they should have someone on tap, but if that person turns out to be competent, you may have to find your role. one place I’ve seen with skilled electricians are the solar companies that are popping up all over the the place. I was extremely impressed with the company that set up our off-grid solar. These are some very young boys who did far neater work than many professionals I’ve seen. It may be worth seeing if you can talk to some of them - or maybe somebody inside those companies has a recommendation.
It really is worth paying extra to get good people. Do not cheap out on your plumbing environment. A failure in either of those things could mean anything from damage to your house and your belongings to outright death.
Septic tanks and grey water
You need a septic tank for black water (toilets) and a separate soakaway or drainage system for grey water (sinks, showers, kitchen). These are not the same thing and should not be connected to the same outlet. Grey water contains soap and food residue; black water contains everything else. Mixing them creates one large problem where you had two manageable ones.
The typical Sri Lankan approach is a concrete septic tank with a soakaway pit. The size of the tank depends on the number of people using it and the permeability of your soil - your engineer should be able to size this correctly, and this should be on your Council Plan. Make sure the tank is accessible for pumping out, which will need to happen every few years. Make sure the soakaway is positioned downhill from your water sources and at a reasonable distance from any wells.
Bad septic work is one of the most common and most unpleasant things that can go wrong with a house. Unfortunately you only figure this out after you spend some time in the house and you’ve had time to really take a few high quality dumps that you don’t ever want to see again.
So for safety’s sake, make sure that joints are sealed, that plumbing that link that leads to these things travels a safe distance away from the house. Do not keep your pits where children might play or heavy loads are going to be carried back and forth.
When you find something wrong mid-build
You will find things wrong mid-build. The question is what to do about it.
For cosmetic issues - a wall that’s not quite plumb, tiling that’s slightly uneven - you can often negotiate a fix without drama. Document it, flag it, make sure it’s corrected before the next payment milestone.
For structural issues - rebar that’s the wrong gauge, a column that’s been poured without adequate concrete coverage, a beam that looks undersized - stop work on that element immediately. Call your chartered engineer, not your contractor. Get the engineer to physically inspect it and give you a written assessment. Do not let the contractor talk you out of this or assure you it’ll be fine. Structural errors are the ones that kill people or require demolishing walls to fix.
This is another reason to hold back a retention - typically 5–10% of the contractor’s fee - for three to six months after the build is complete. This gives you leverage during QC and creates a financial incentive for the contractor to actually come back and fix defects. Make this part of your written agreement from the start.
Costing
We started with rudimentary back-of-the-napkin costing. Now, a little more granularity.
I can’t tell you exactly what your house should cost, but costs are going to be broadly divided between structure and interior.
Structure is predictable. Structure is the foundations, the skeleton, the roofs. Costs scale well with size, and personal preferences don’t move the needle much. One brand of cement will cost very similar to another. If you’re getting the right specification (e.g. 42.5 R cement), they will perform nearly identically.
Interiors are where costs explode - and are almost impossible to estimate in advance. The look of your tiles will drastically change their cost. The kind of paint will massively impact it. Want marble countertops? That’s going to cost you. You can get a toilet for forty thousand rupees, or one for seven hundred thousand rupees.
What I would advise: get a handle on the structural cost as fast as possible. These costs are affected by global availability and by fuel and transport costs, but otherwise there’s not a lot of play here.
Then let your contractor begin. Follow through all the structure. Check at each stage. Educate yourself as much as possible. Try not to cry too much, because you are essentially throwing money into a hole in the ground.
While this is happening, to distract yourself from watching your bank account empty out . . .
Interiors and mood boards
You can approach interior design in two ways. The first is to start by picking specific things you want - a friend of mine wanted French windows; another wanted very specific terracotta flooring. You make choices from lists that increasingly look like this:
Flooring: tile type, pattern, and colour; wood (hardwood, laminate, engineered) - species, finish, colour; carpet - material, pile, colour; concrete or polished concrete; stone (marble, granite, slate); vinyl or linoleum.
Wall finishes: paint - colour, finish (matte, eggshell, satin, gloss); wallpaper or wall coverings; wall panelling or cladding; textured finishes (stone, brick effect, plaster).
Kitchen: cabinetry - material, style, colour, finish; countertops - granite, marble, laminate, quartz, wood; backsplash - tile, stone, metal, glass; appliances - brand, style, colour; sink and faucet - material, style, finish; lighting fixtures.
Bathrooms: tiles - wall and floor, colour, pattern, size; bathtub/shower - material, style, size; toilet - type, colour; sink/vanity - material, style; faucets and fixtures - finish, style; mirror - size, style, frame; lighting and ventilation.
Doors and windows: door styles and materials (wood, glass, metal); door hardware (handles, locks, hinges); paint/stain colours; window treatments - curtains, blinds, shutters, shades.
Lighting: light fixtures - style, type (ceiling, wall, pendant, recessed); switches and outlets - style, finish; dimmer options.
Ceilings: paint colour and finish; texture or smooth finish; false ceiling materials; decorative elements.
Hardware and fixtures: door handles, knobs, and locks; hinges and brackets; shelving; towel racks, toilet paper holders; mirror mounts.
Other interiors: staircases - material, railing style, finish; built-in storage or shelving; room dividers or partitions; accent walls; decorative mouldings or cornices.
Then you add up the cost and cringe a little, and hope it all works together. If you’re on good terms with the architect, you can get your 3D model updated so you have some idea of how things will look.
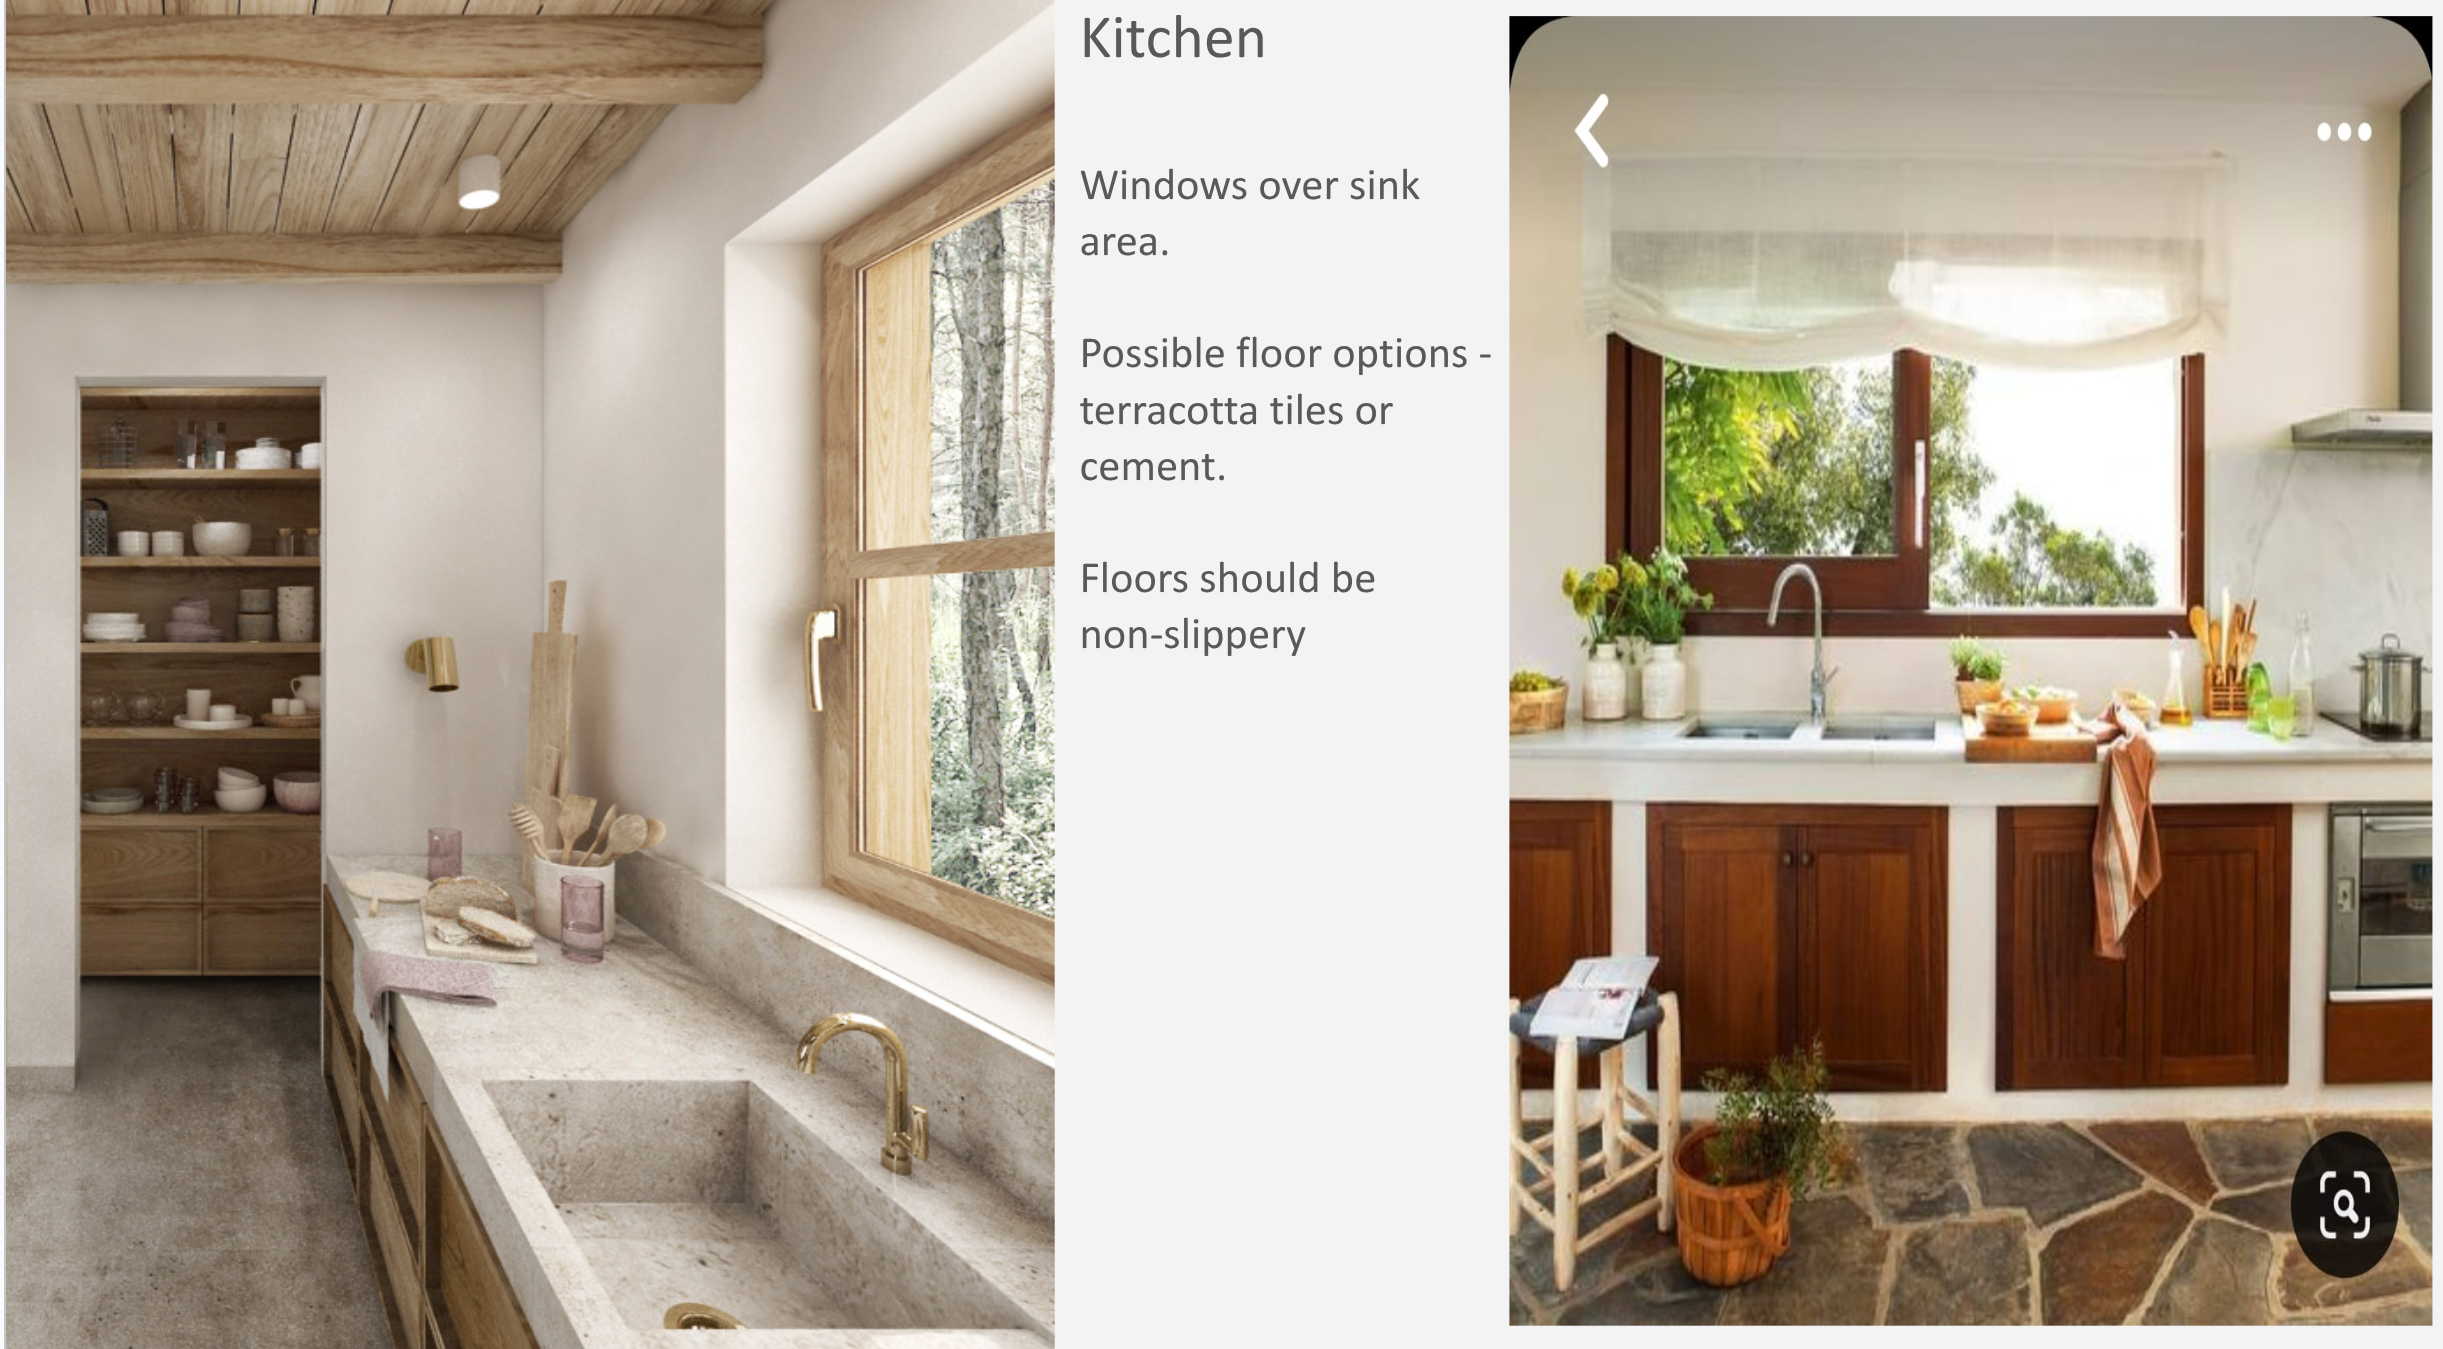
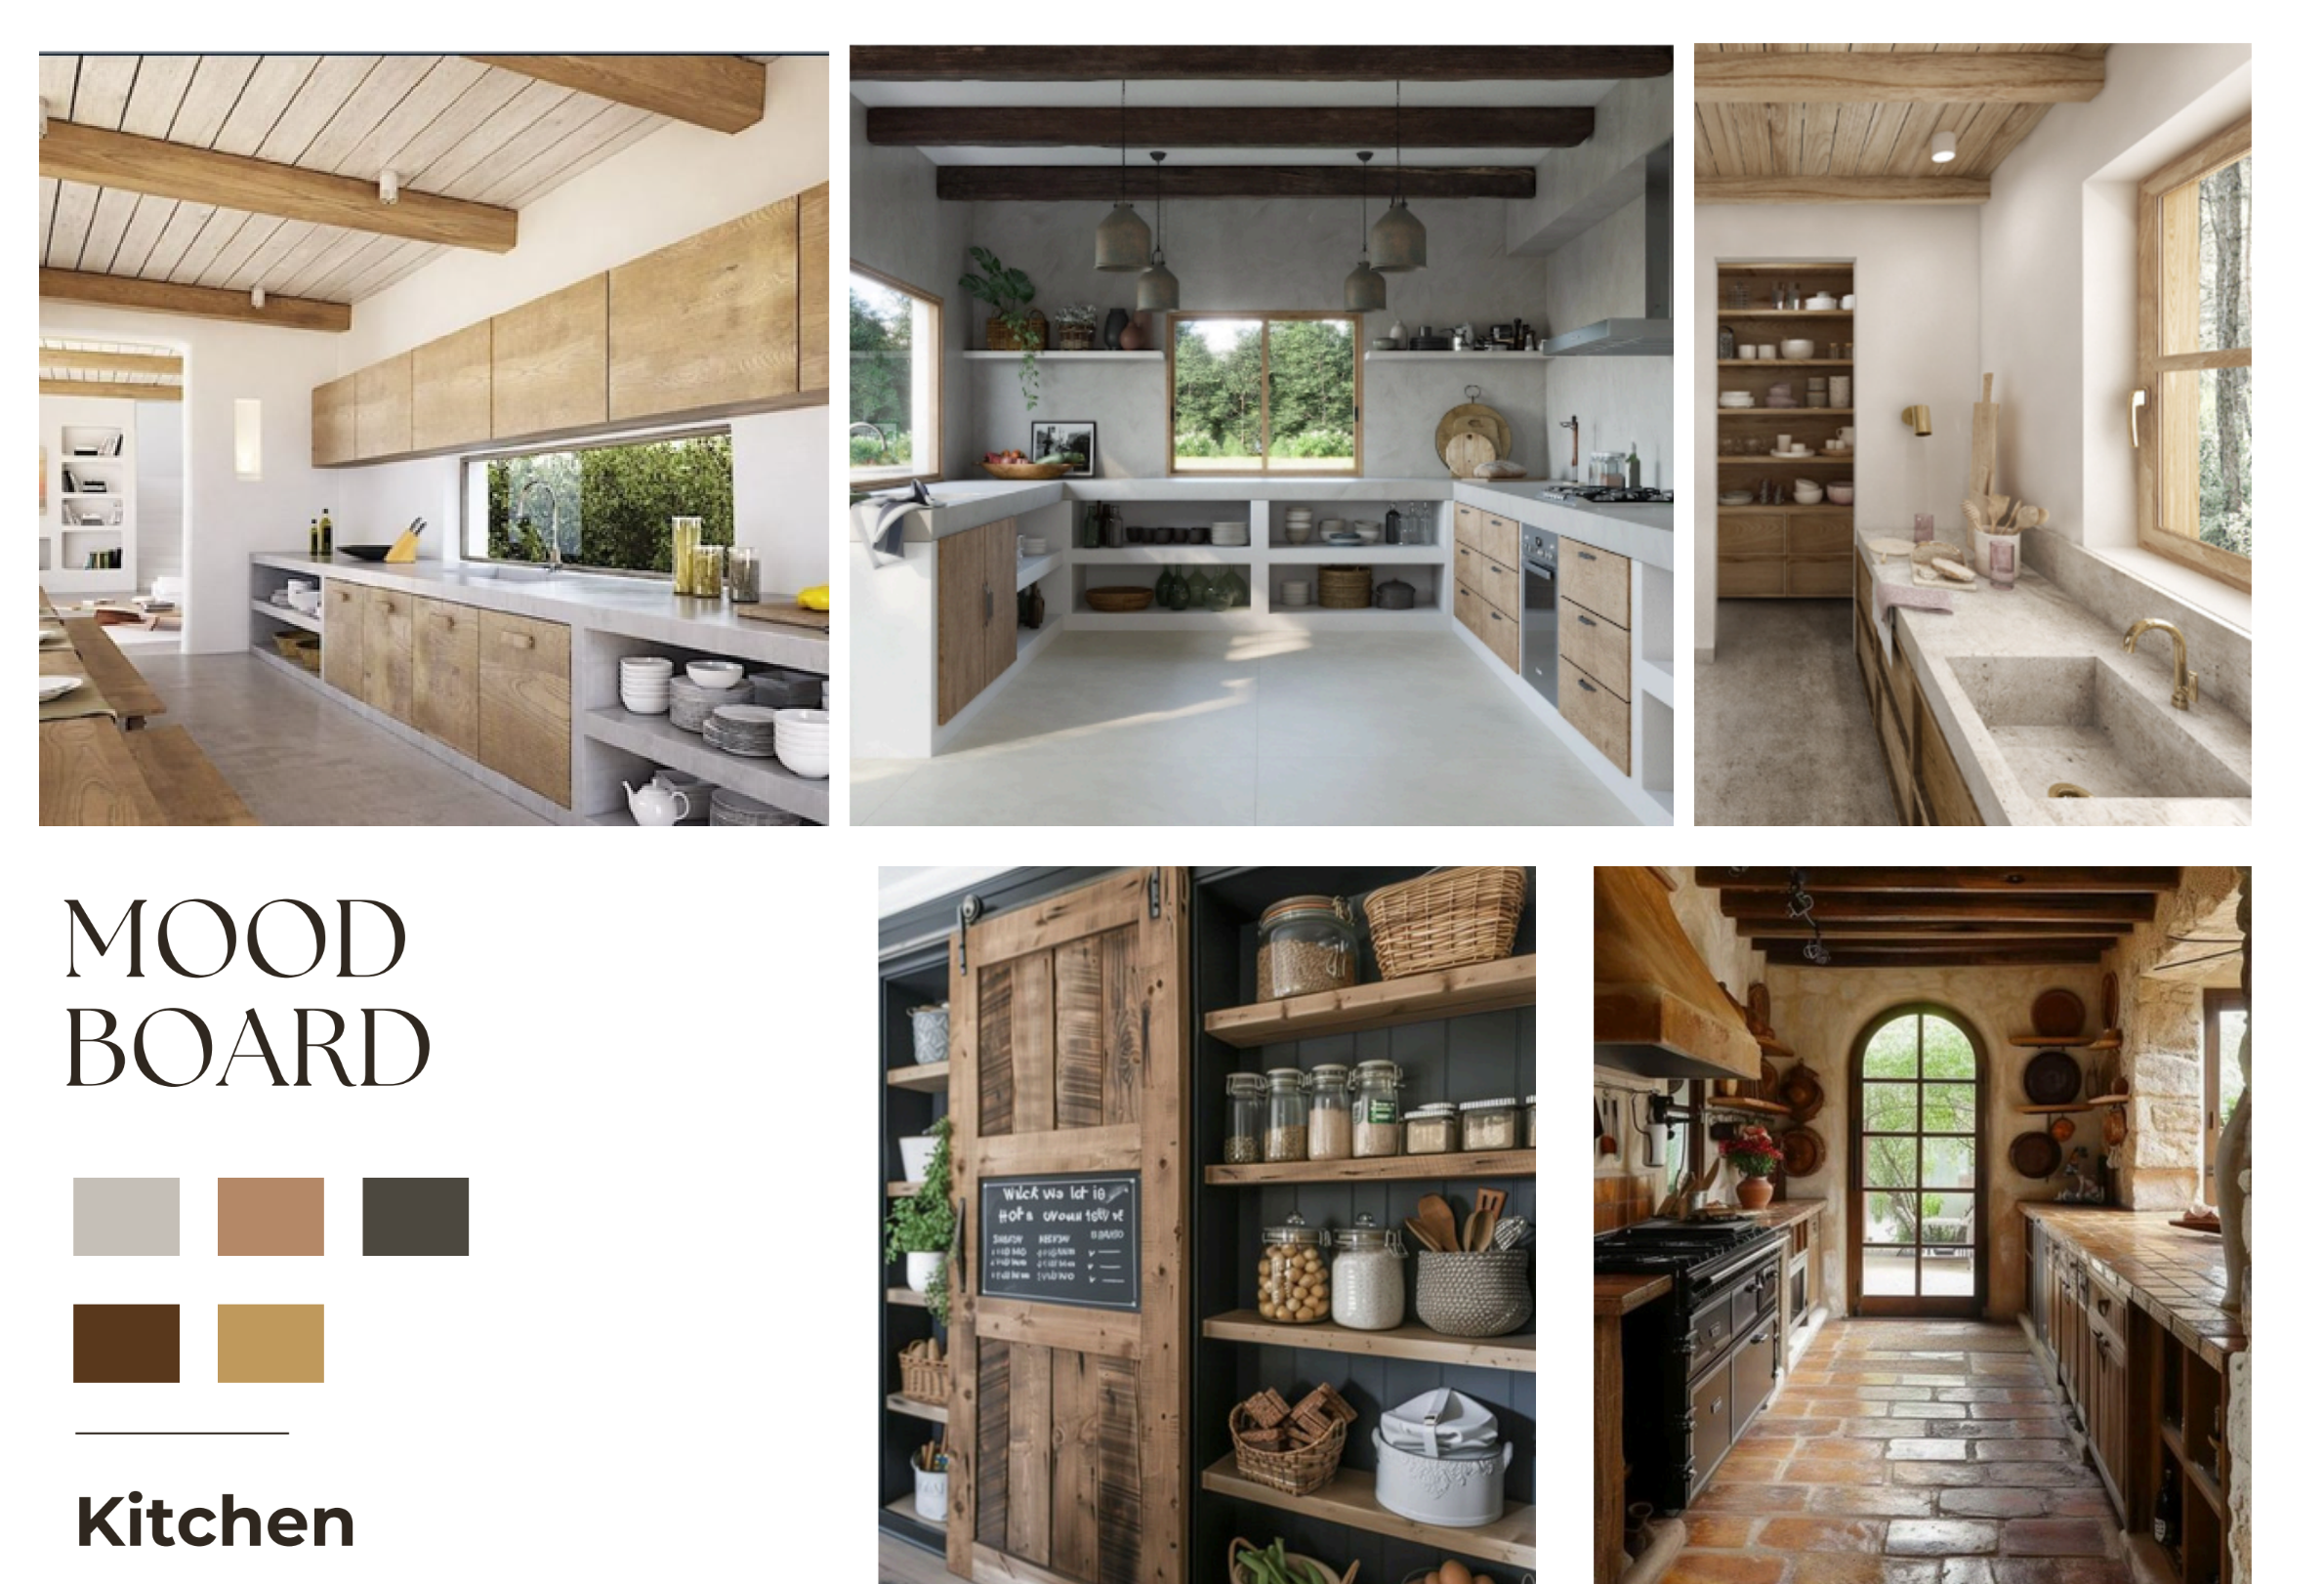
The other approach - the one we took - is to start with a mood board for the entire house. Pick the colours and architectural themes you’re going for, and let those govern every subsequent choice.
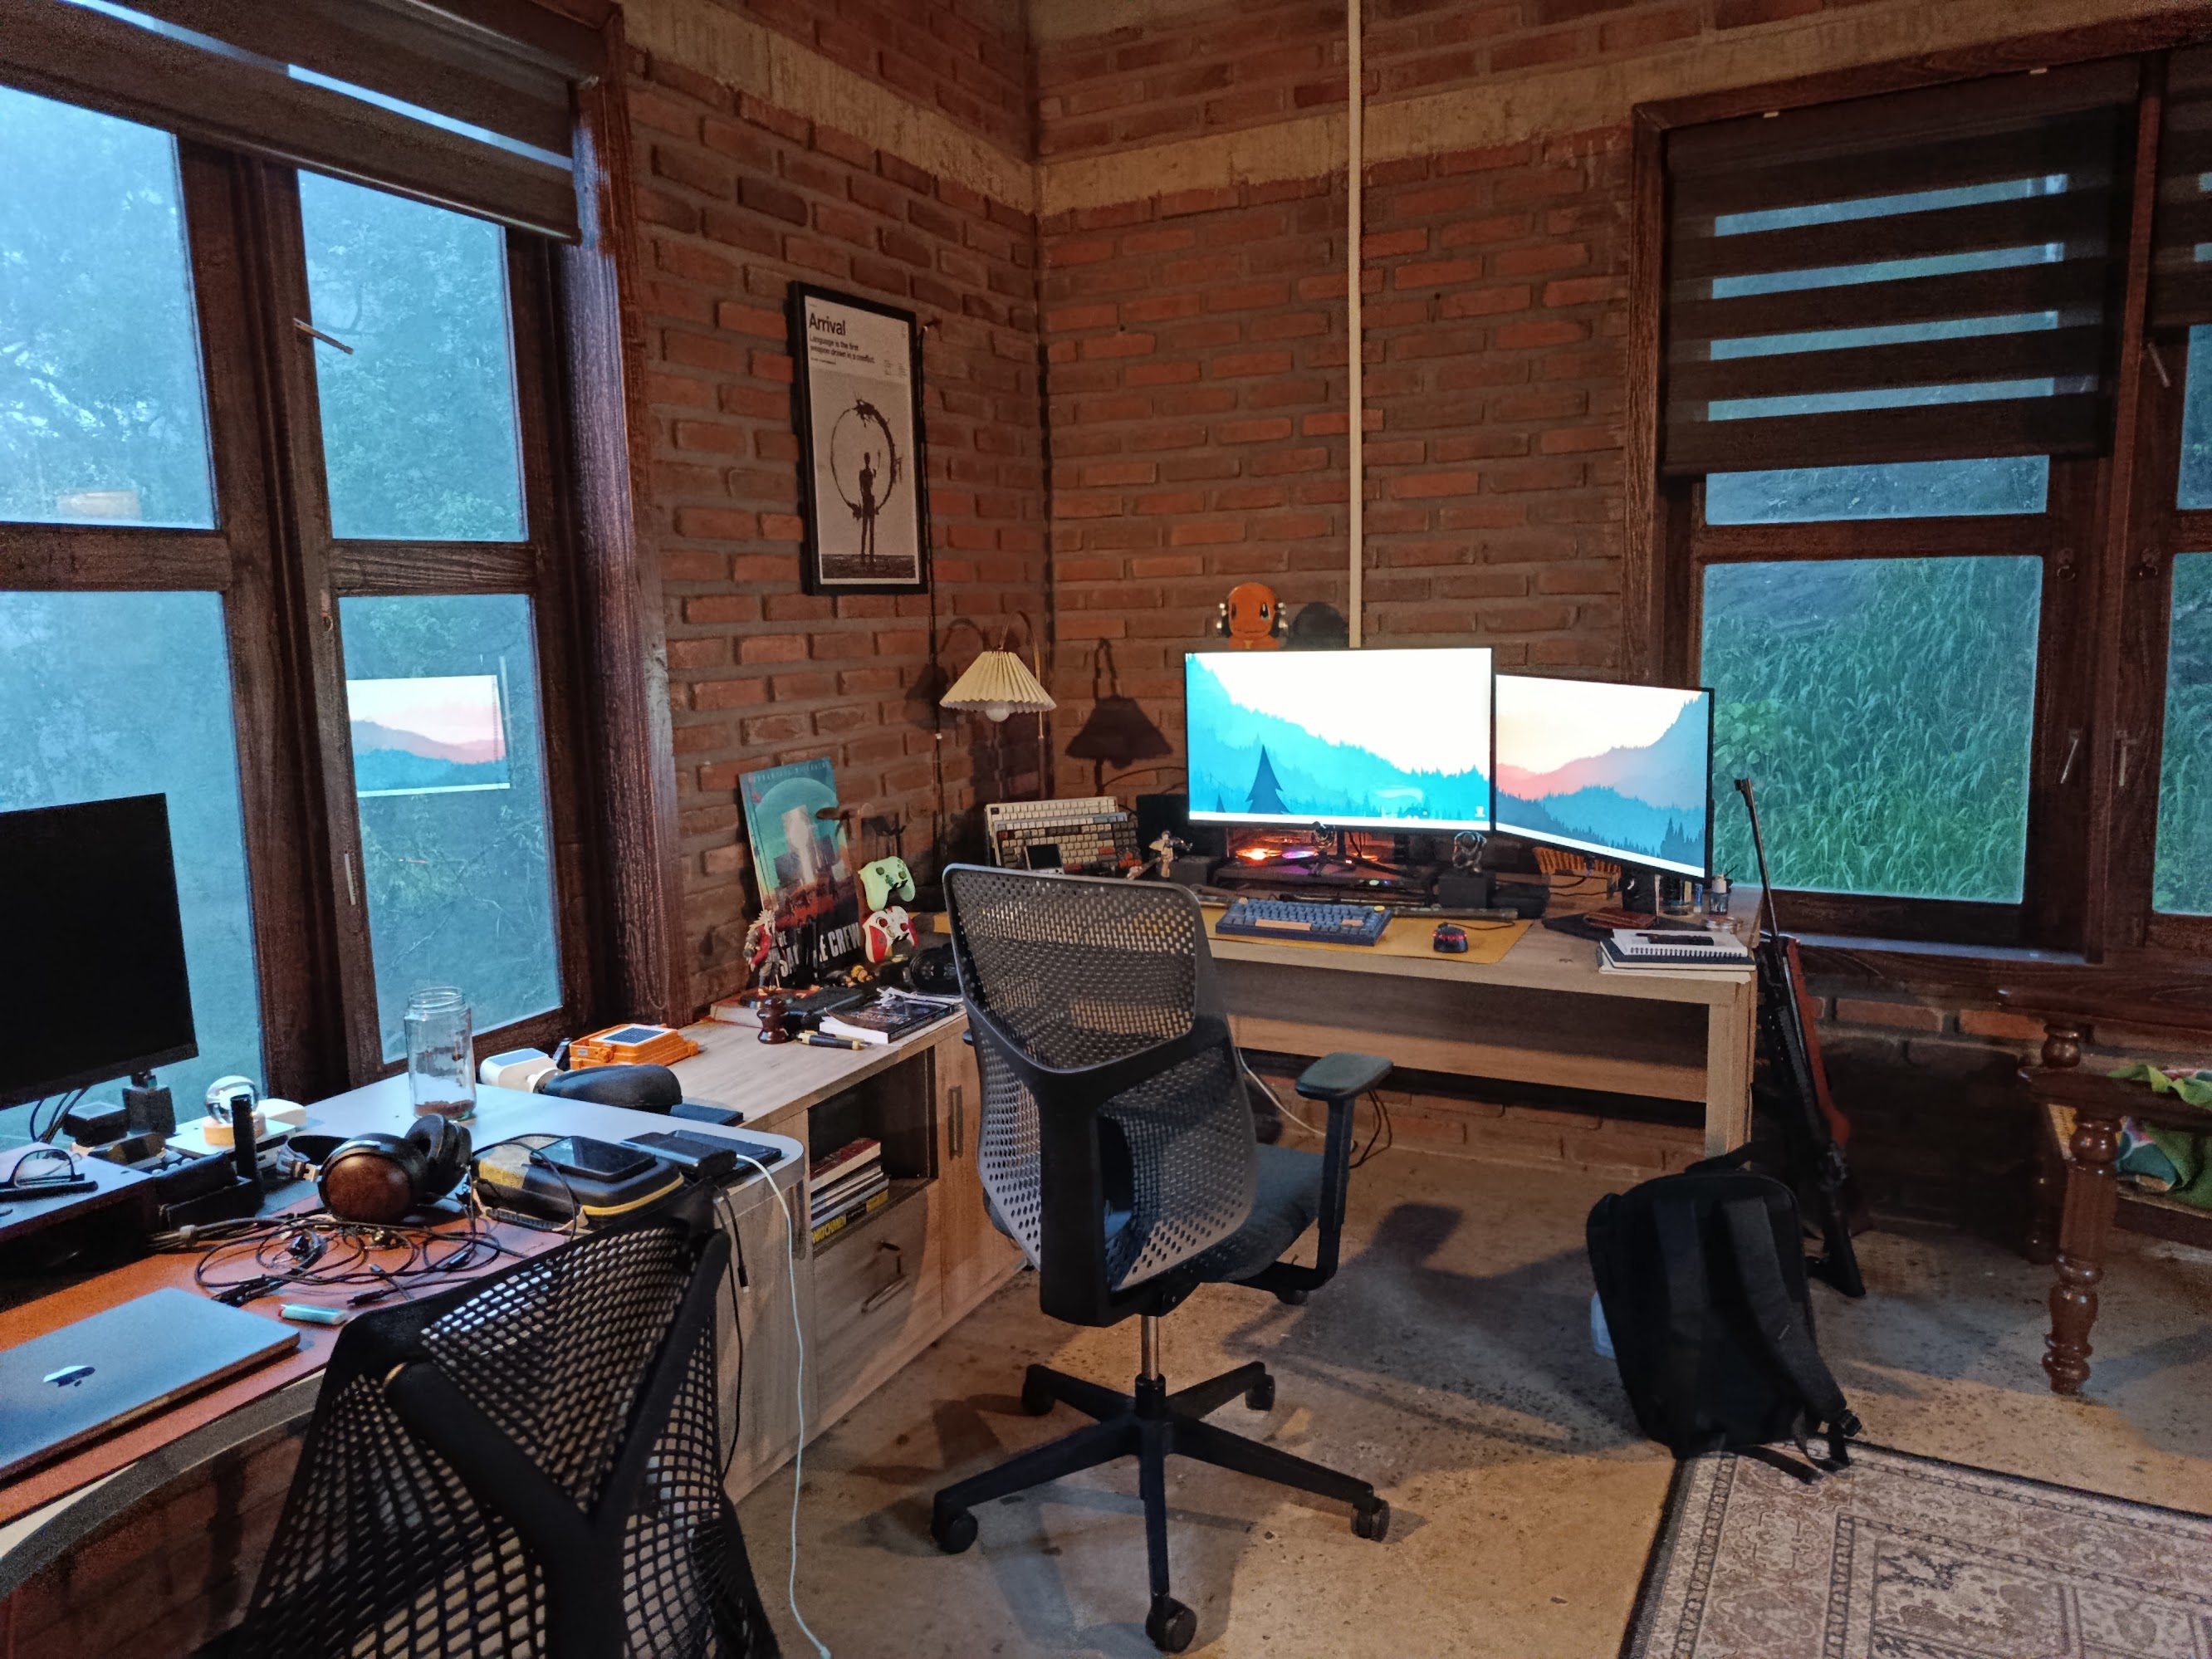
I’m a huge fan of brutalism. It appeals to me as a philosophy because at its core it is about being honest about the materials and structure you’re creating - not attempting to hide anything. It also has the added advantage of being cheap (though not always - protecting concrete in humid environments takes work) because you reduce expenditure on flourishes that hide things. Both my partner and I also wanted the warmth that comes from brick. So we settled on an interplay of brick and concrete with large windows, and white walls very carefully placed to bounce light around so the interior wouldn’t be overwhelmingly dark. Based on this we decided on wood framing and a particular rustic type of door and window panelling, rather than aluminium.
Here’s what that looks like:
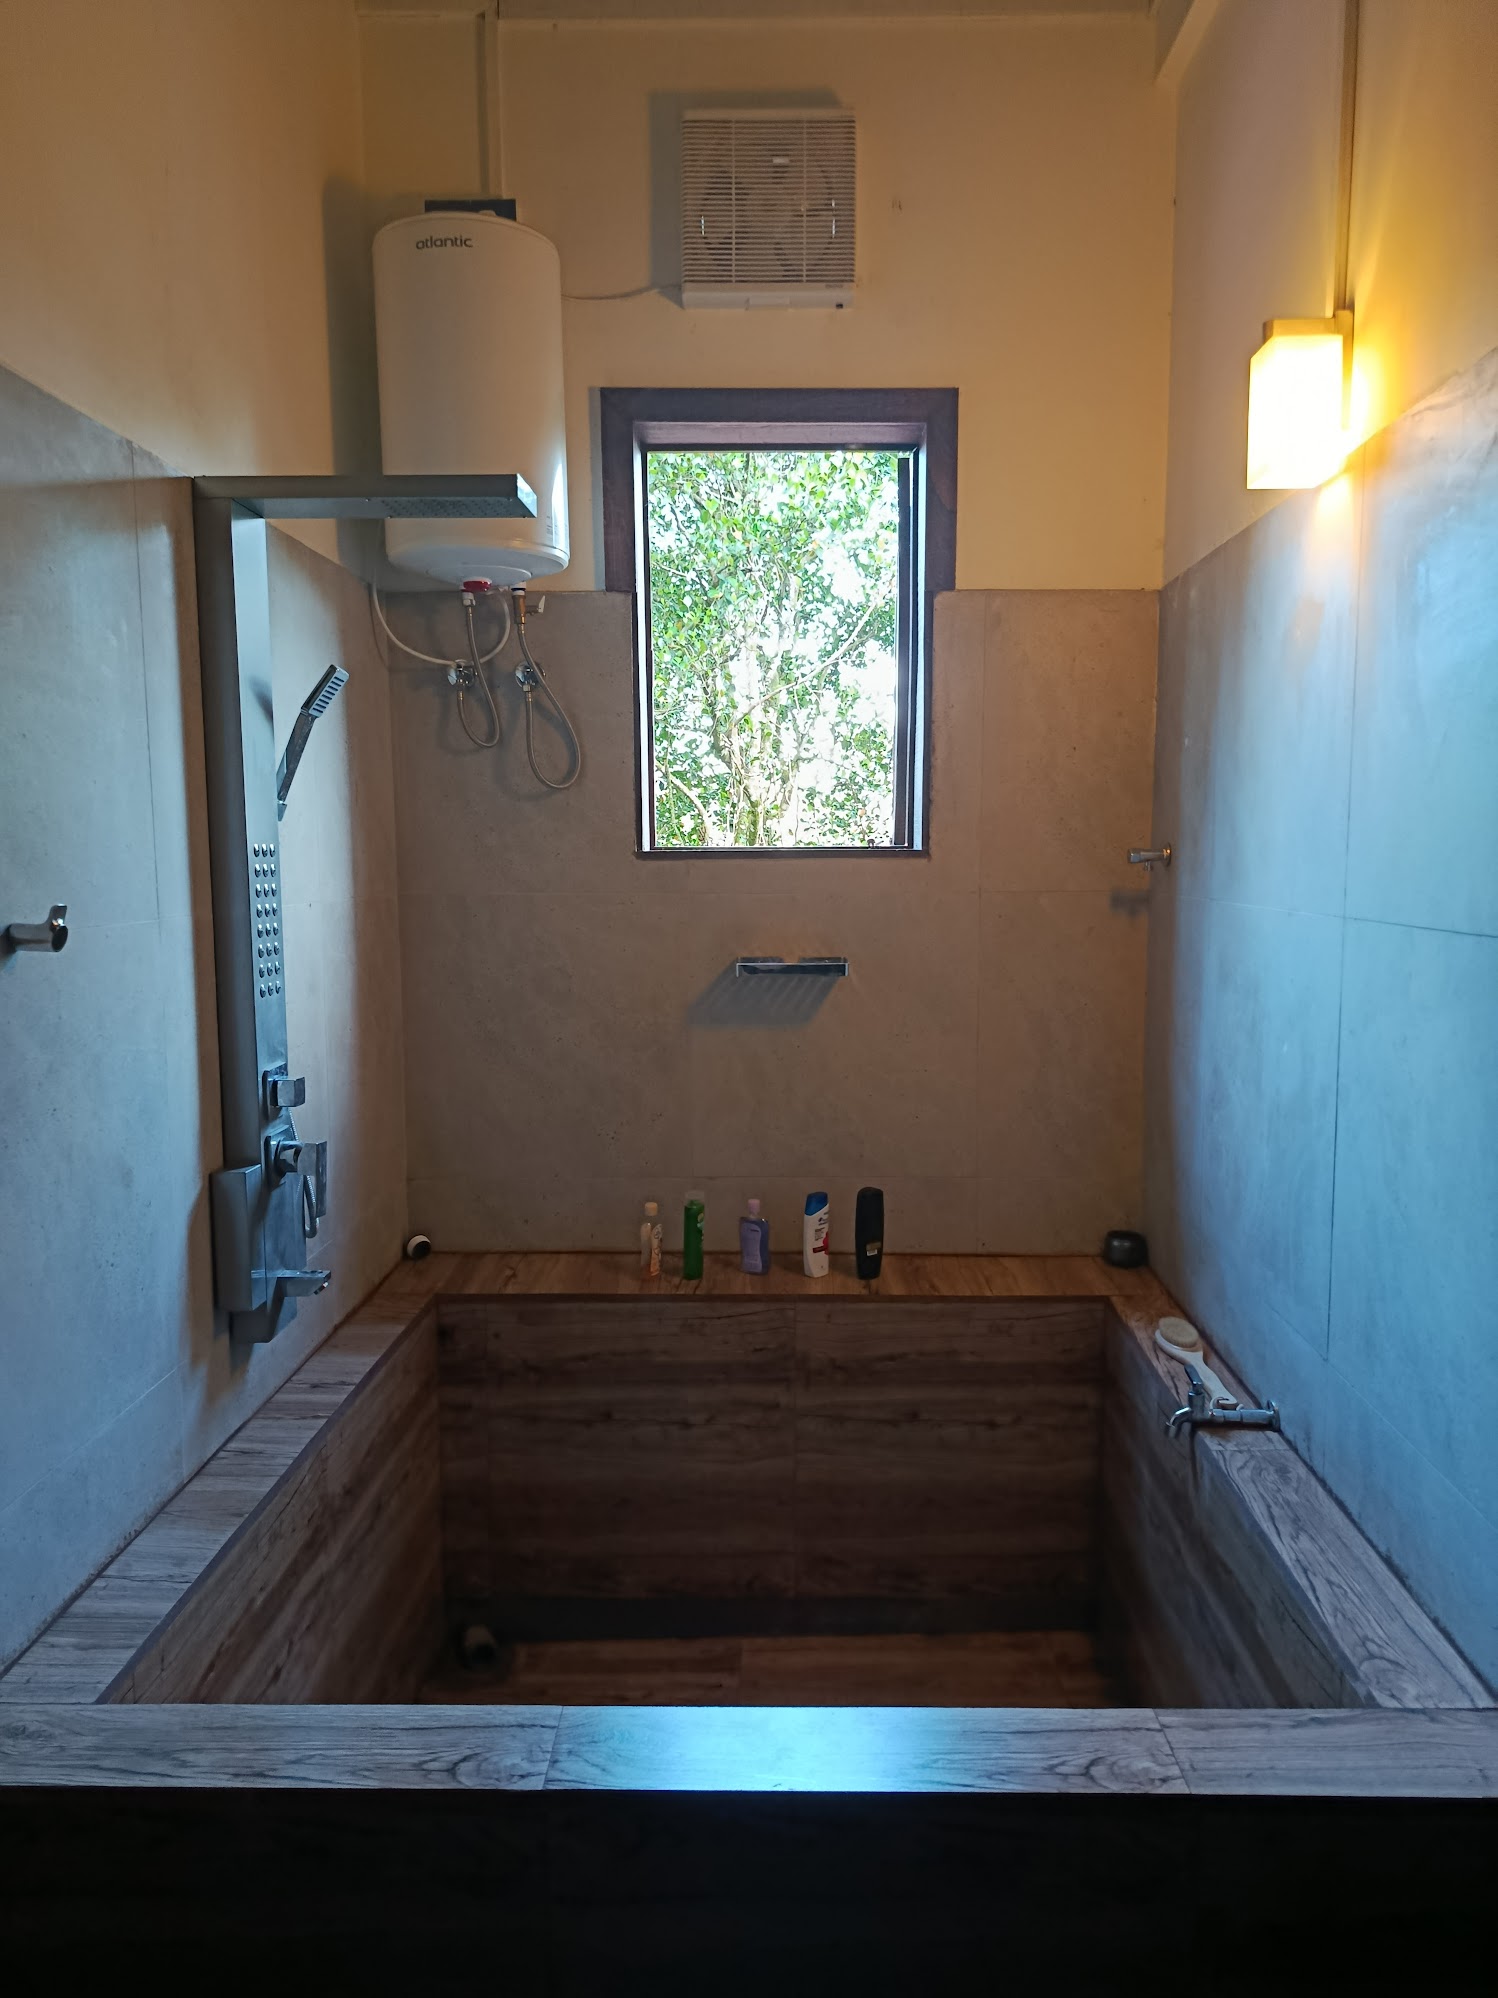
At this point we had not selected specific providers or showroom models. We settled the visual identity first. Then, within a budget, we went out and bought things that matched it. For example, we wanted a kitchen island - we decided to have it made entirely out of concrete, mirroring the rest of the house. Instead of an expensive set of pantry cupboards where things would lie in darkness gathering insects and dust, we went with open concrete shelving.
For flooring, instead of oppressive white apartment tiling, we wanted to preserve the look of concrete and stone. The classical way to do this is titanium cement - a very fine cement finish. But after falling in a hotel bathroom and breaking my left hand, I am extraordinarily paranoid about titanium cement, because when wet it gets very slippery. So we cut and polished the concrete slab itself, which gives a concrete terrazzo look while preserving the texture of poured stone (which is really what concrete is).
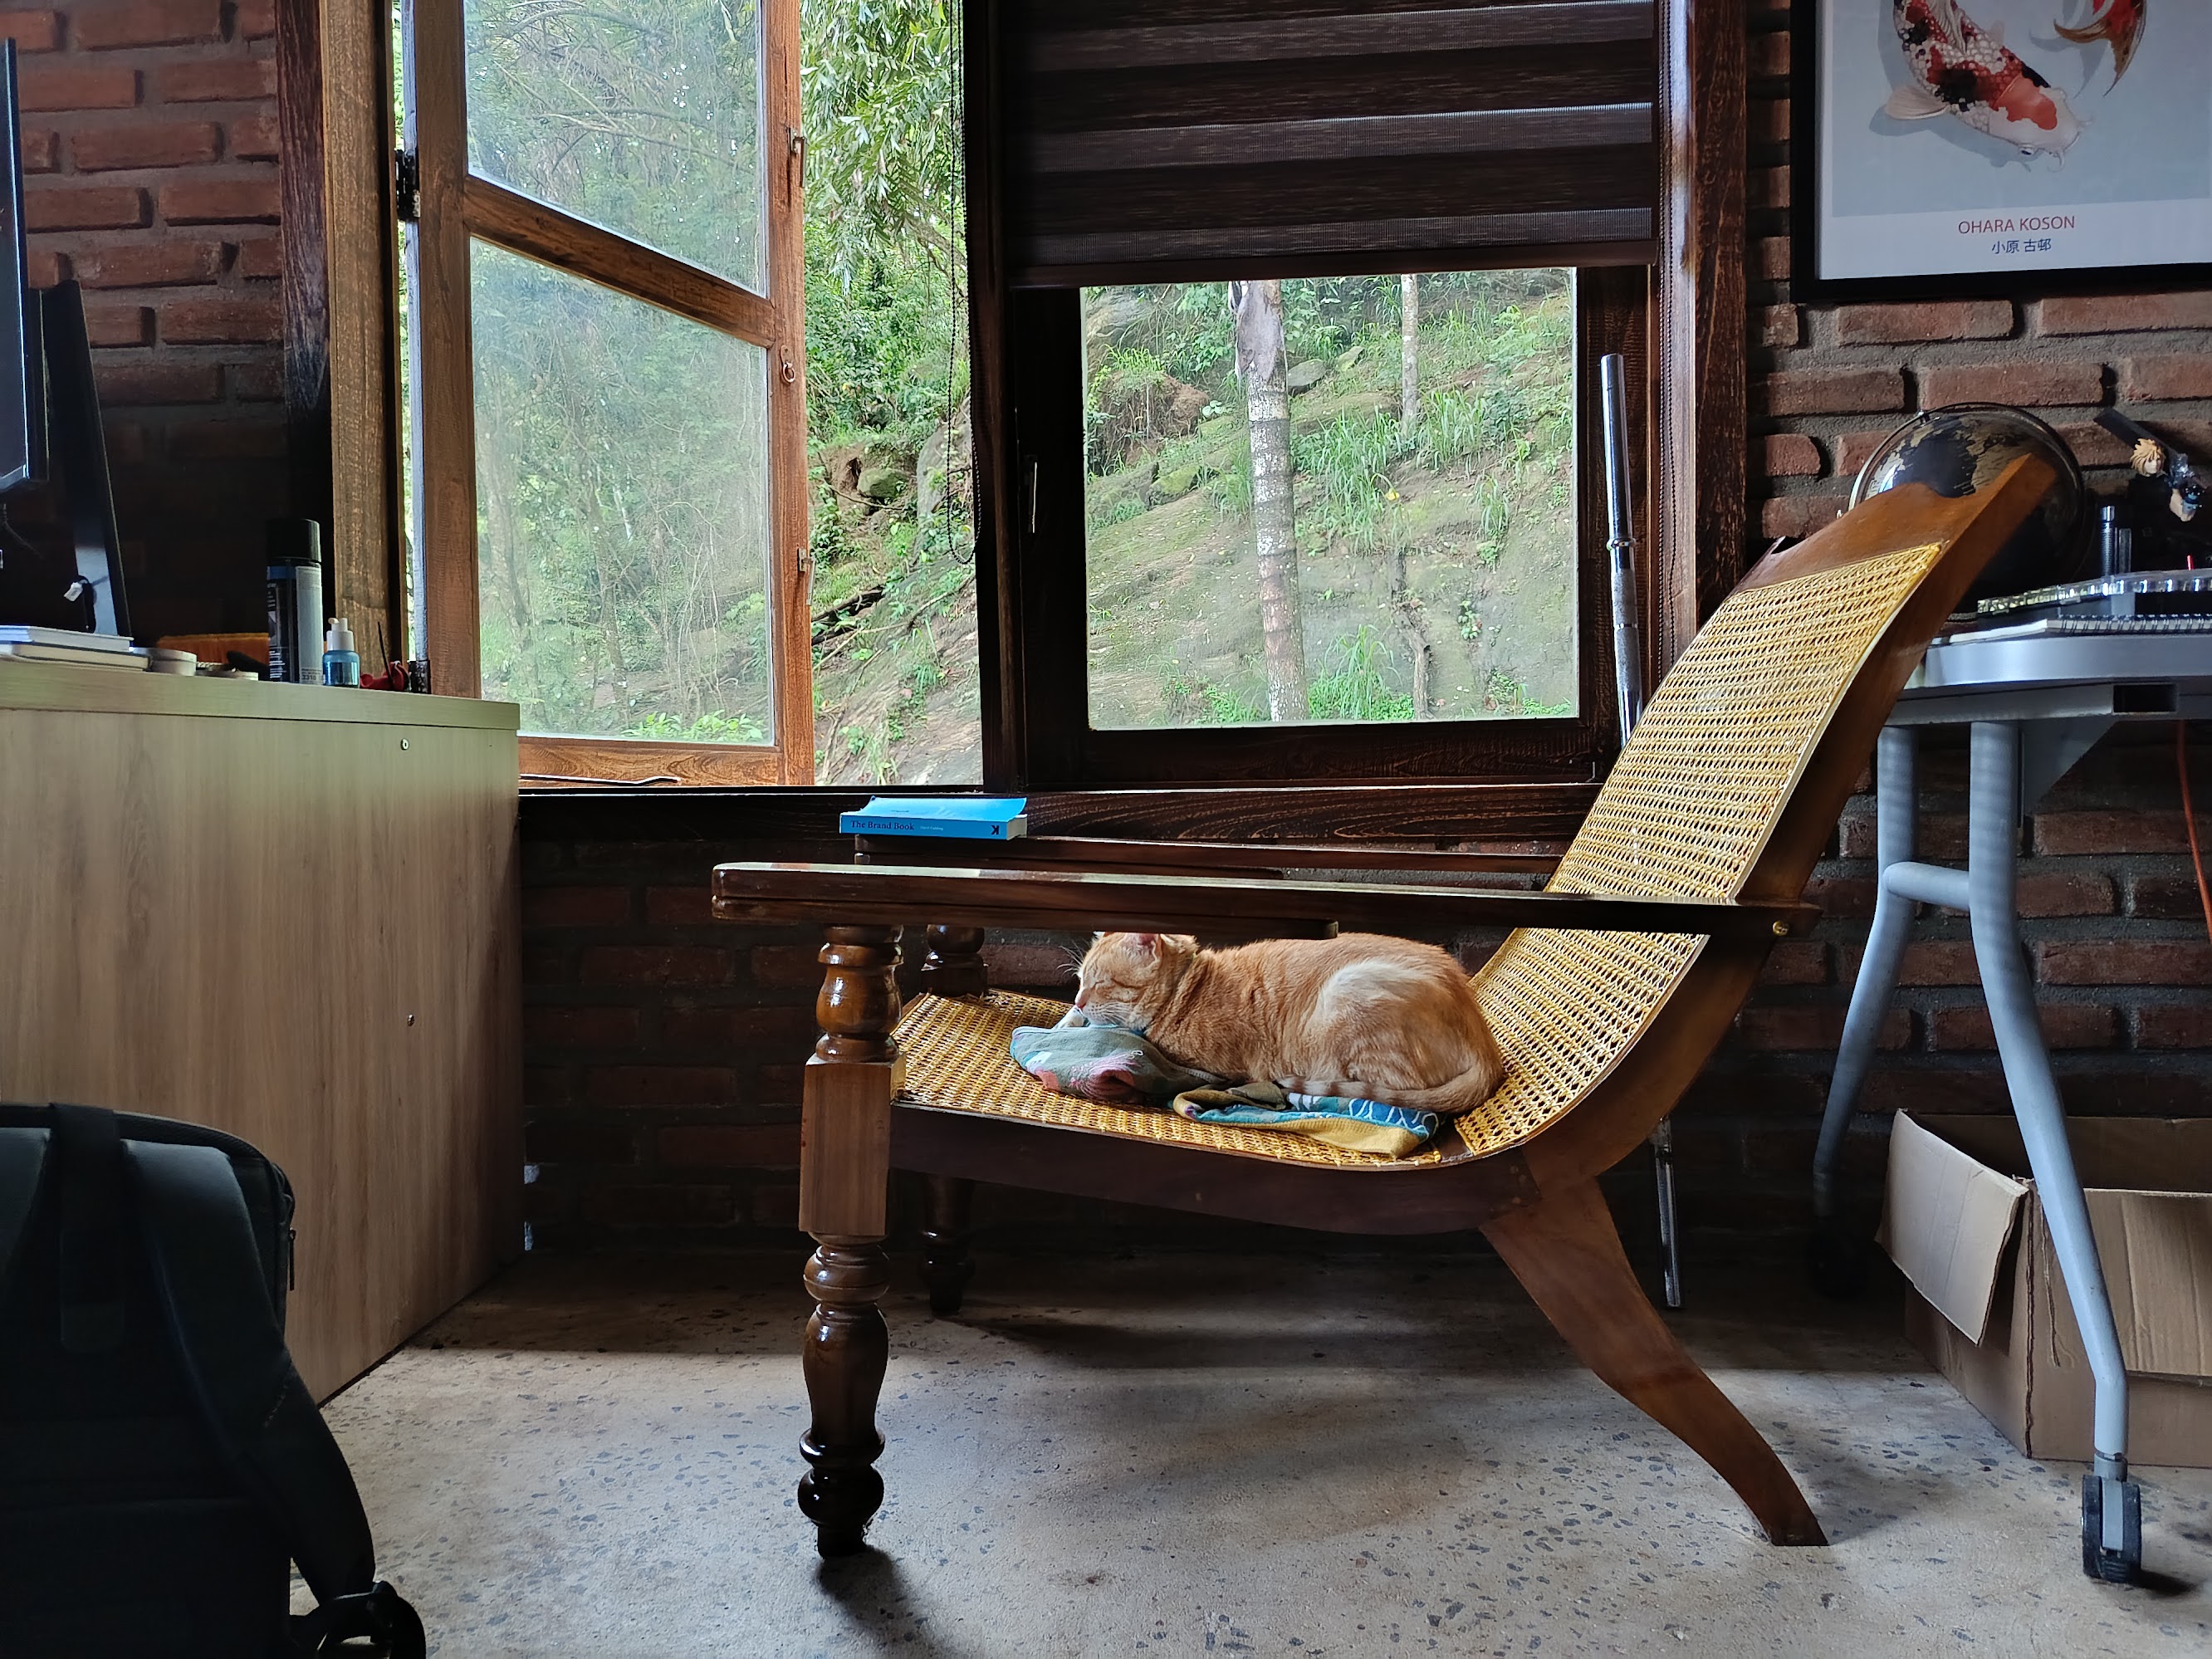
We went with the contractors to shops selling light fittings and tiles, and in each case had the mood board on hand to select the most cost-effective thing that fit the theme. We also found a local ironworker through our contractors - he has done a fantastic job. All the railings inside and outside the house, the perimeter fencing for the entire property, even the greenhouse.
And as for the wood elements, much of what we w needed was readily available at Dumro. We didn’t have to go custom furniture. For what did require custom furniture - shelving and so on - we decided that we would make it ourselves.
Interiors are where people get screwed by costs. If an architect or contractor gives you an estimate at this stage, be well aware that it is, at best, informed guesswork.
A few general tips:
- Try not to buy things that look fancy but feel flimsy. Form at the expense of function is not worth it and will cause headaches down the line. Quality of construction matters more than brand.
- Expensive plastic is often better than cheap metal. Cheap metal will corrode. At best it’ll look ugly and rusty. At worst it may leave green stains on your skin.
- You can get good deals at factory outlets.
- Don’t fall for country-of-origin marketing. We installed Italian water heaters on our showers that required an insanely complicated start-up procedure that three actual software engineers were stumped by at shower time. We swapped those out for much simpler geysers. Country of origin has little bearing on quality nowadays - brand and features do.
- Buying bulbs from lighting fixture stores often gets you a relatively low-quality product. I’ve found much better longevity going to an Arpico and getting Panasonic or other reputable brand bulbs that have specific longevity guarantees.
- If you want smart home systems, spec them out separately, source those parts separately, and have an electrical engineer install them - or do it yourself. The electricians who run wires to 230V sockets aren’t always the engineers who can configure a mesh network and get your smart bulbs on it.
- Leave curtains and blinds until after the build is done. There are separate suppliers for those. They will come over, measure, and fit. Best to handle it last, when the house has been properly cleaned out.
Labour, Erratica, and Build Time
One thing you’re going to have to get used to: your build will not happen on time.
At some point you may have ten people standing around waiting for concrete to cure - a slab typically takes fourteen to twenty-one days depending on thickness and complexity. On other days it might rain and people might not show up. On yet other days the conditions might be perfect and you’ll still find yourself short, for various unspecified reasons. Someone slept in. This kind of thing happens all the time in Sri Lanka.
There are two ways to deal with this. One is to become a taskmaster - micromanage, incentivise, do whatever you have to do to get people on site on time. The other is to become Zen and accept that things take time, which means whatever deadline your contractor gives you, multiply it by two. If he says it can be done in one year, it’s going to take two. If he says six months, come back in a year and laugh at him.
Three things will accelerate this beyond what your contractor tells you, and none of them will appear in any contract.
The first is the monsoons. Sri Lanka has two: the south-west monsoon from around May to September, and the north-east monsoon from around October to January. Kandy and the hill country get hit additionally by the inter-monsoon rains in between. Concrete cannot be poured in heavy rain. Plastering is pointless when the walls are wet. Workers - quite sensibly - do not show up when it’s pouring. If your critical structural work lands in the wrong months, your timeline will slip by weeks at a time. Plan your start date with the monsoon calendar in mind. Your contractor will rarely volunteer this information.
The second is the nakath. Auspicious and inauspicious days for when we break ground, pour the first slab, install the roof, and move in. Your workers may have strong opinions about this. Your own family almost certainly will. I am not here to tell you whether to take it seriously - that is between you and whatever you believe - but I will tell you that ignoring it entirely creates friction with people you depend on. Know that it exists, factor it into your scheduling, and pick your battles.
(I decided to not give a fuck).
The third is socioeconomics. The fundamental backbone of your labour force (as of the time of writing) is people from the lower socio-economic end of the ladder making, if they’re lucky, three thousand rupees a day. If they’re experienced concrete specialists, maybe four thousand seven hundred. Apprentices: two thousand seven hundred to three thousand. Electricians: maybe four thousand five hundred.
They work on a daily basis. Every day they have the option of not showing up at all. And sometimes they won’t.
I’ve often heard it said that Sri Lankans, particularly Sri Lankans who work with their hands, lack discipline or don’t want money or are unreliable wastrels. My experience is something totally different. Most people who do this work survive on a day-to-day basis, and so do their families. When something hits them, it hits hard. They often don’t have a predictable monthly income, and their livelihood depends on them being in perfect health all the time - not taking days off even with back pain, not even with a cold, which as we all know is not the reality of things.
And yes, some of them are actual idiots. Shout out to our first carpenter, who should ideally have been fired from a cannon into the sun. But for the most part, people will work extraordinary hours lifting extraordinarily heavy amounts of equipment, with barely any automation or labour saving devices that are common in construction anywhere in the civilized world. And when and if they stop showing up to the site, you should actually go and check.
You’re going to have to get used to a certain degree of creative interpretation of deadlines. This is why the tier-one constructors can charge you extra - they make sure these are not things you have to see. Anywhere else, whether it’s a small contractor or your local labour, you are going to see this whether you want to deal with it or not.
My way of dealing with it so far is to pay people their rate and give the good ones a bonus on milestones met. This way we’ve been able to grow a crew of ten to twelve people we can call on depending on the specific skill sets needed.
If they’re good at what they do, expect an additional problem: they’re going to be in demand. The same person doing your plumbing and wiring may be working three other sites simultaneously. Sometimes you’re going to have to book specific people a month or two out in advance.
Final QC
Hopefully you’re nearing the end of your build. The structure is done. The interiors have been installed broadly to your specifications. A few small things aren’t exactly as the architectural plan says - some factors have to be changed on site for practical reasons - but this is, broadly speaking, the house you set out to build.
Don’t do what we did. Don’t move in immediately.
Instead, spend about a week in your new home. Preferably a rainy week.
Think of this as quality control. This is where you spot corners that have been cut - windows that leak, gutters not adequately waterproofed, tap lines that struggle, U-traps not installed properly, fittings not screwed in correctly. There will be a myriad of these. Unexpected odours that will require rethinking of where grey water drains. Lights that don’t work inexplicably. Drains clogged because a large amount of concrete dust has gone through them.
Spot everything. Fix everything. Then move your stuff in.
Aftercare and Maintenance
Congratulations. You are now the proud owner of a house.
Now you will realise an inexplicable truth: any attempt at construction is basically a battle with the universe itself. Entropy will come for you whether you want it to or not. Everything from a shack to a cathedral is constantly decaying and slowly crumbling into the abyss.
Unless you want to call in a carpenter or electrician every time something goes funny, I would recommend teaching yourself the very basics of keeping your house maintained. We live in an age where knowledge of this sort is not just free, but conveniently available. YouTube is an incredible source. I now know how to mix and polish concrete, how to build a wall out of cement blocks and bricks, how to hook up solar panels to a battery and from there to the grid, how to operate a generator - all things learned by doing.
Over time, you should build yourself a basic toolkit. Here are things you’re going to want to have around:
Hand tools:
- Hammer (claw hammer for general use)
- Screwdrivers - Phillips head and flat head (or a multi-bit screwdriver)
- Adjustable wrench
- Pliers - slip-joint and needle-nose
- Tape measure (25–30 feet is standard)
- Level (to check if things are straight/plumb)
- Utility knife or box cutter
- Flashlight or headlamp
Fasteners and hardware:
- Nails - assorted sizes
- Screws - assorted sizes and types
- Anchors and wall plugs (for hanging things)
- Hooks and eye bolts
Drilling and fastening:
- Cordless drill/driver (very useful for multiple tasks)
- Drill bits - assorted sizes
- Saw - hand saw or small hacksaw
Cleaning and maintenance:
- Bucket
- Mop and broom
- Cleaning brushes
- Sponges and cloths
- Ladder or step stool
Miscellaneous:
- Work gloves
- Duct tape and electrical tape
- Rope or cord
- Extension cord
Optional but useful:
- Power drill (if you don’t have a cordless drill)
- Socket wrench set
- Allen wrench set
- Crowbar or pry bar
- Paint brush and roller (for small touch-ups)
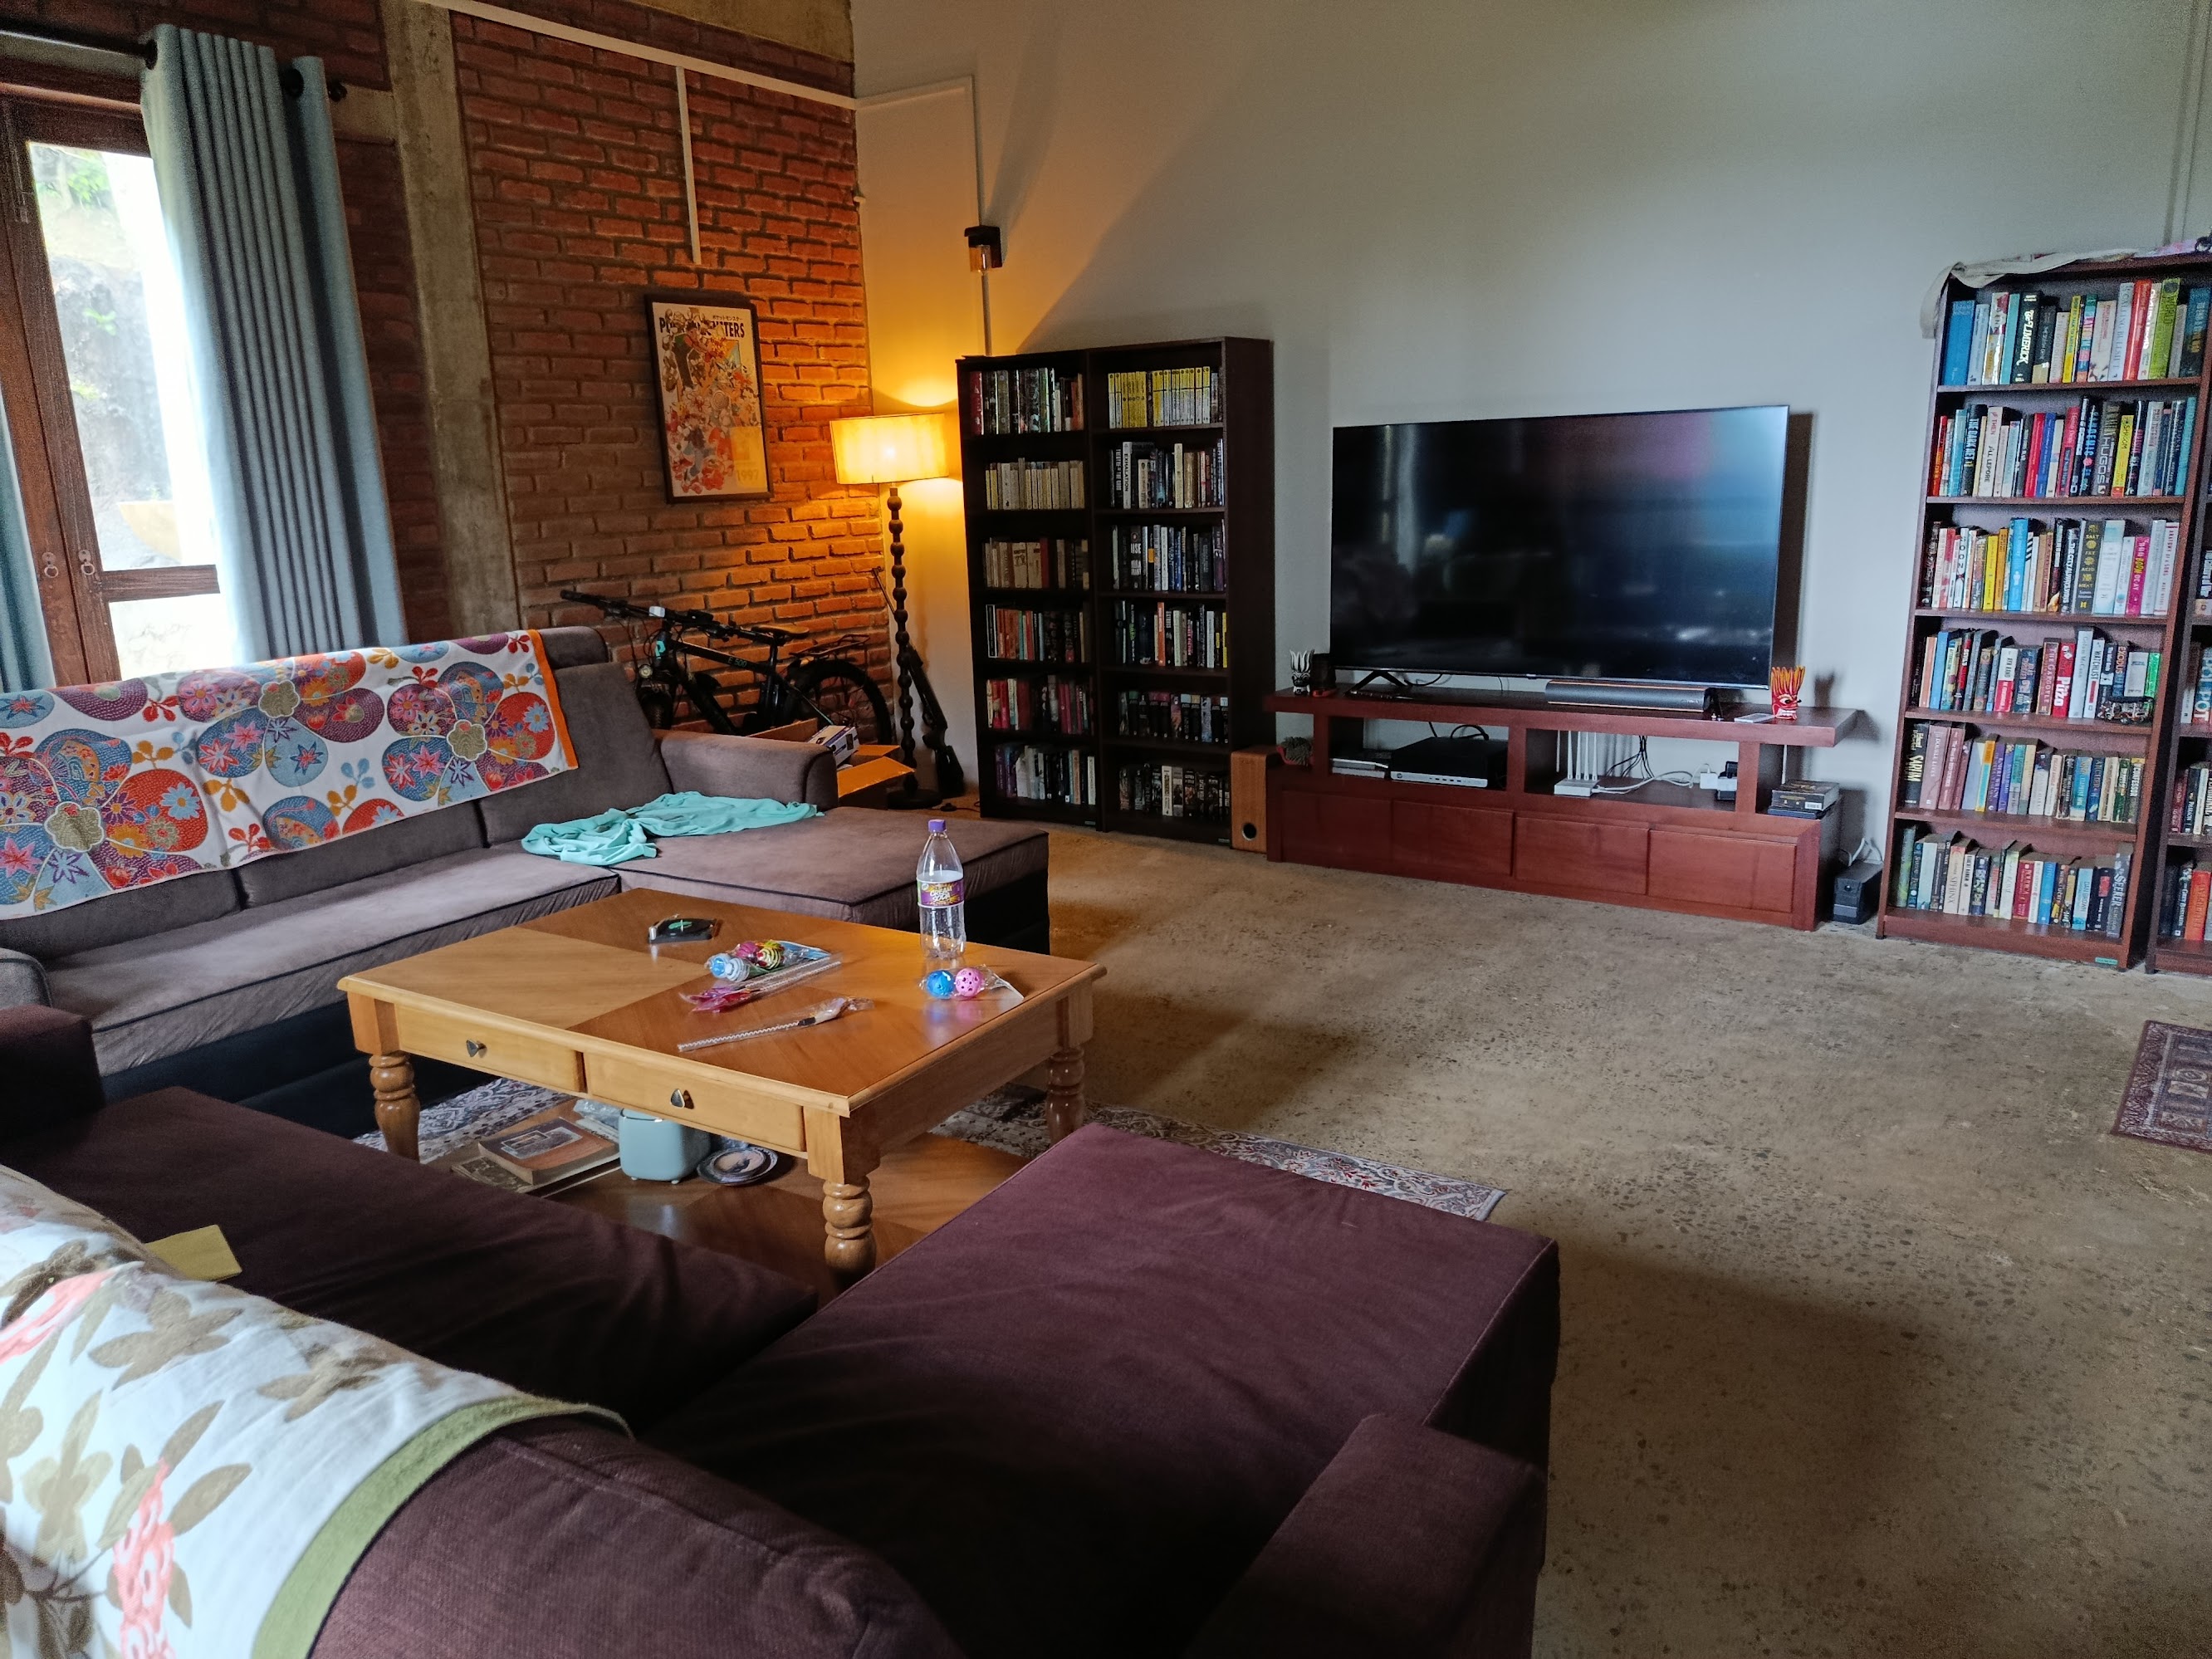
Five years. More grey hairs than I can count. And at the end of it: a house on a mountain, with windows that catch the light just the way we planned, back when we were drawing notebook sketches and arguing about where to put the kitchen.
Don’t let the complexity of what I’ve just said put you off. It is easier if you break it up into up into small chunks that we are trying to and you take it a step at a time. And at the end of it, there is something particular about living in a place you helped design. It is, ultimately, your desire you will fall.
Hopefully I’ve been able to save you some pain.
Good luck.
Best, Yudha